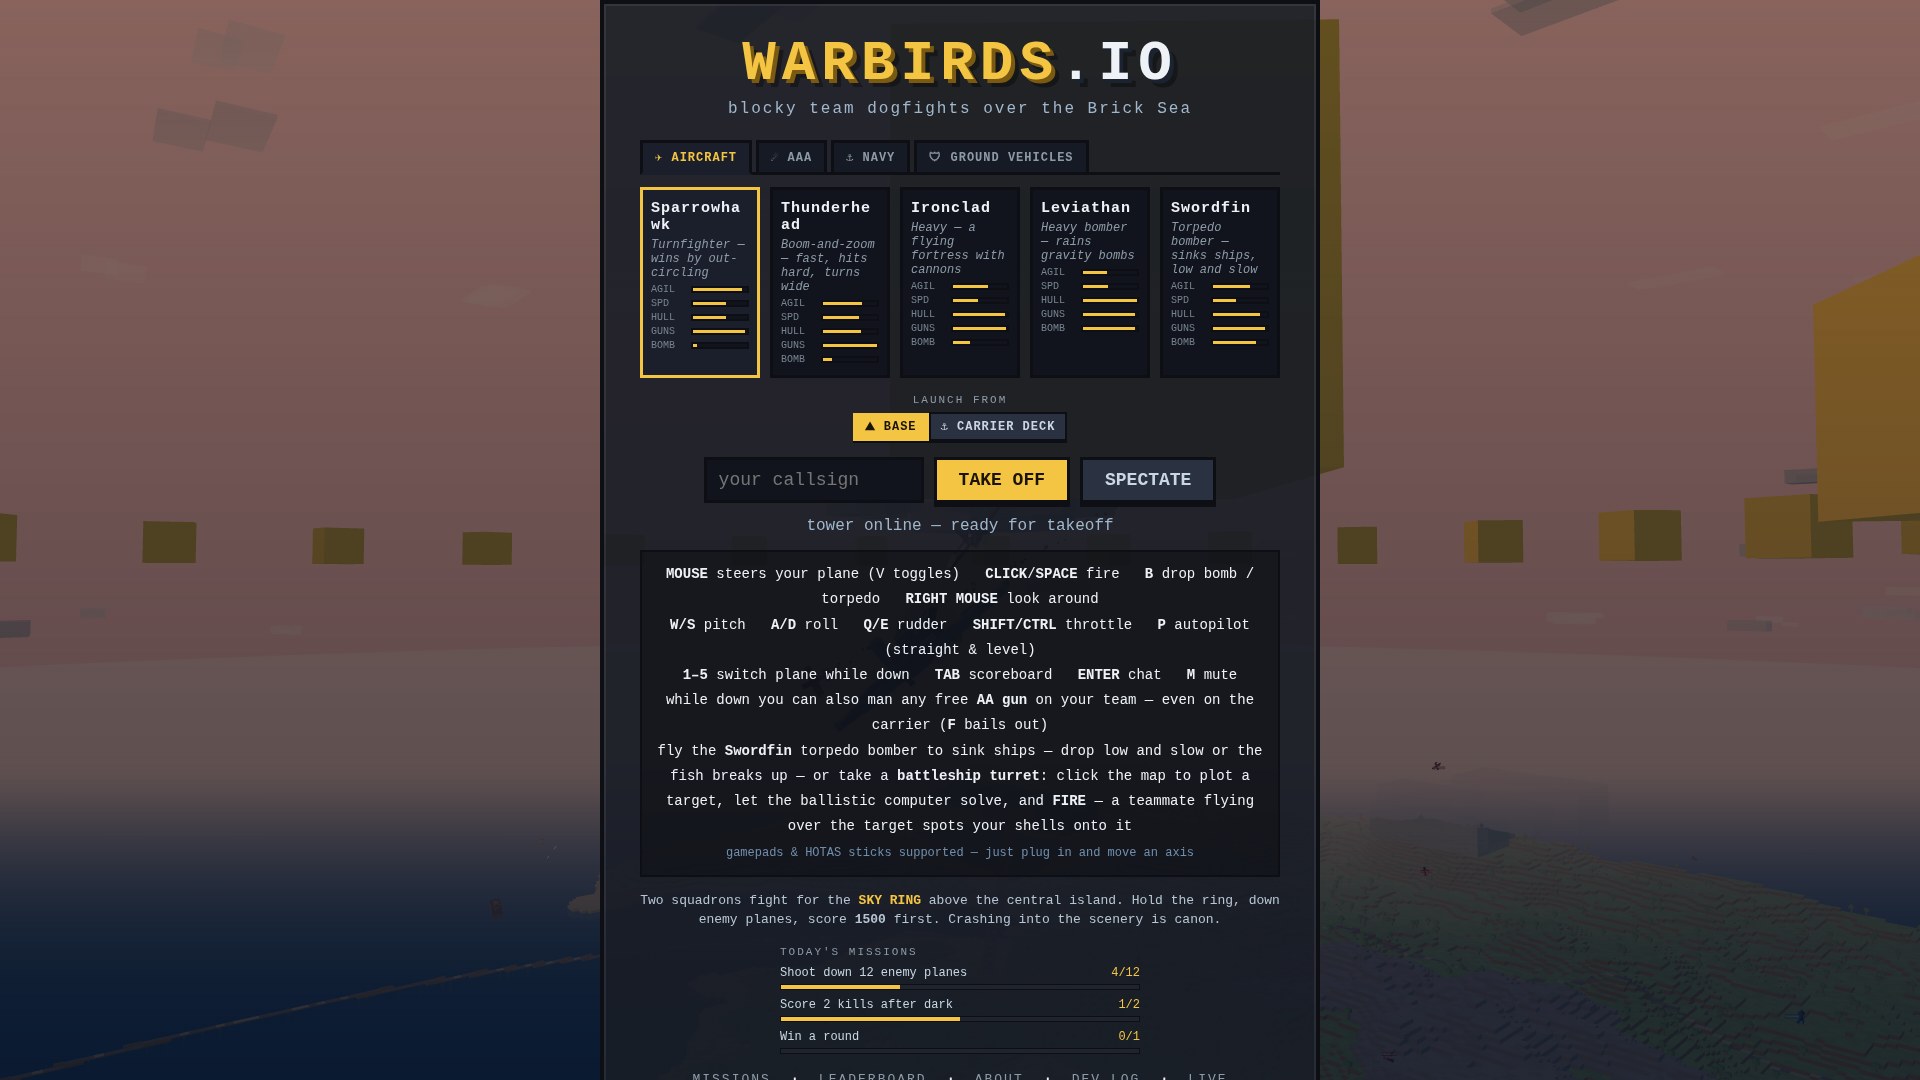
WARBIRDS.IO

blocky team dogfights over the Brick Sea

A free, browser-based multiplayer dogfighter set in a Minecraft-inspired voxel world. Two teams, planes and ships, one golden ring to fight over. Here's how it all fits together — tap any screenshot to view it full size.

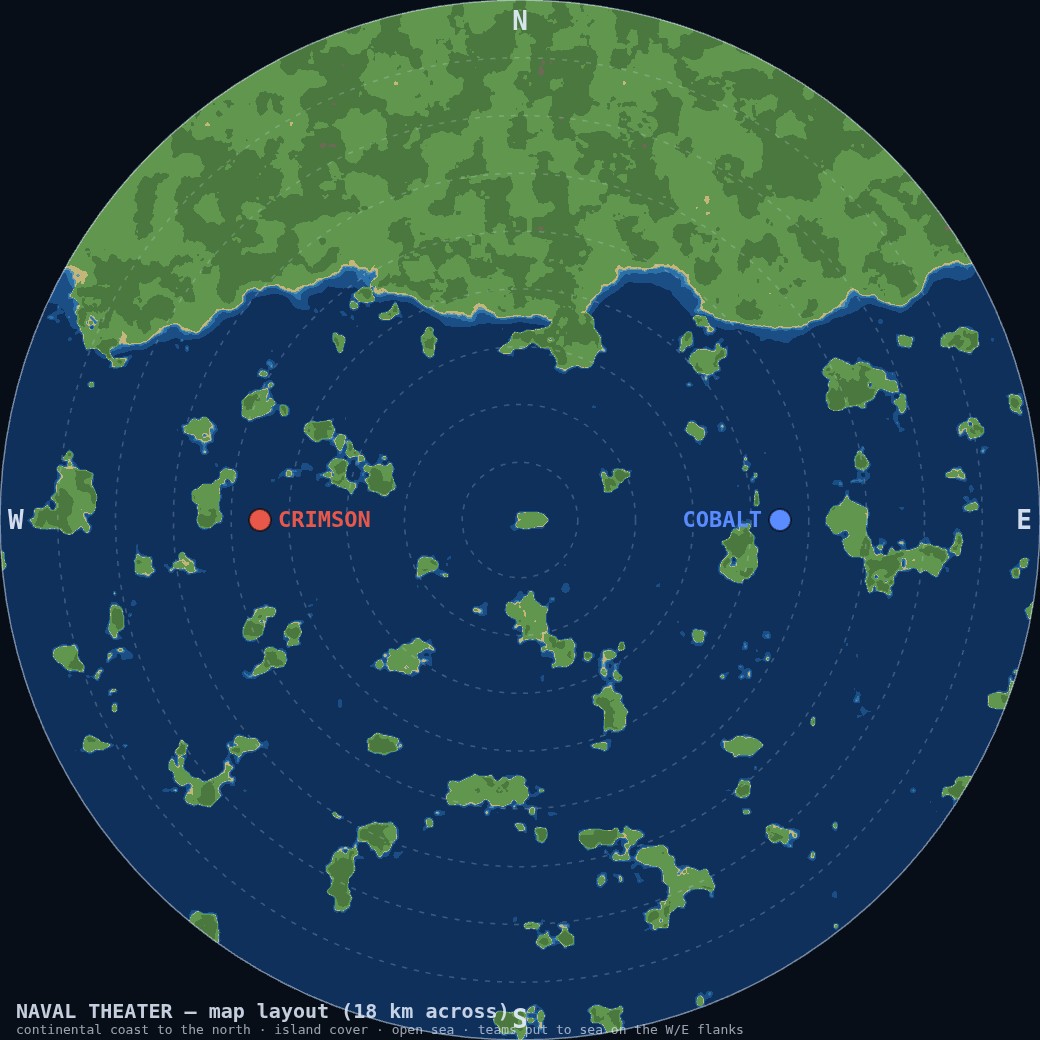
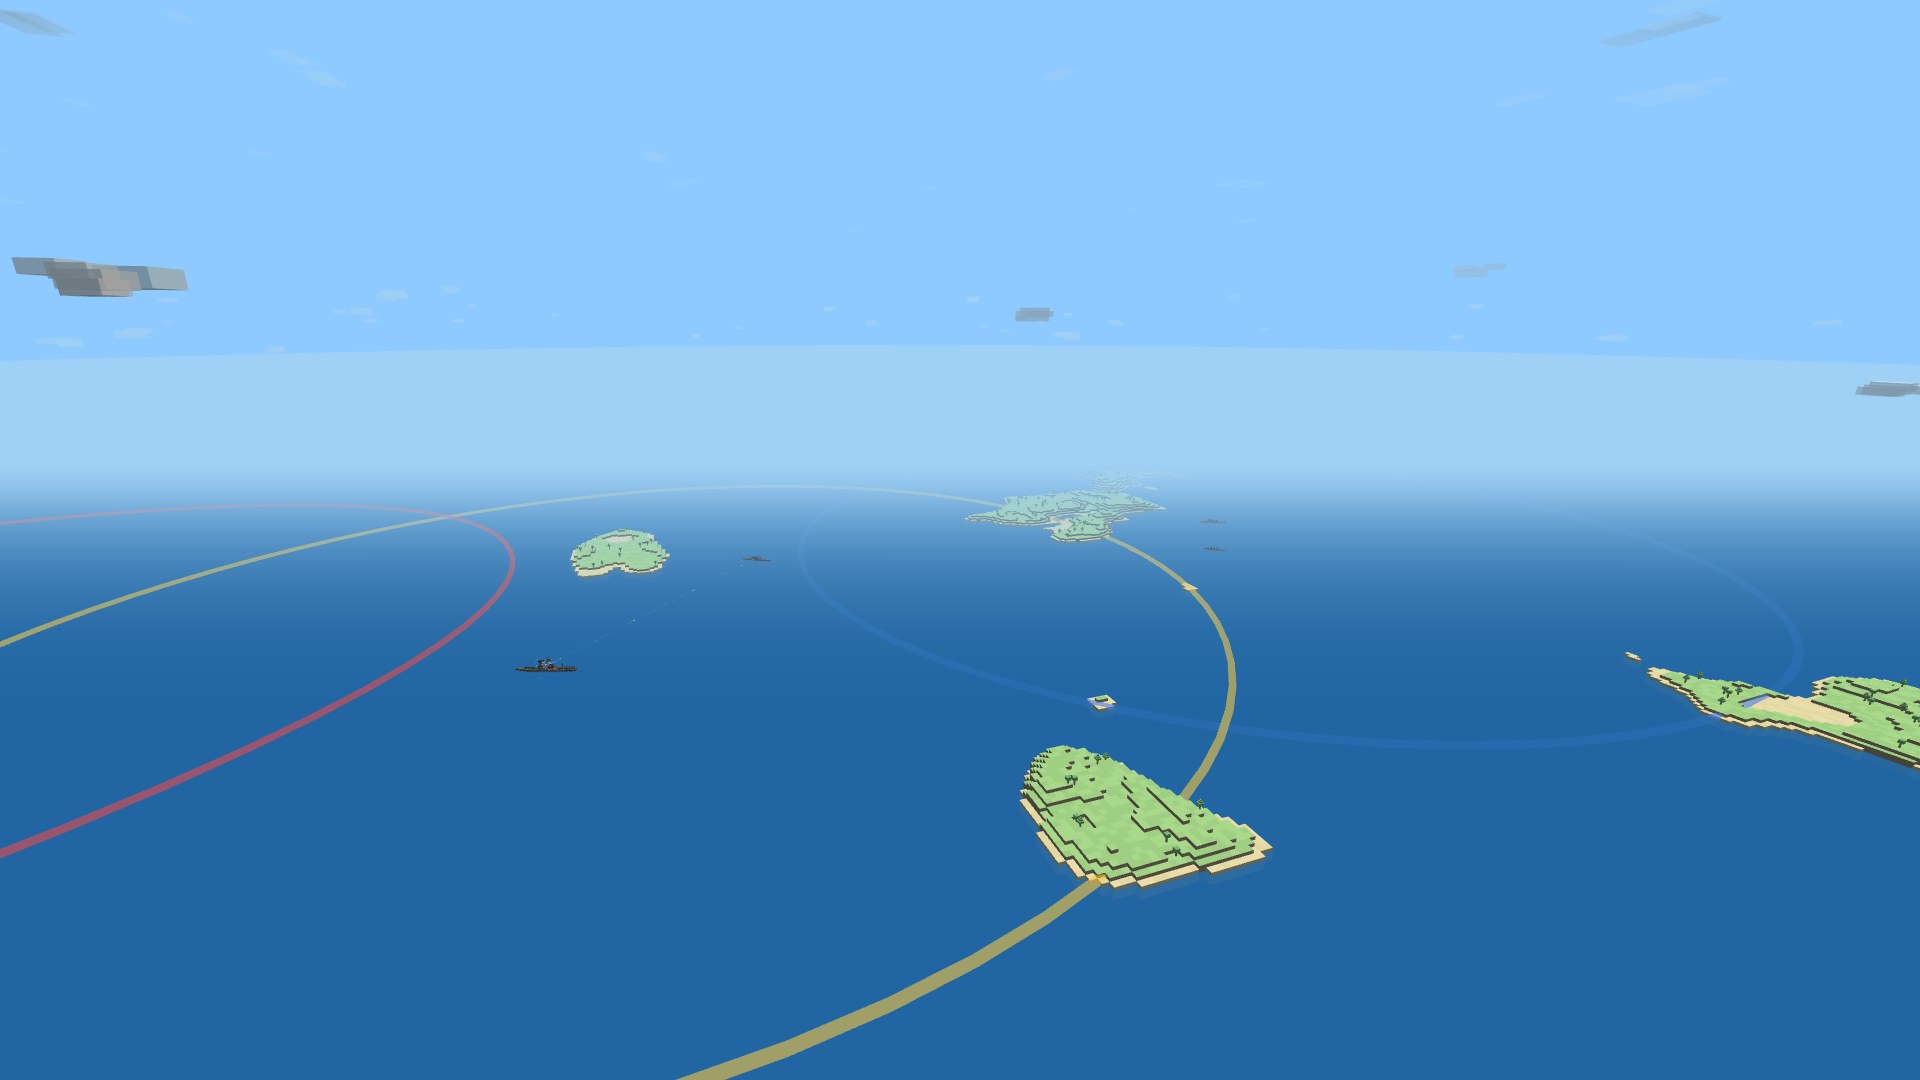
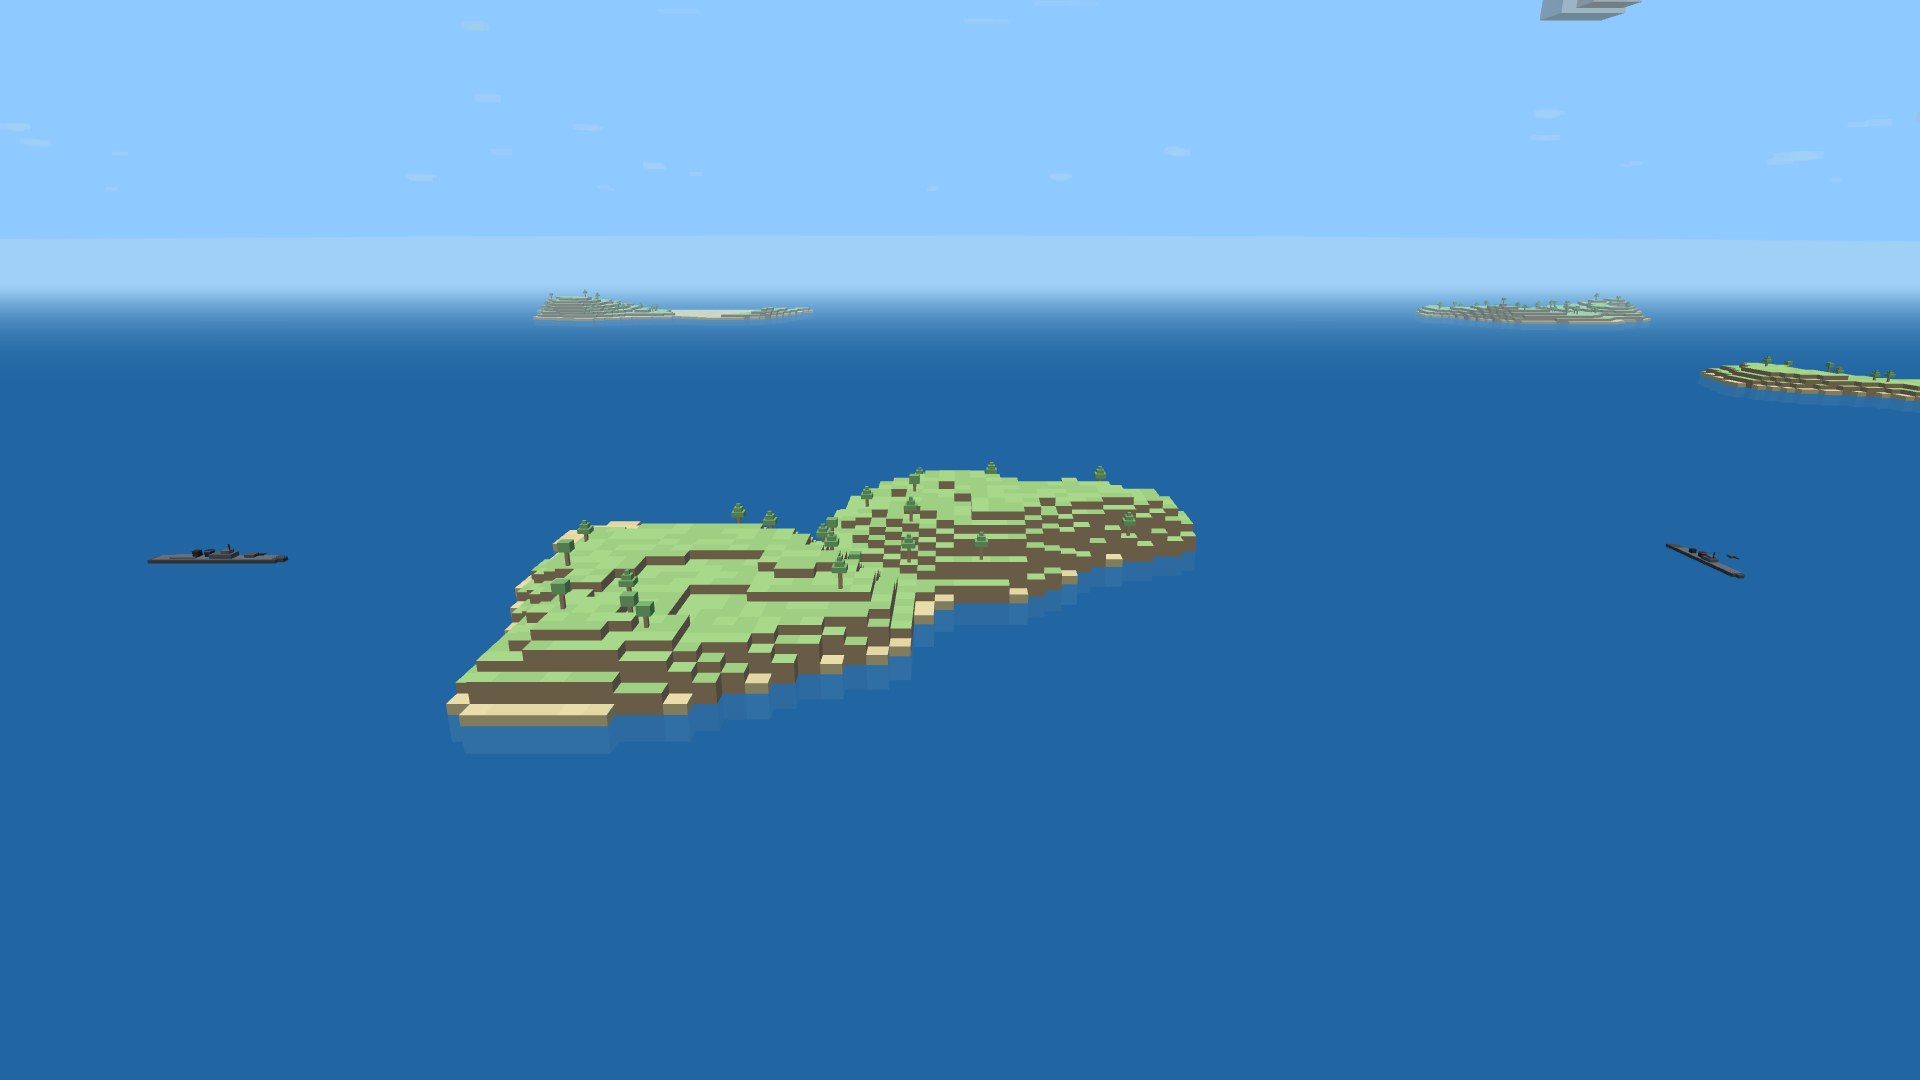
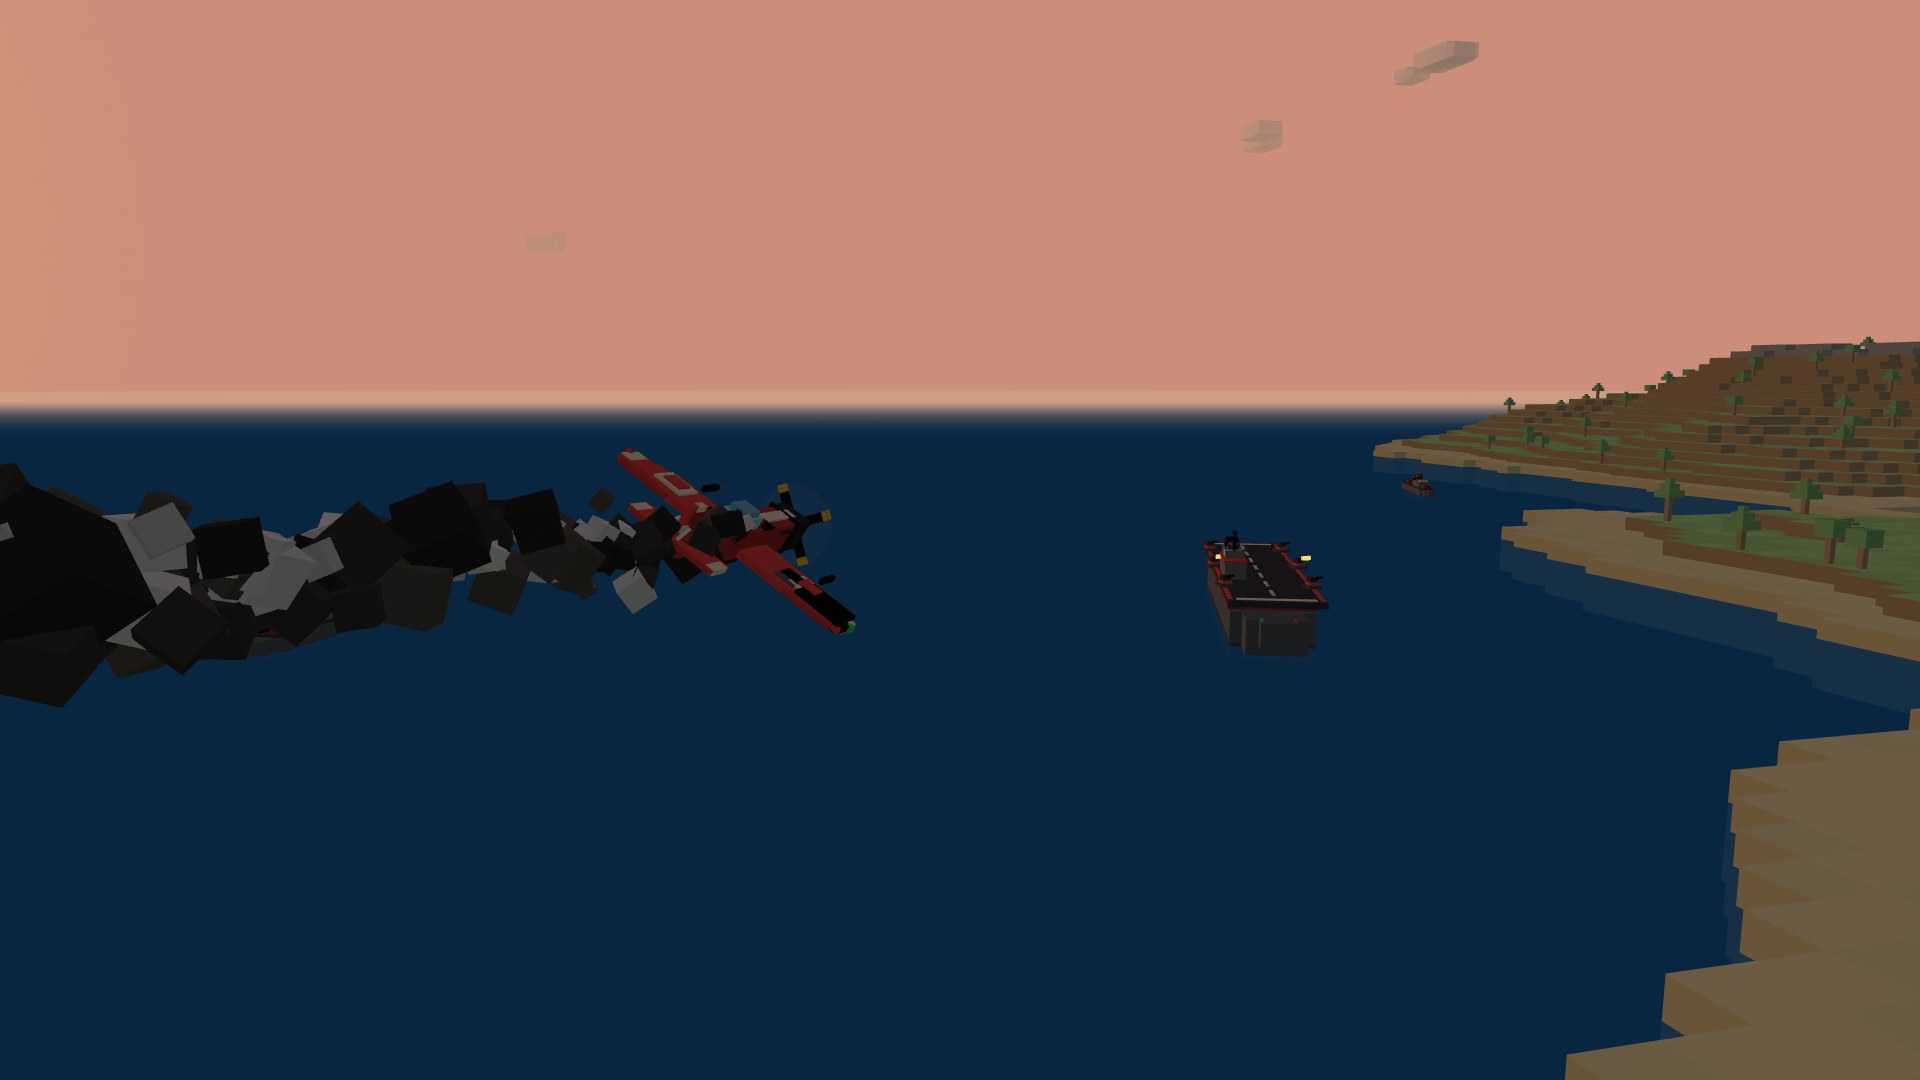
The naval theater (new)

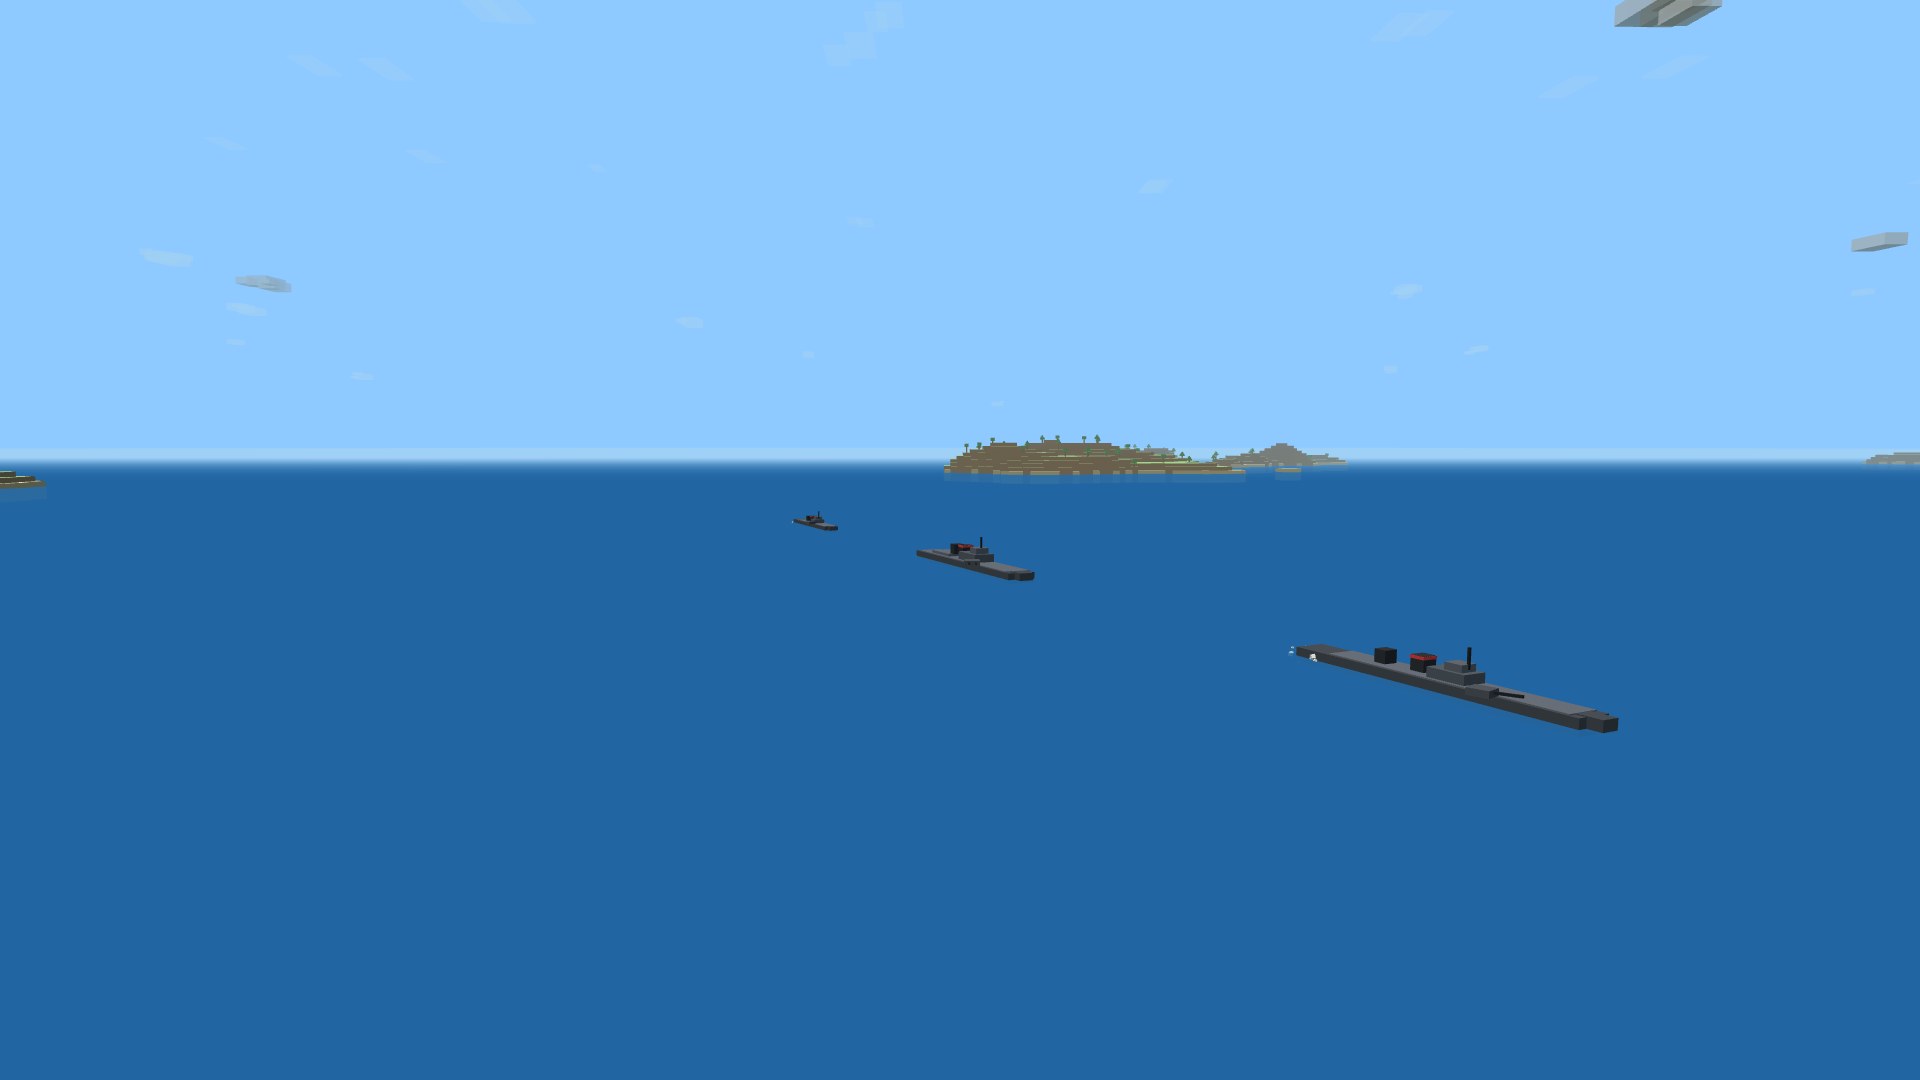
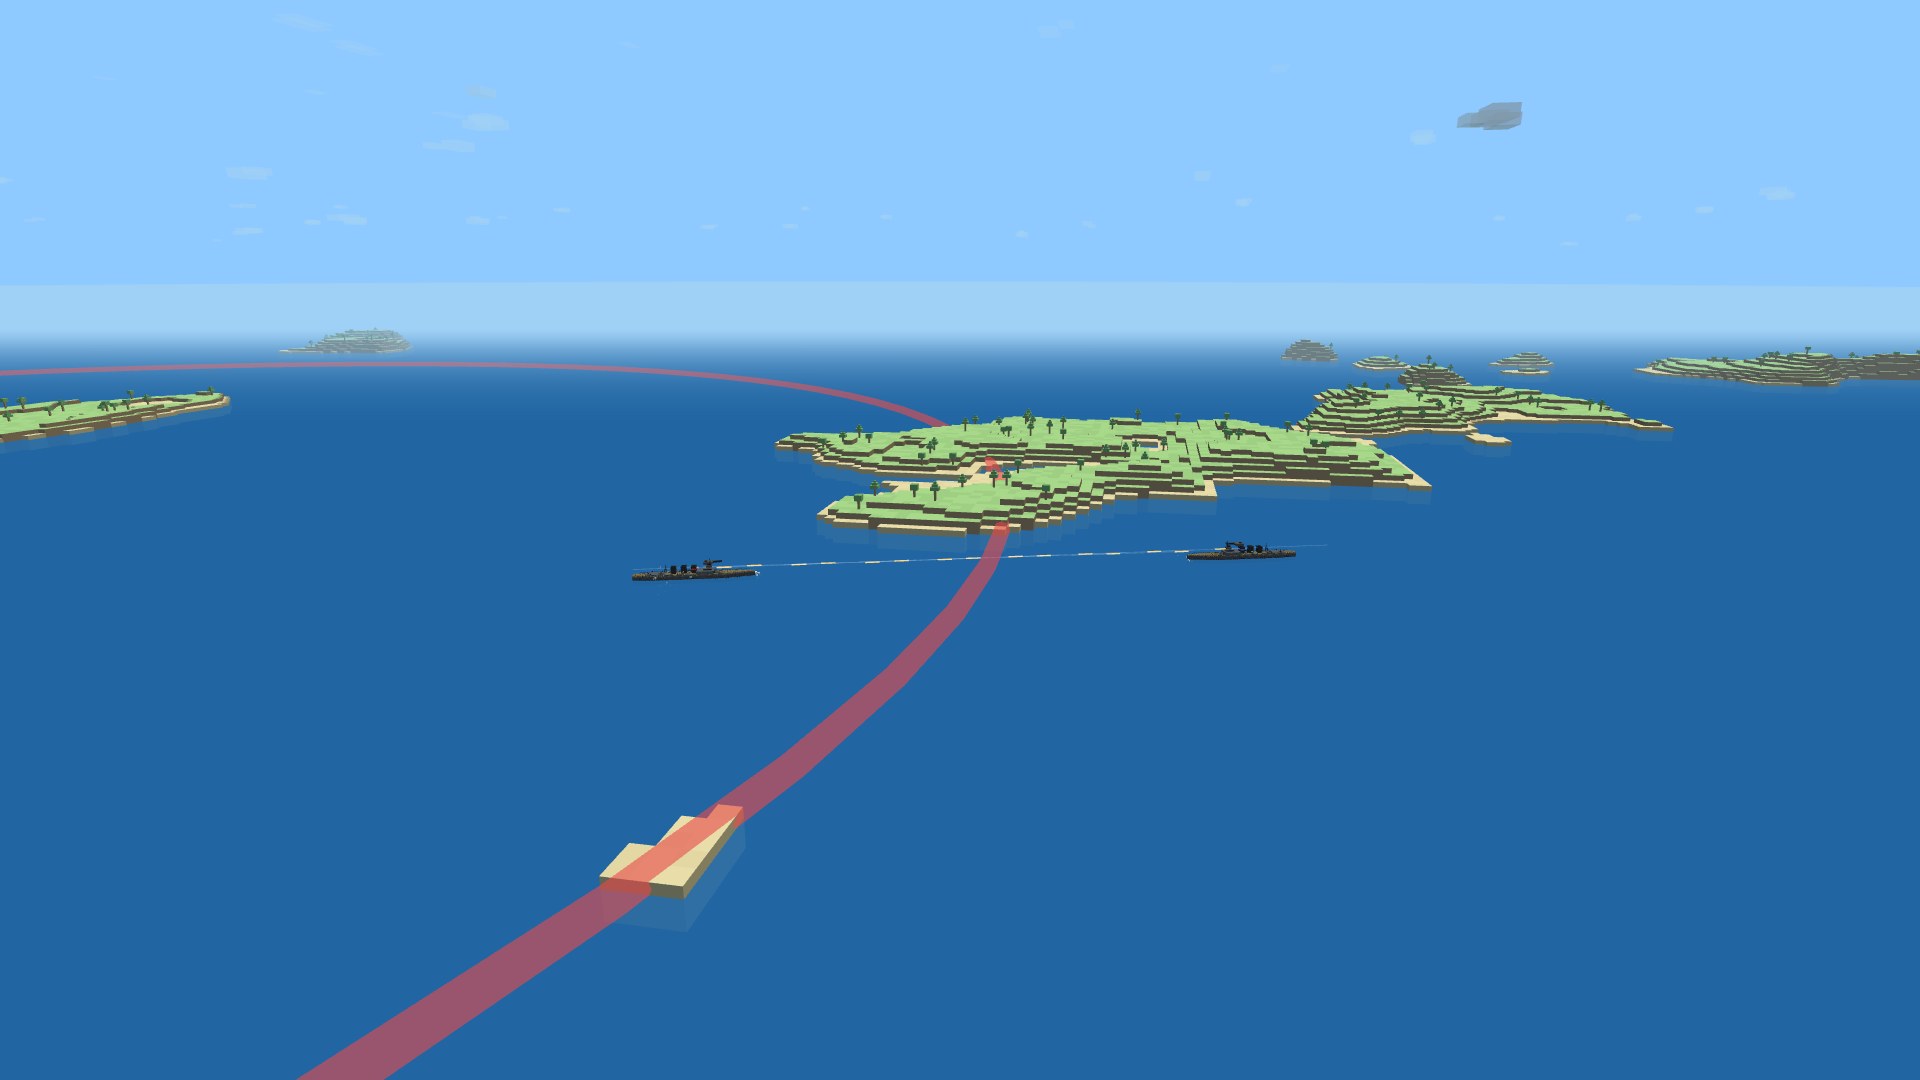
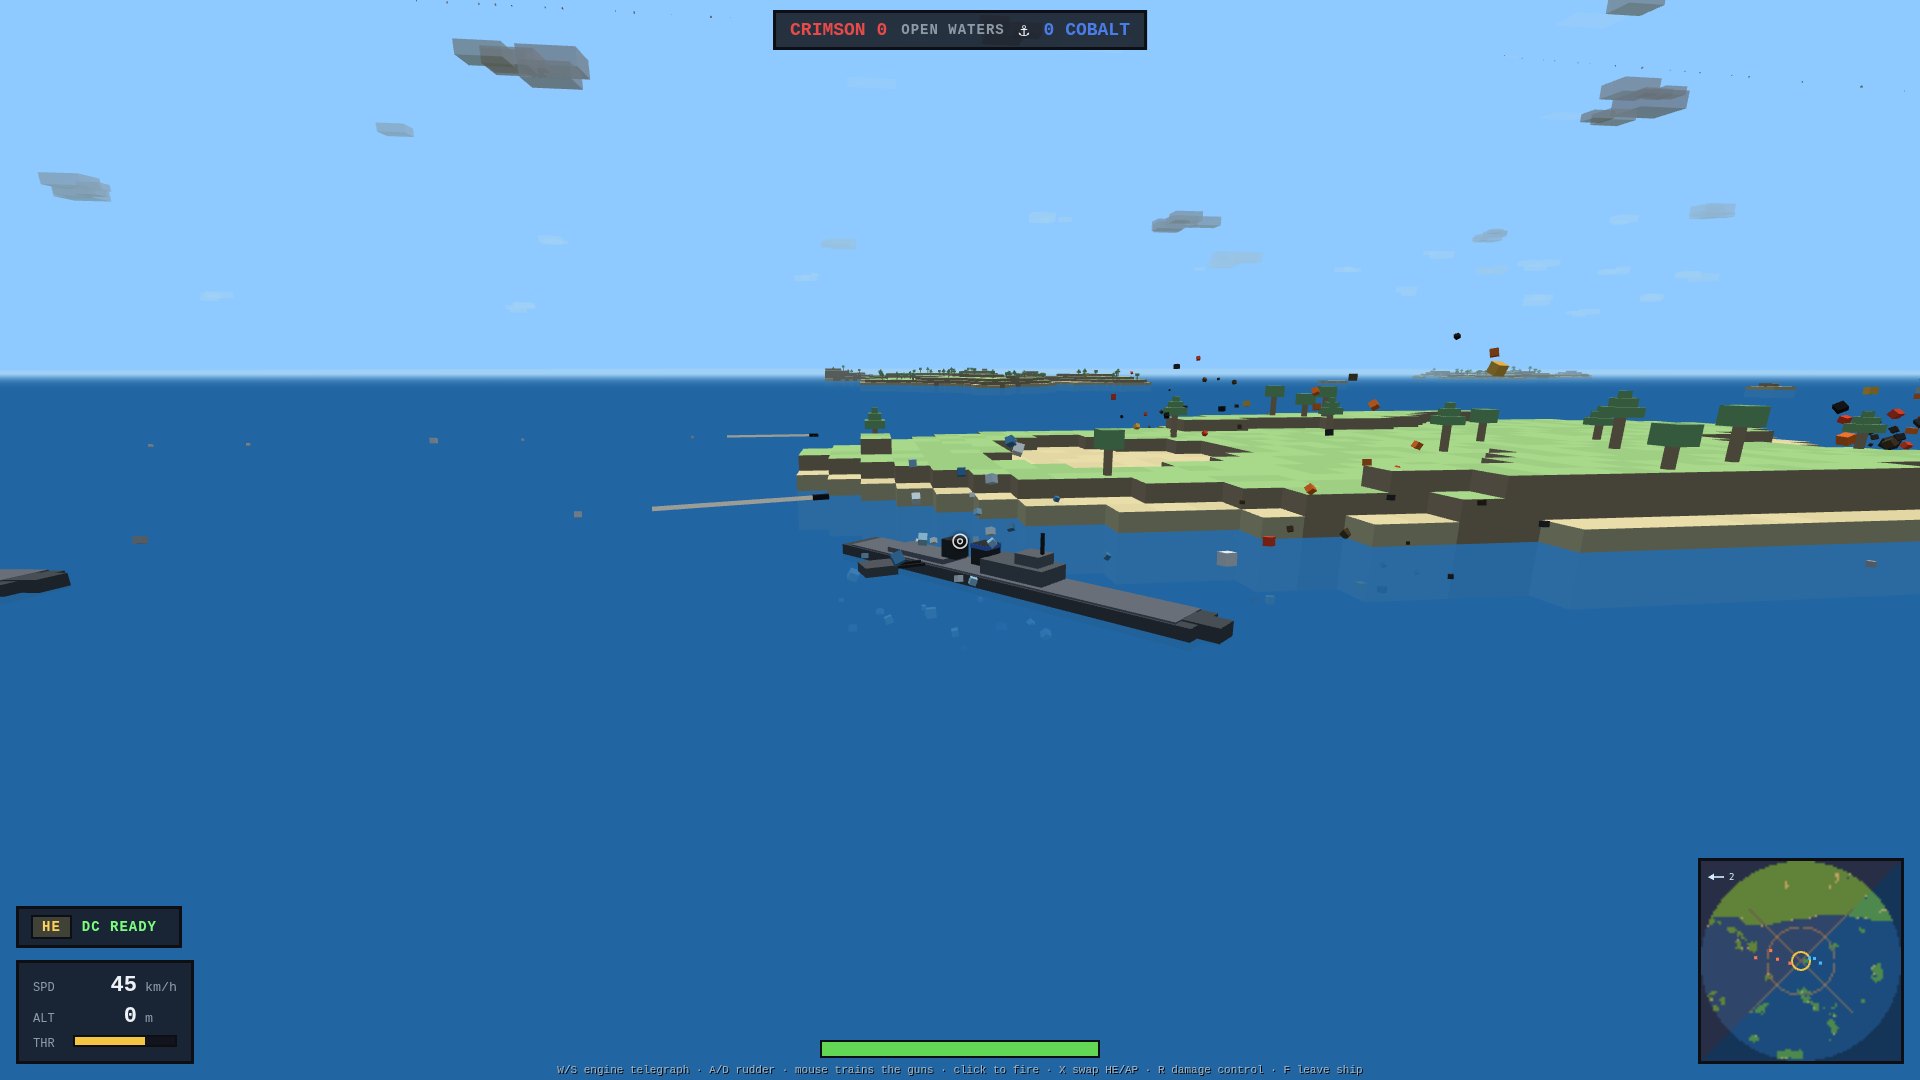
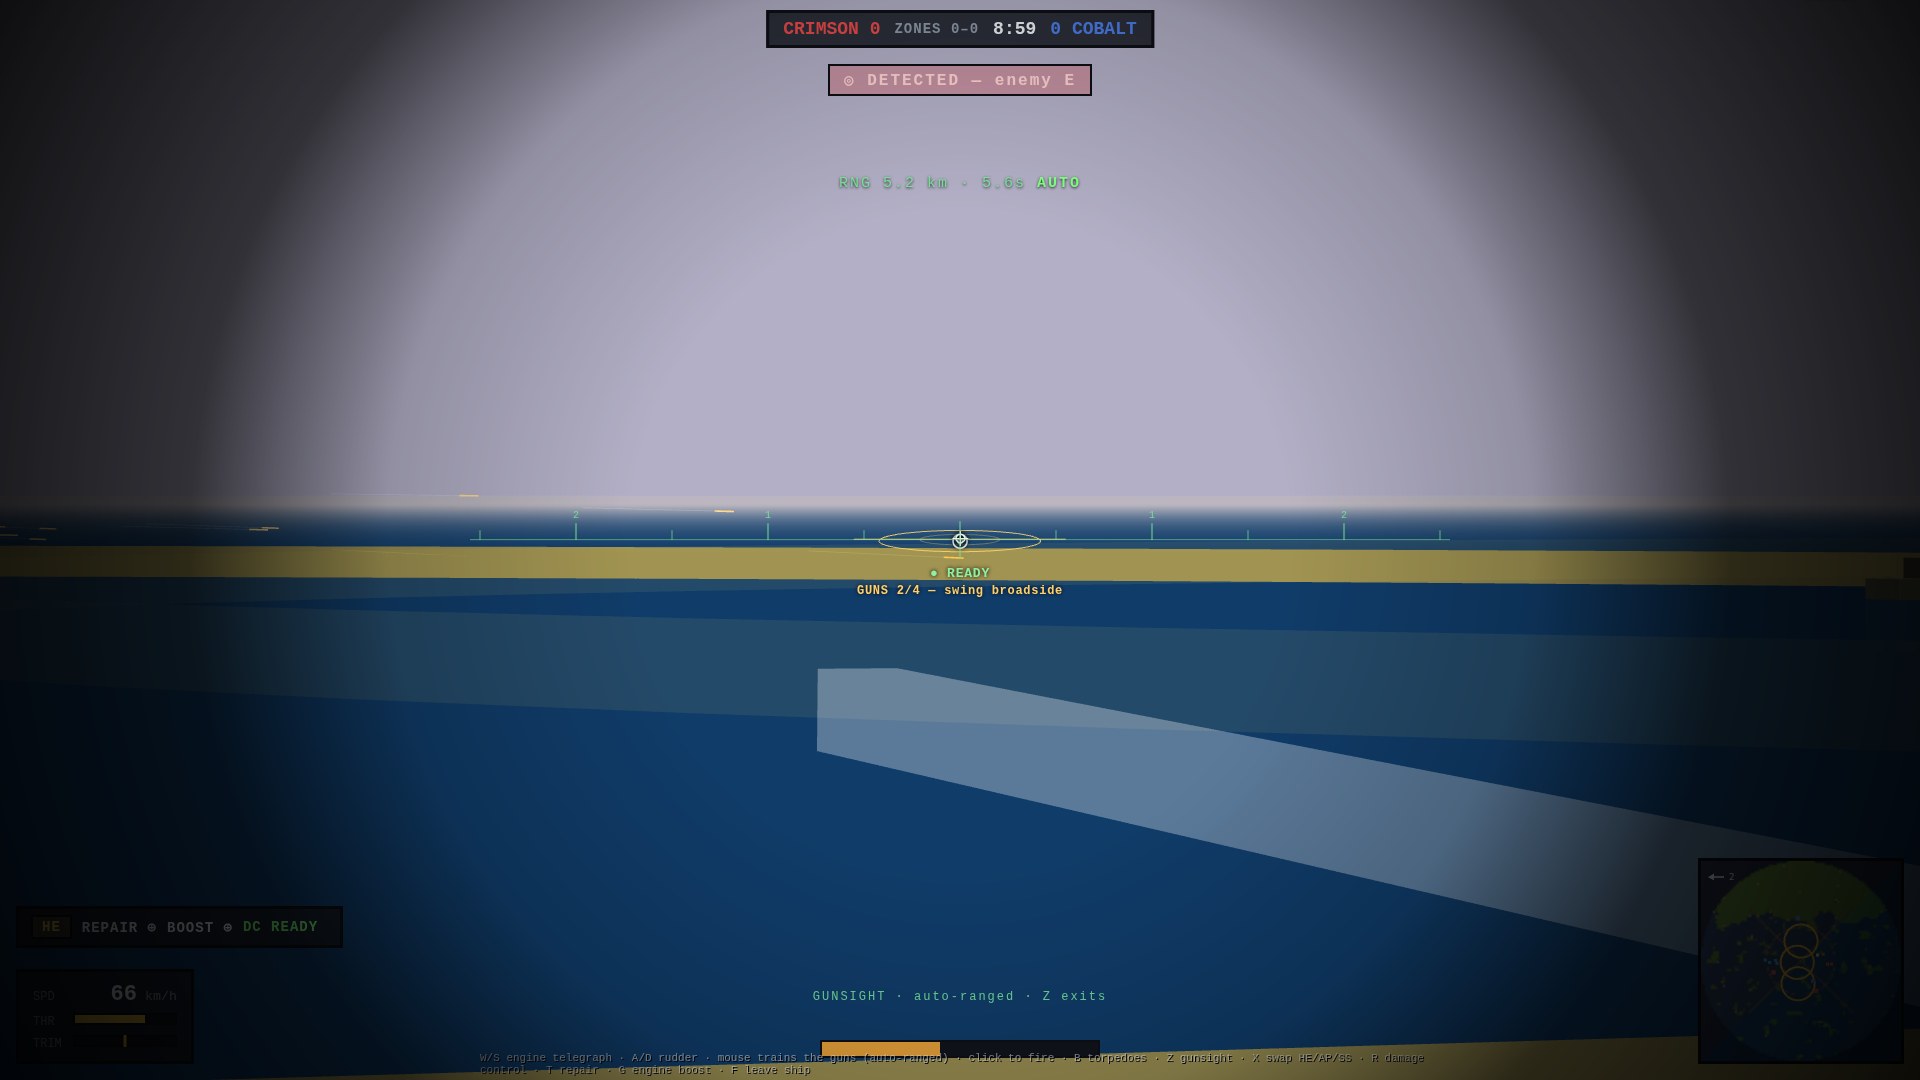
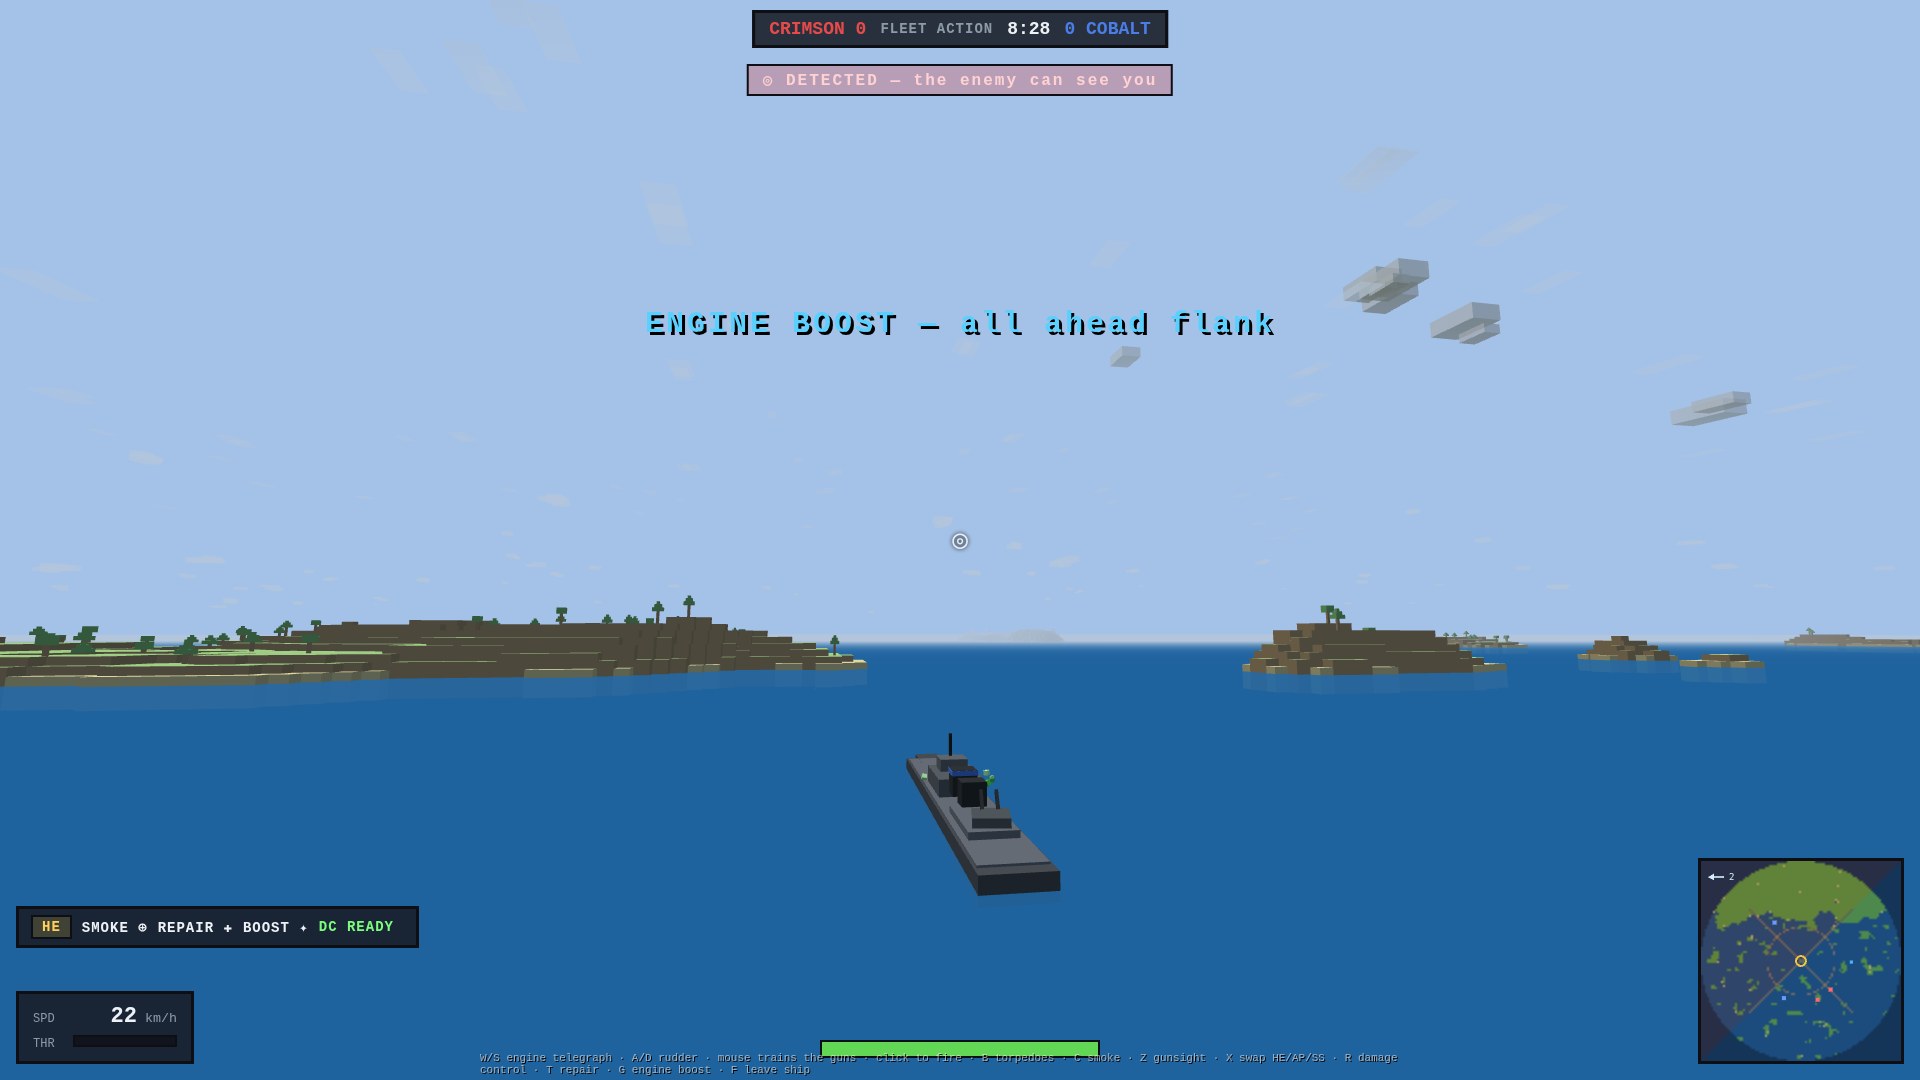
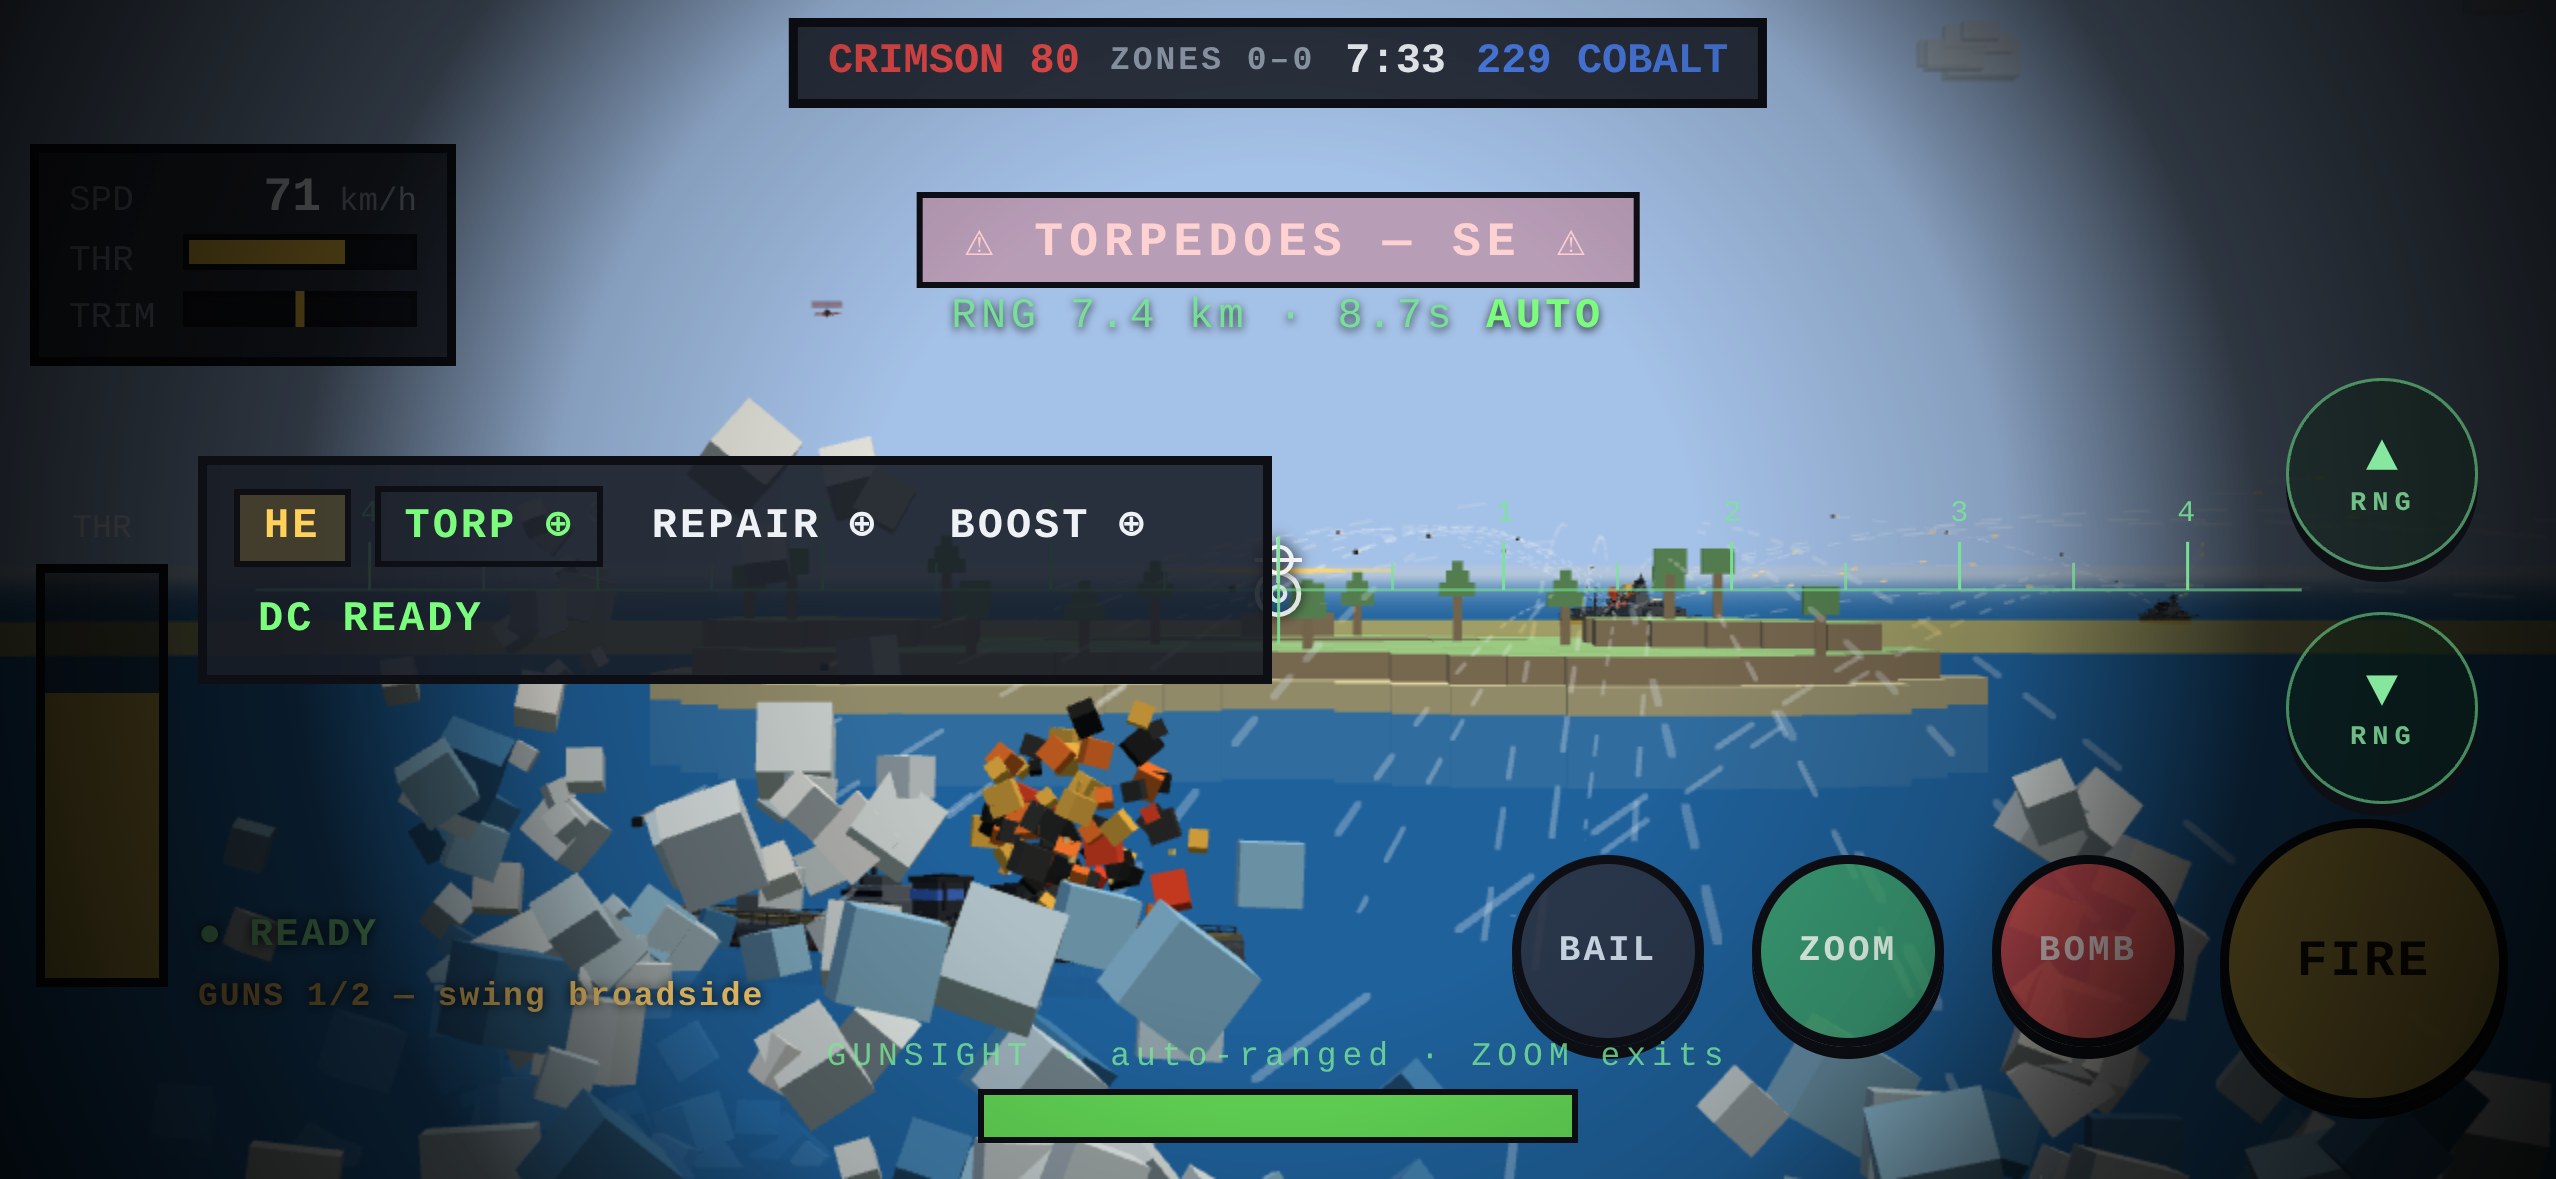
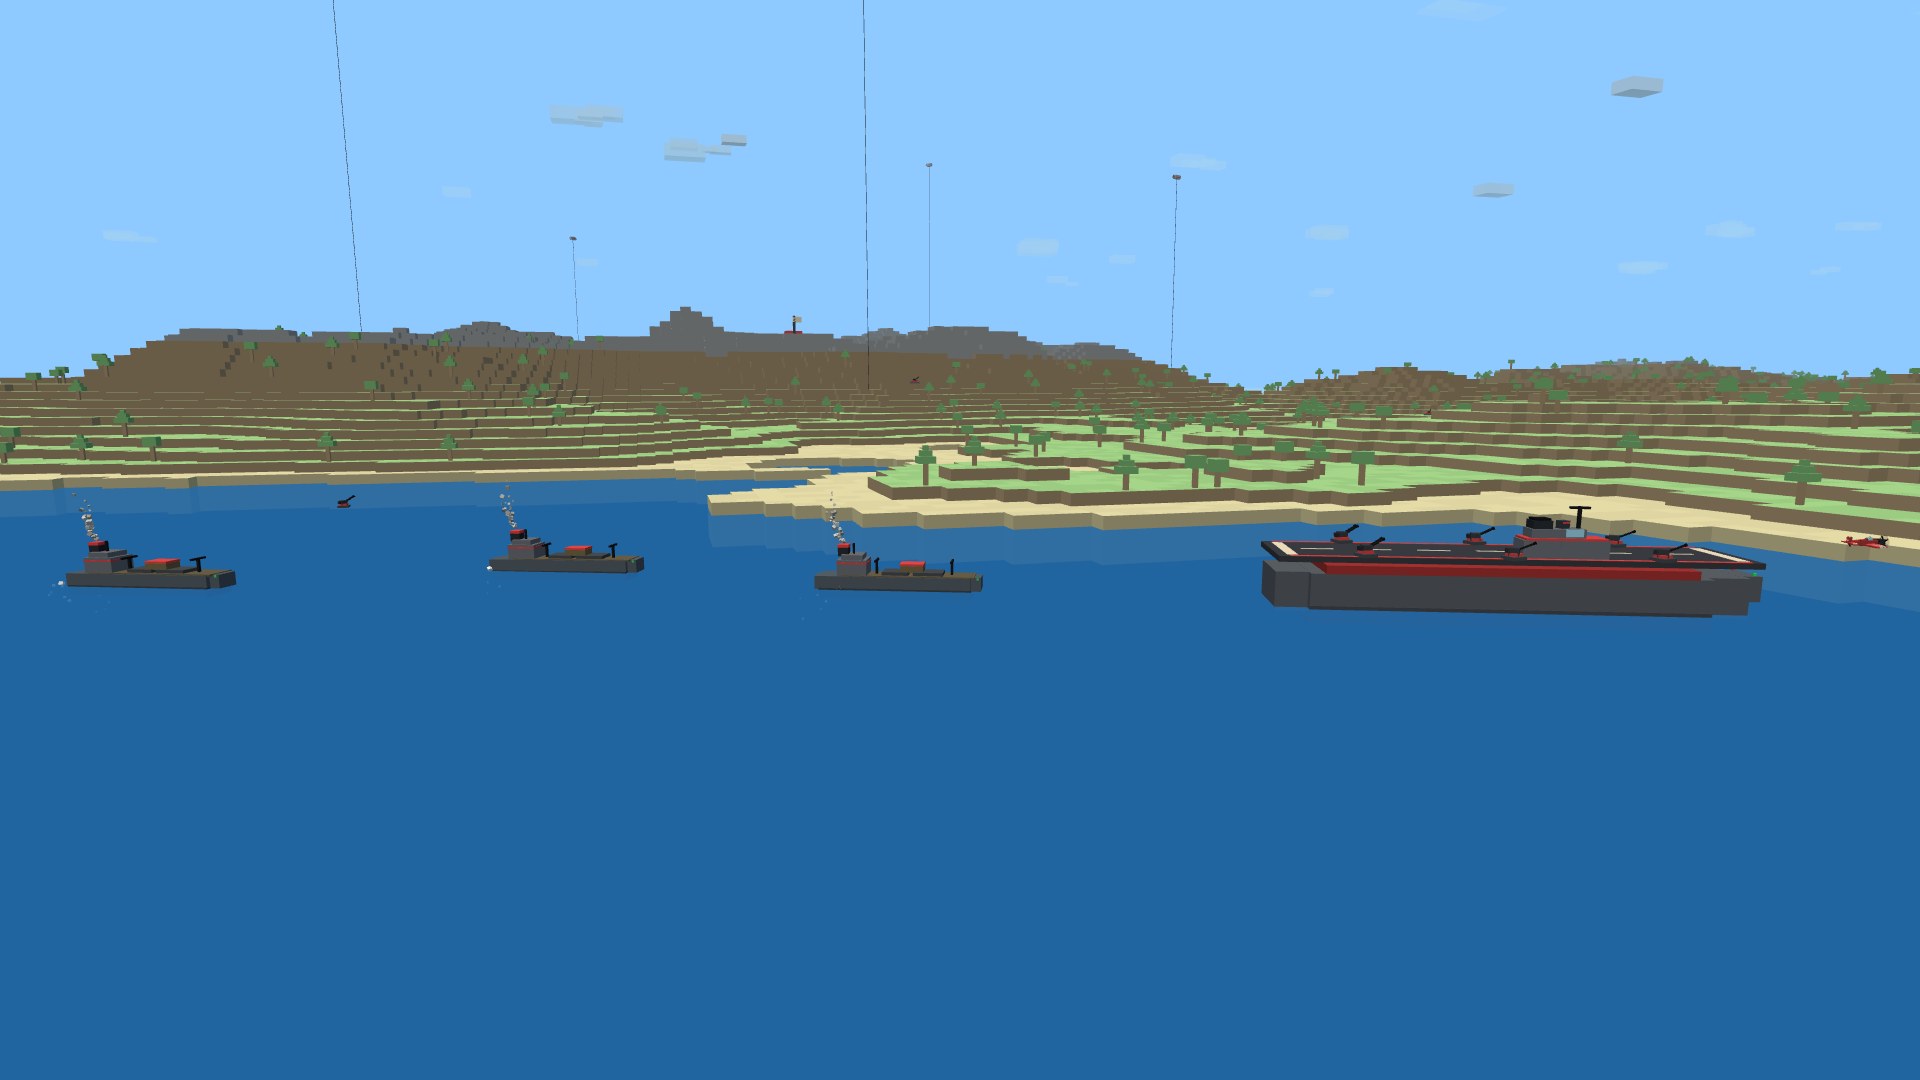
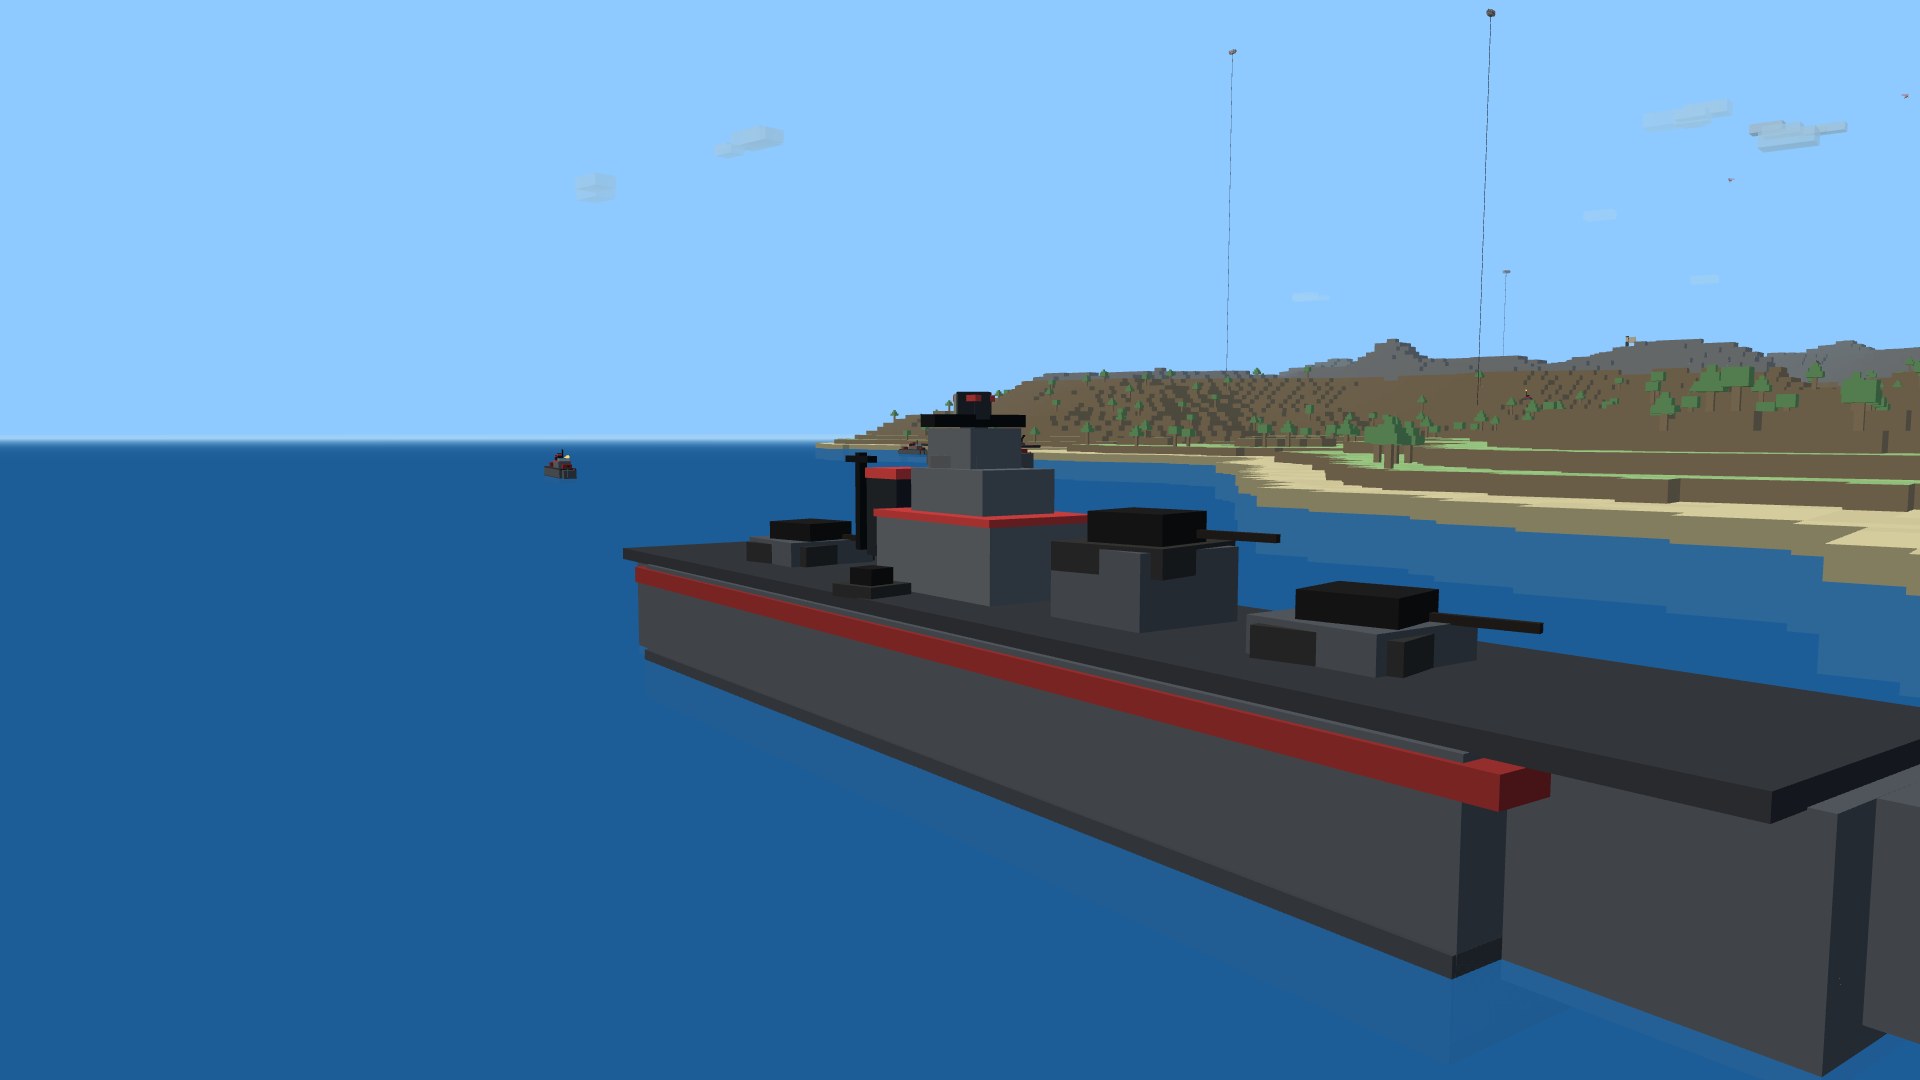
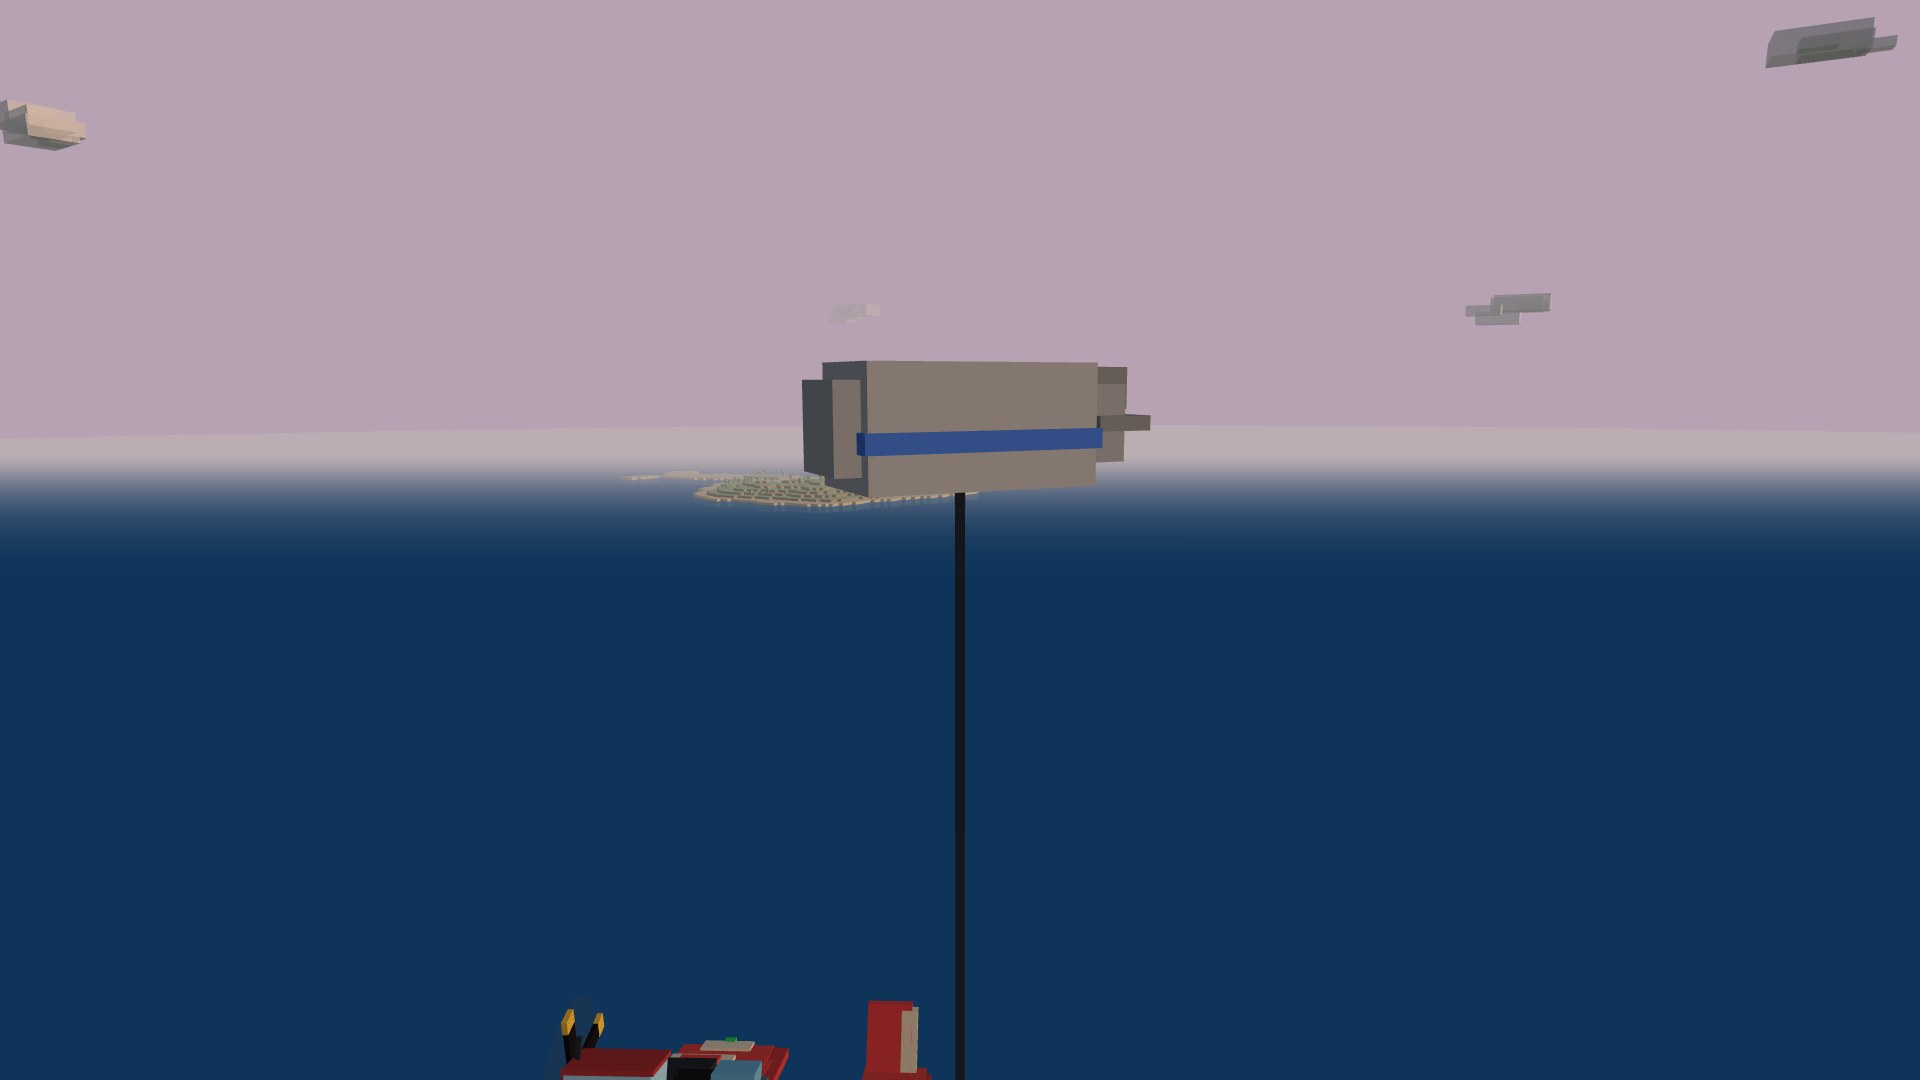
The fleet war is splitting off into its own game on its own map. The naval theater is open ocean — mostly sea for maneuver, strewn with low islands to fight around, and a continental coastline along the north edge. You don't fly here; you take command of a warship and sail it, World-of-Warships style. A destroyer is fast and nimble; a cruiser trades agility for armor and heavier guns; a battleship is slow and ponderous but wrapped in thick belt armor that shrugs off cruiser shells, with devastating main guns that reload at their leisure. Hulls handle like real ships: the throttle is an engine telegraph you spool up and down (no stopping on a dime), and the rudder lags and bites harder with speed — a near-stopped ship barely answers her helm, so you learn to think a ship's length ahead. The guns train independently of the bow, so you line a target up with the mouse while the hull holds its course.

A top-down tactical chart of the naval map: a continental coast across the north, open sea scattered with island clusters, range rings, and the Crimson and Cobalt put-to-sea flanks marked west and east
The map, top down. A continental coast to the north, open sea strewn with island cover, and the two fleets putting to sea on the west and east flanks — they steam toward each other across the central islands.
A destroyer steaming across open blue ocean on the naval map, scattered green islands around it and a long continental coastline stretching across the horizon
The naval map: open water to maneuver, islands for cover, a continental coast to the north — a sea built for ship duels, not dogfights.
A grey blocky destroyer under way past a wooded island under a clear noon sky, its funnel and bridge catching the light
Under way. A destroyer at speed past an island — W/S works the engine telegraph, A/D the rudder, the mouse trains the main battery.
Three blocky warships abreast on open water for scale: a small destroyer, a larger cruiser, and a long broad battleship with multiple gun turrets and a tall bridge tower
The roster. Three hull classes, smallest to largest, each modeled on a real warship — the lean destroyer (a Fubuki-class type), the three-funnel cruiser (a County-class heavy cruiser), and the broad battleship with its towering pagoda mast (a Yamato-class).
A task group steaming in line ahead across open blue ocean: a cruiser leading two destroyers in column, broad wakes off their sterns, an island and clouds on the horizon
Task group at sea. A cruiser and her destroyer screen steaming in line ahead — the kind of column that puts to sea on each flank and steams toward the centre to fight.

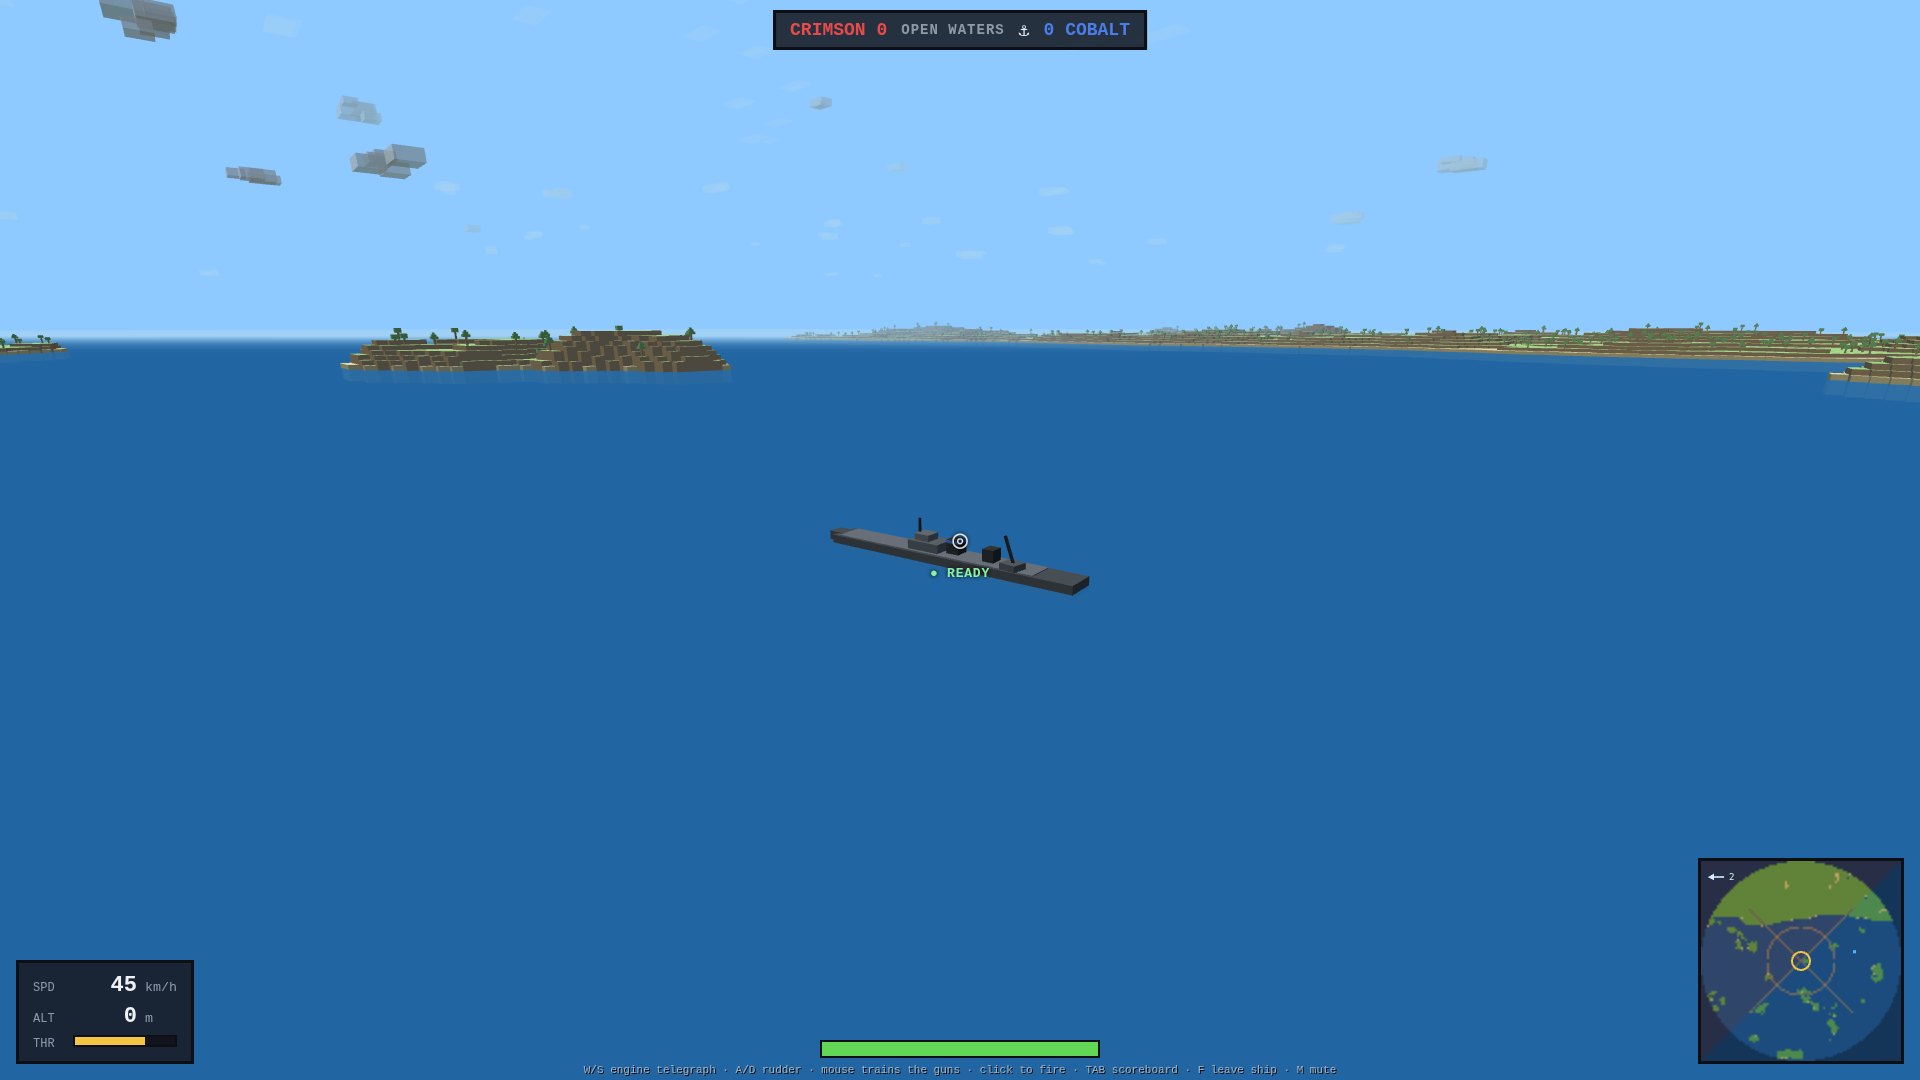
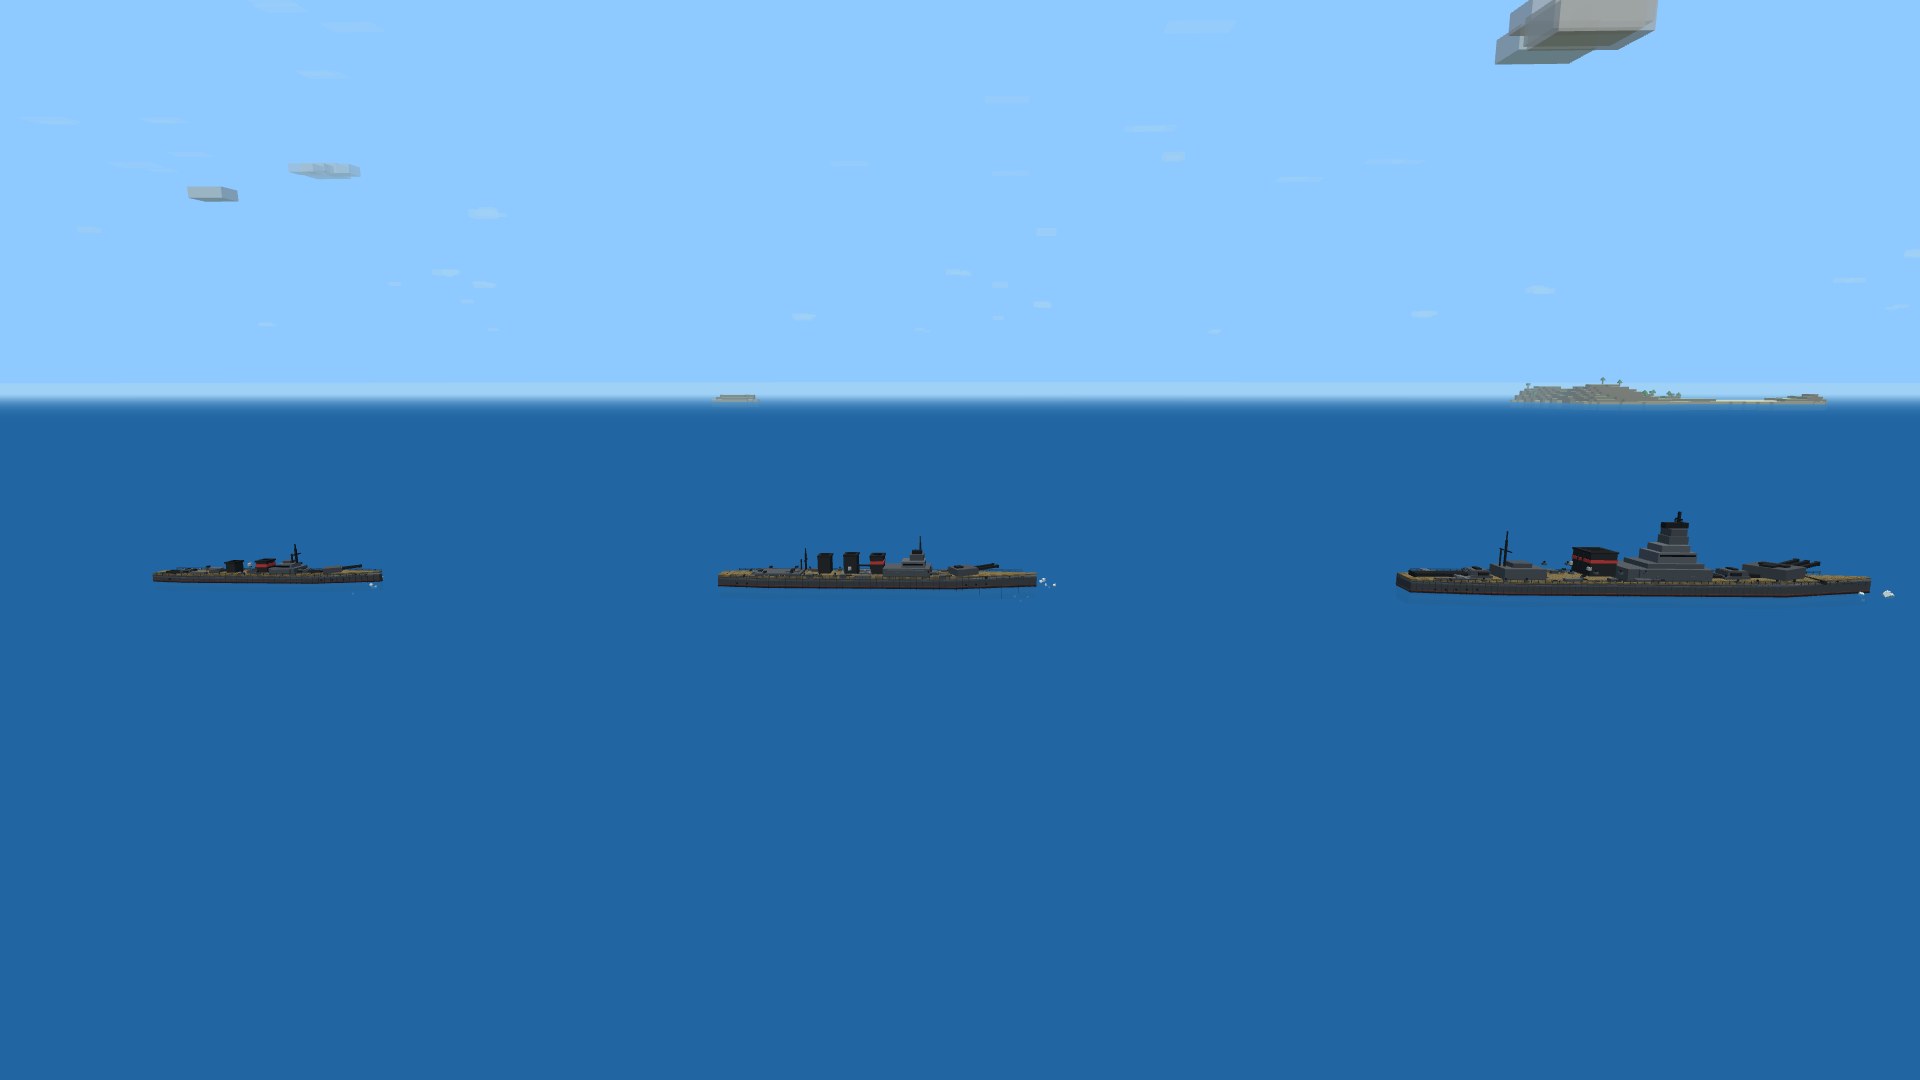
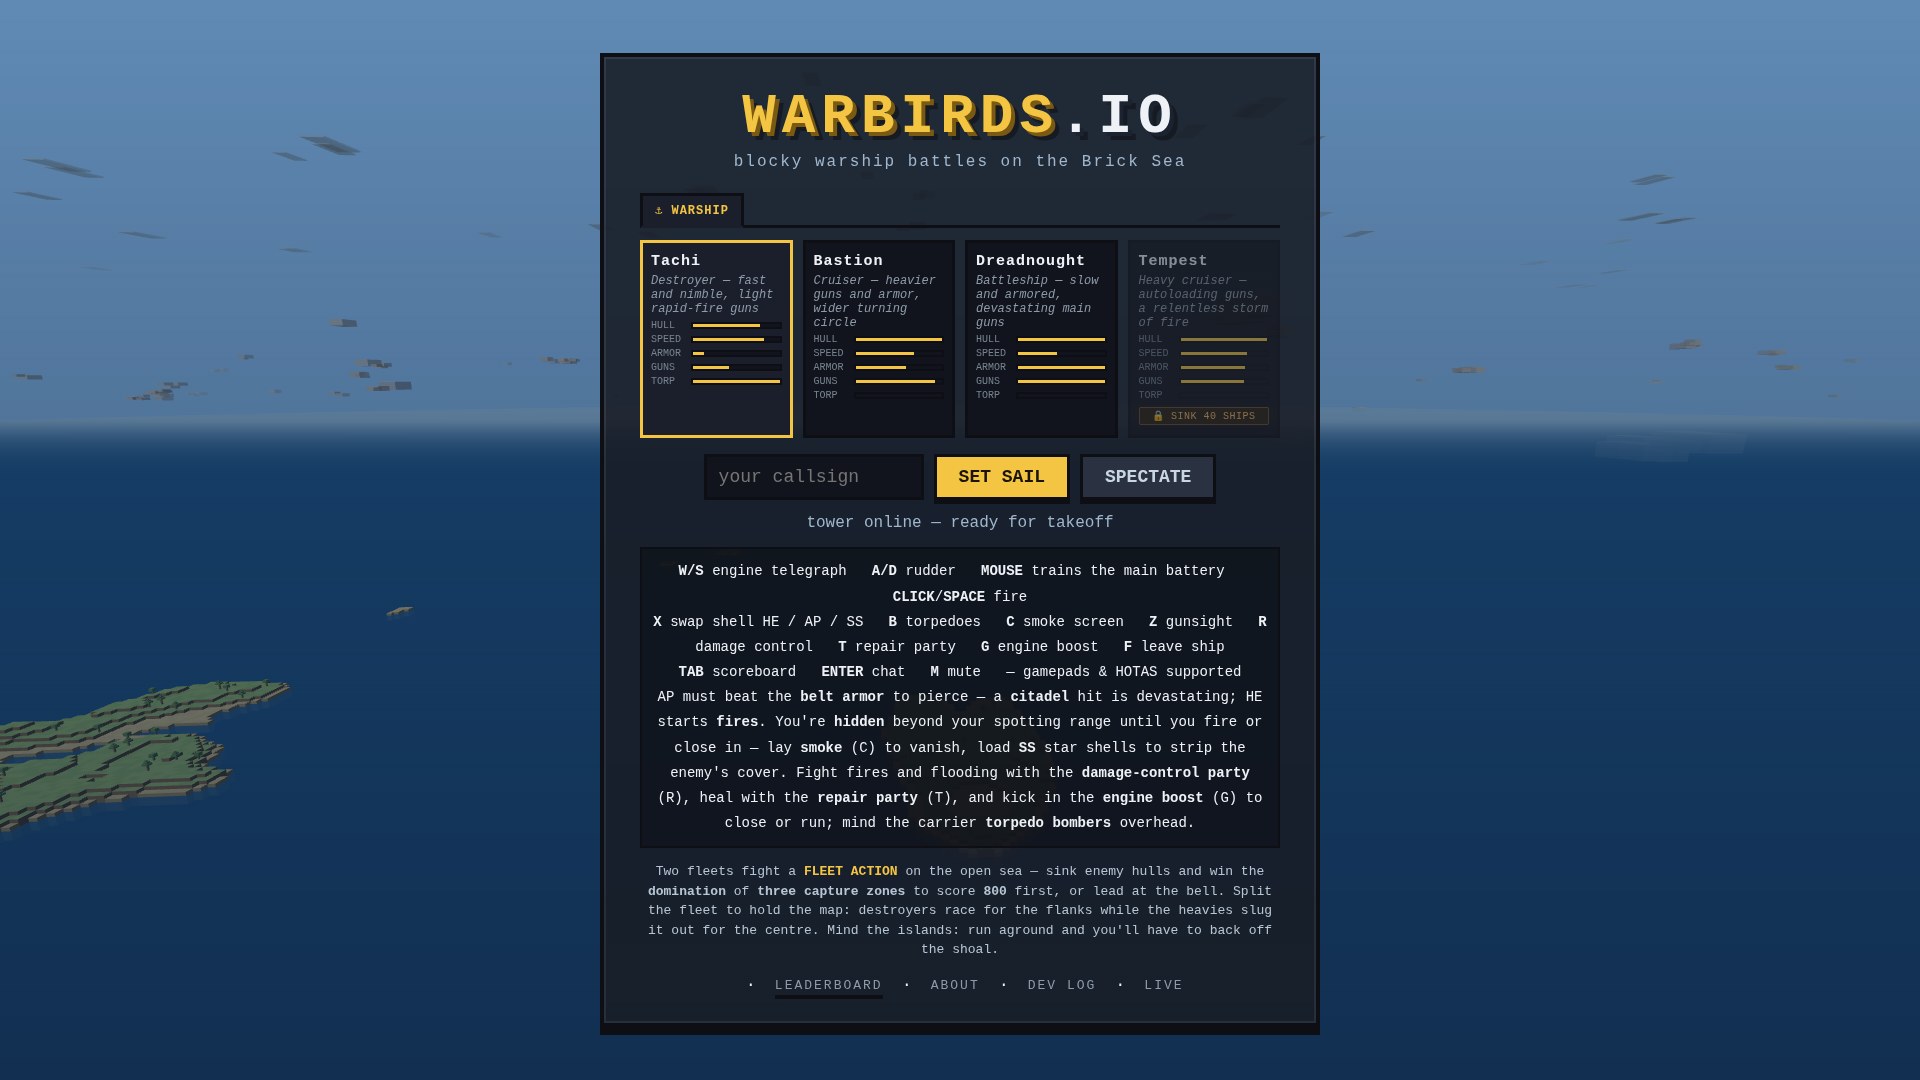
The whole fighting line is yours from your first sortie: pick the Tachi destroyer, the Bastion cruiser or the Dreadnought battleship straight off the hangar wall and put to sea — no grind between you and the big guns, just three honest trade-offs of speed, armor and firepower.

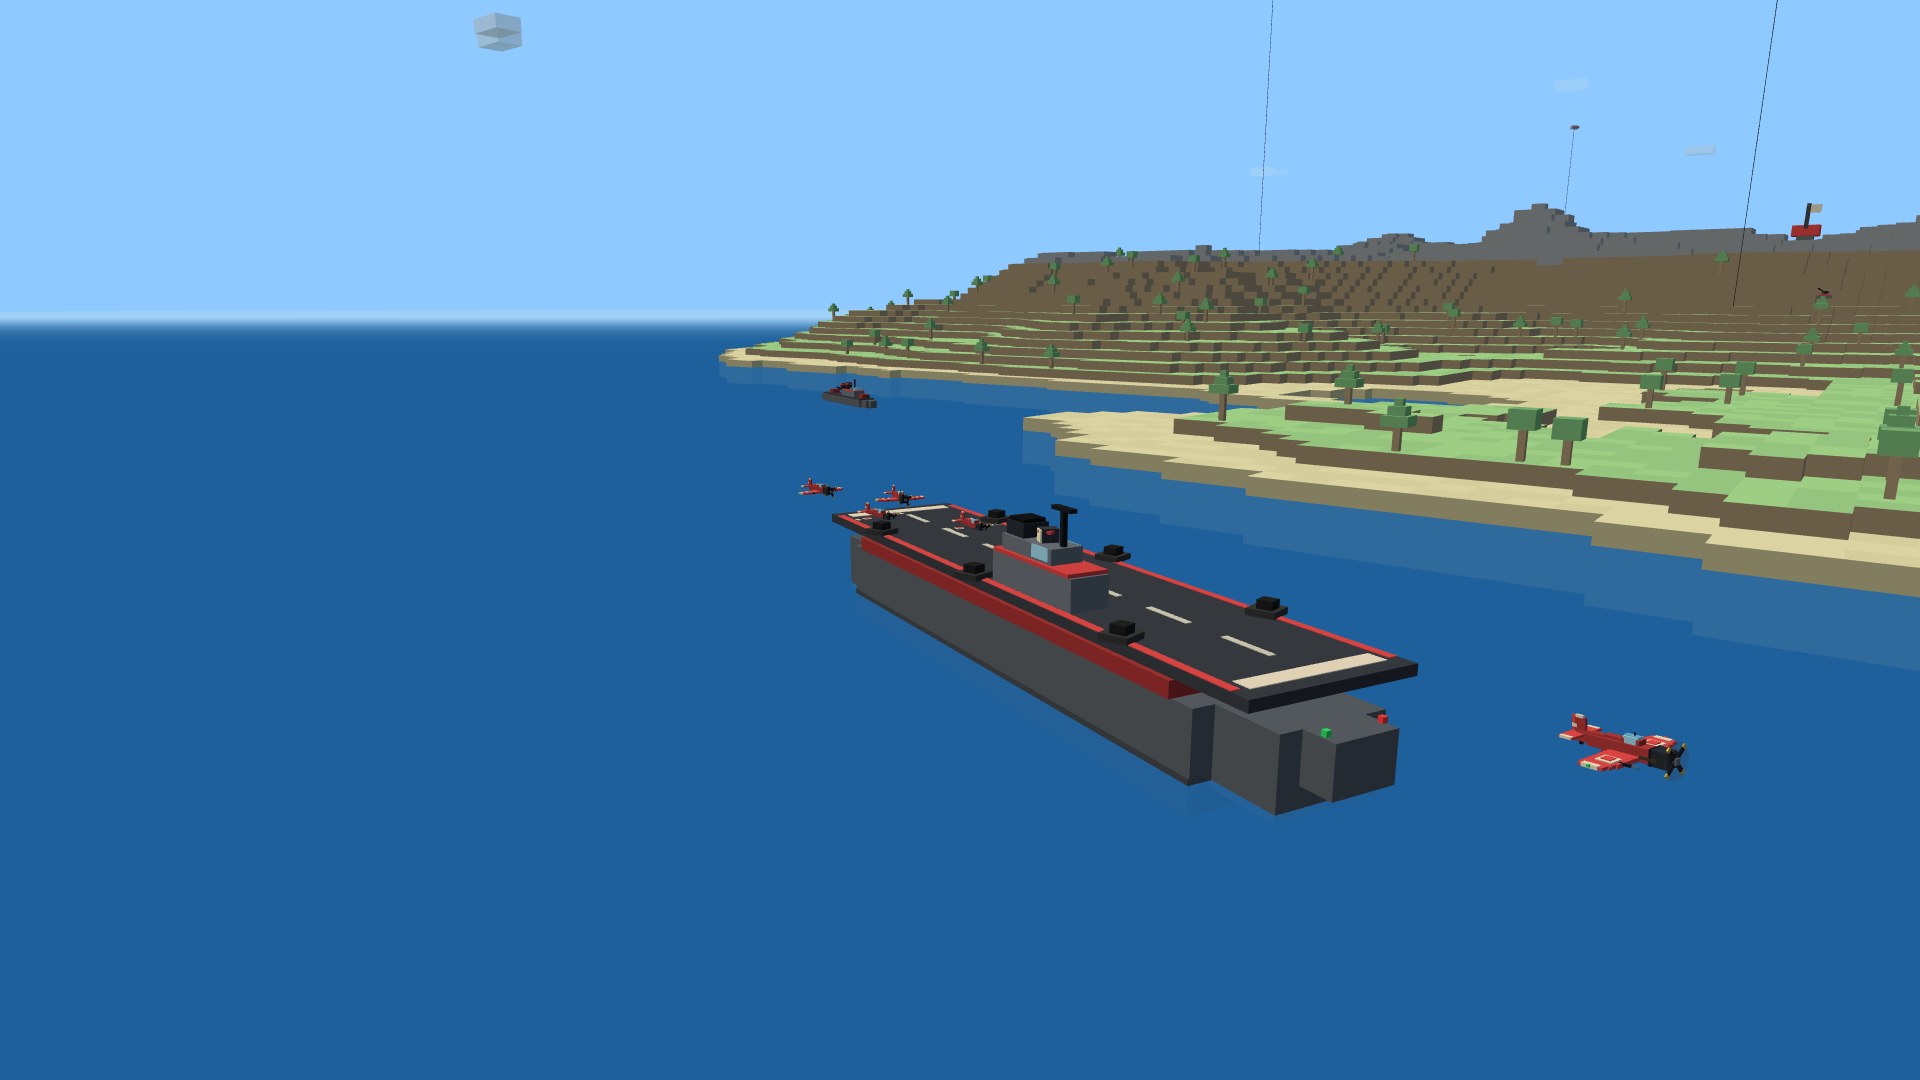
Only one hull is earned: forty ships sent under wins the Tempest, a premium heavy cruiser with autoloading guns. Where a normal cruiser works up to a salvo every few seconds, the Tempest's three triple turrets cycle in barely over one — the highest sustained rate of fire in the fleet, a relentless storm of shells and fires. Your tally rides your pilot record between sessions, a callout fires the moment she's yours — and she's a player's reward alone: you'll only ever meet a Tempest in another captain's hands, never the AI's.

The warship picker in the naval hangar: the Tachi destroyer, Bastion cruiser and Dreadnought battleship all open to pick, while the premium Tempest is greyed out with a lock badge reading SINK 40 SHIPS
The line is open. Destroyer, cruiser and battleship are yours from the start; only the premium Tempest waits behind a career of sinkings.
The Tempest heavy cruiser at speed on open water, a long sleek hull with twin funnels and three triple-barrel turrets, the forward turret trained out to starboard
The prize. The Tempest — the top-of-the-ladder premium heavy cruiser, her three triple autoloader turrets throwing the fastest sustained fire on the Brick Sea.

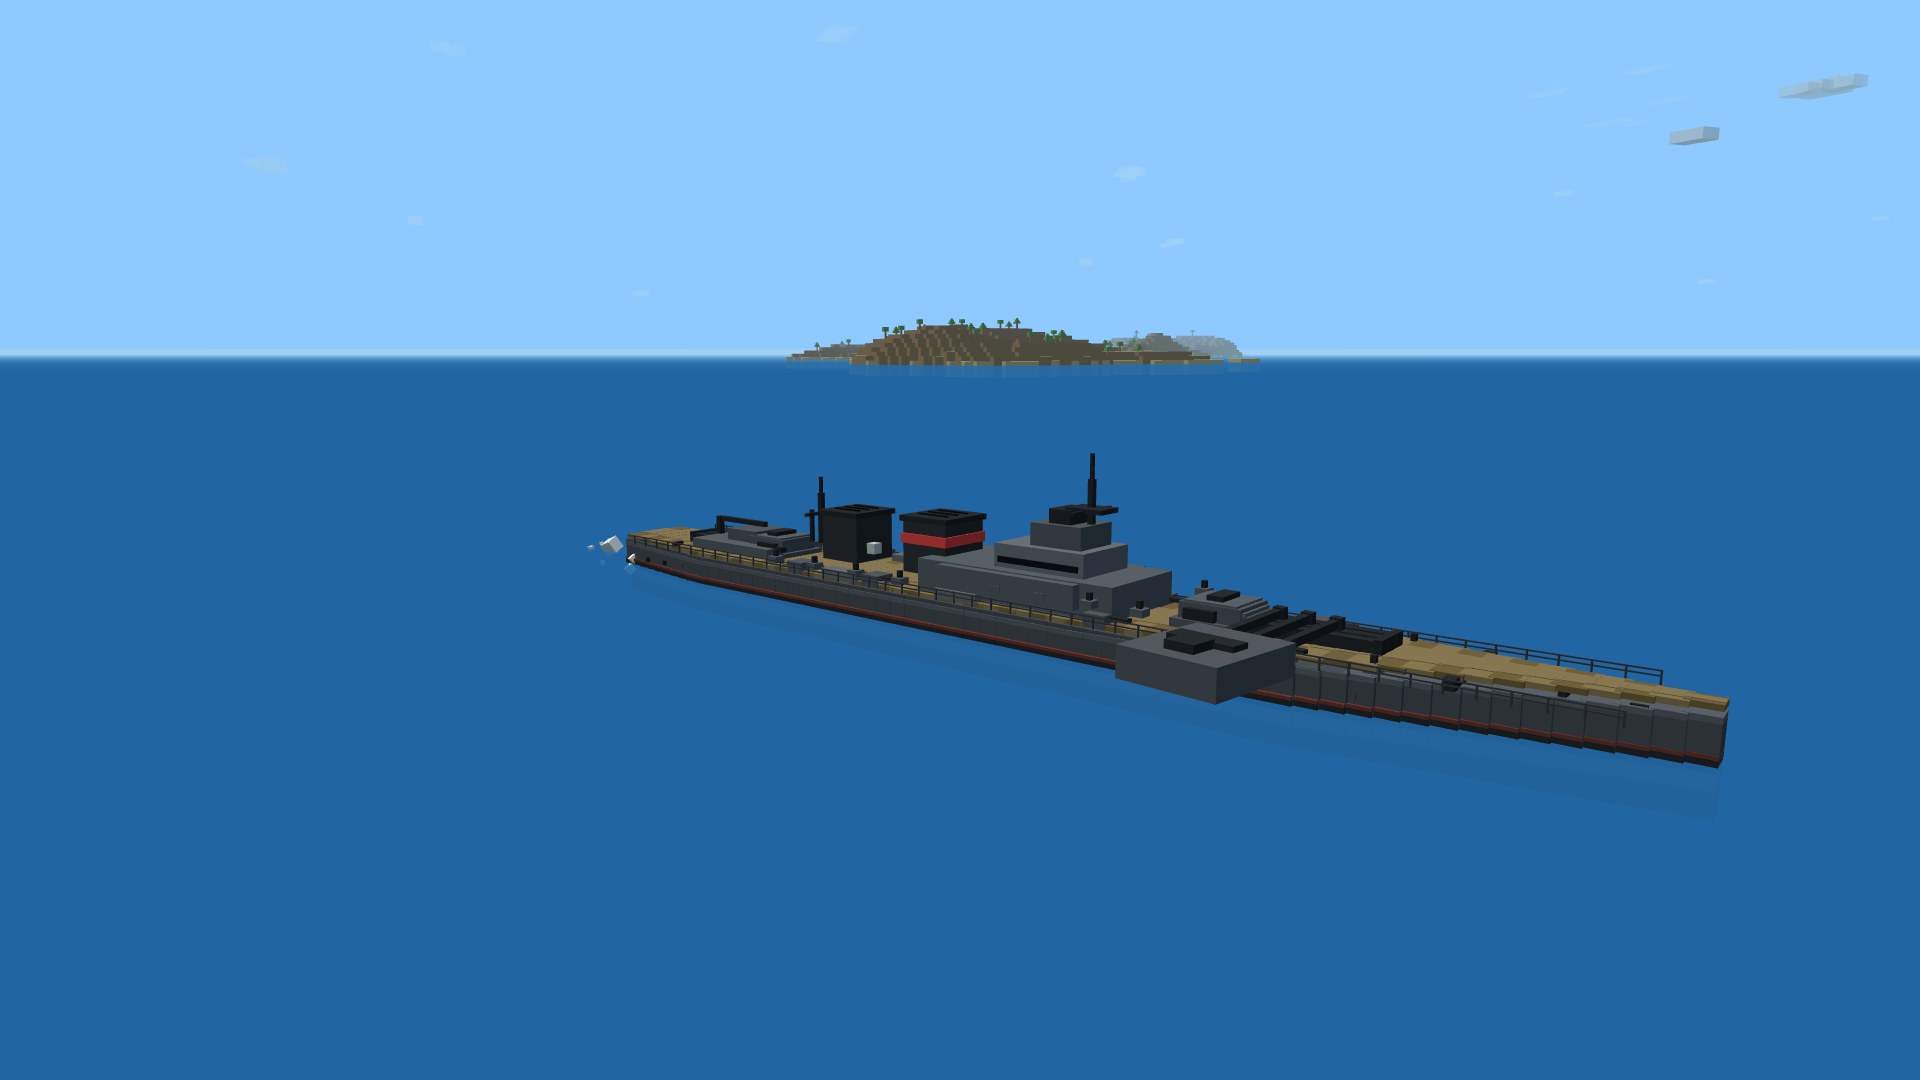
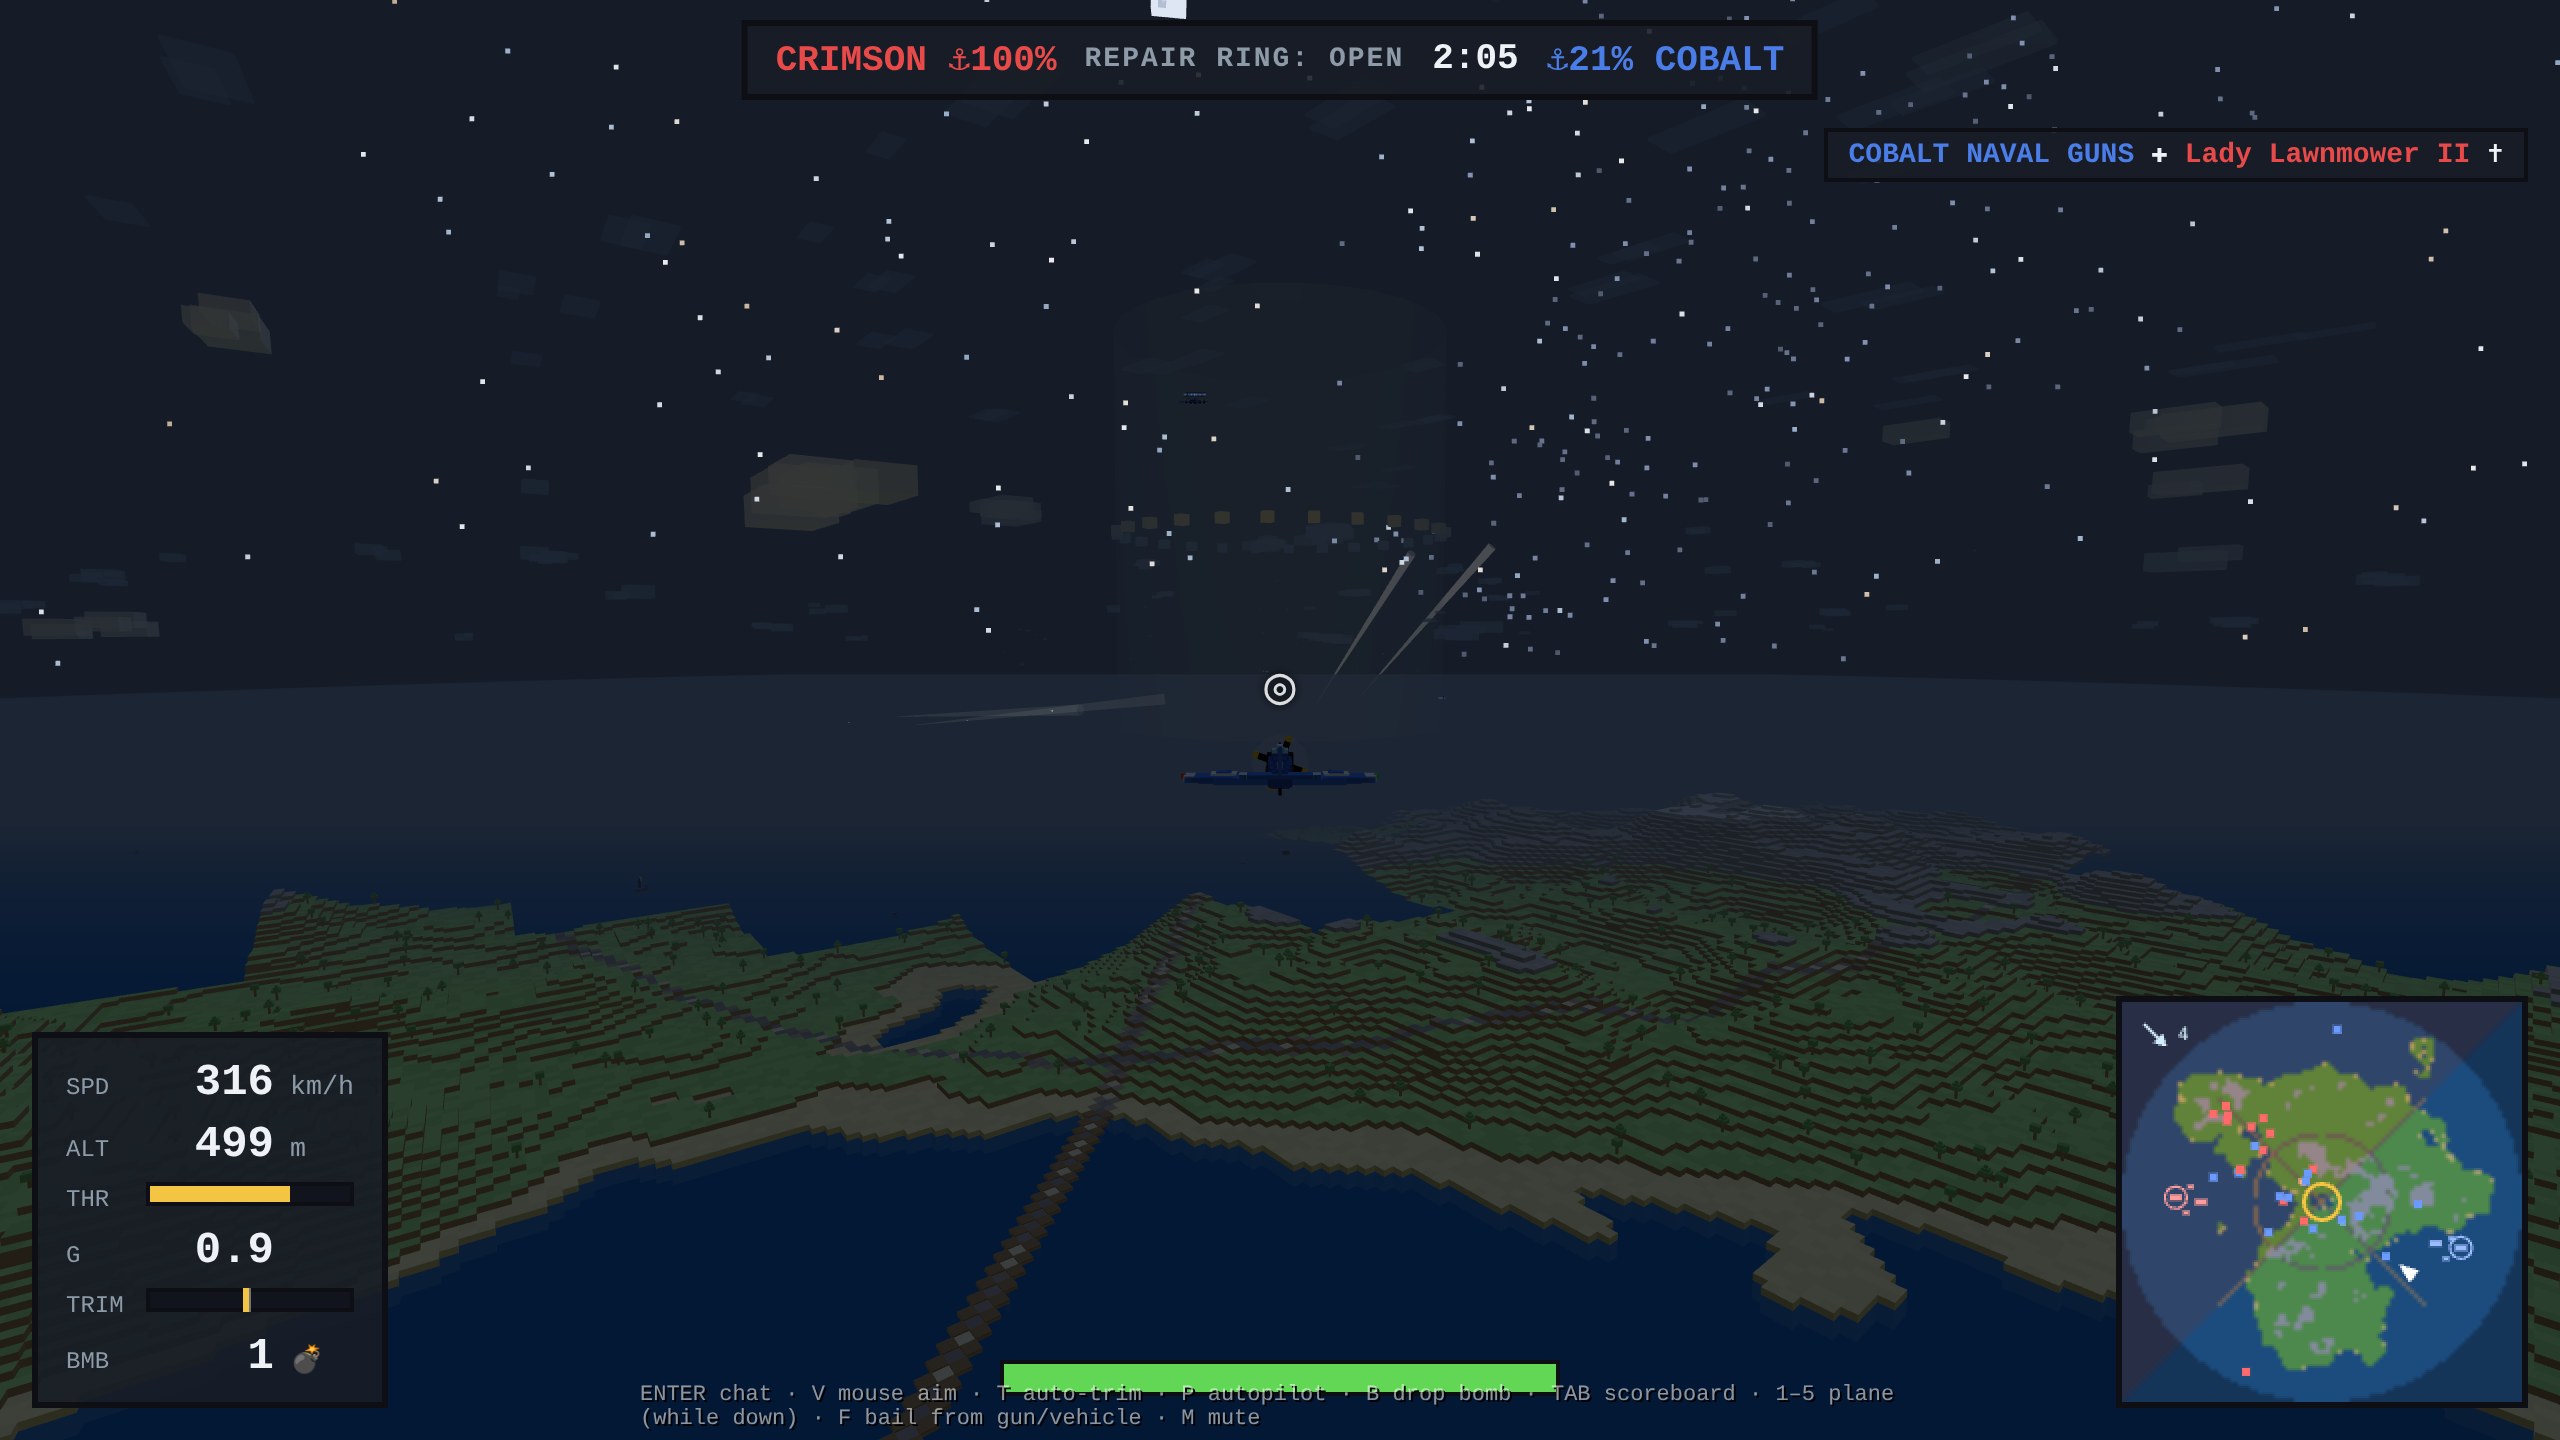
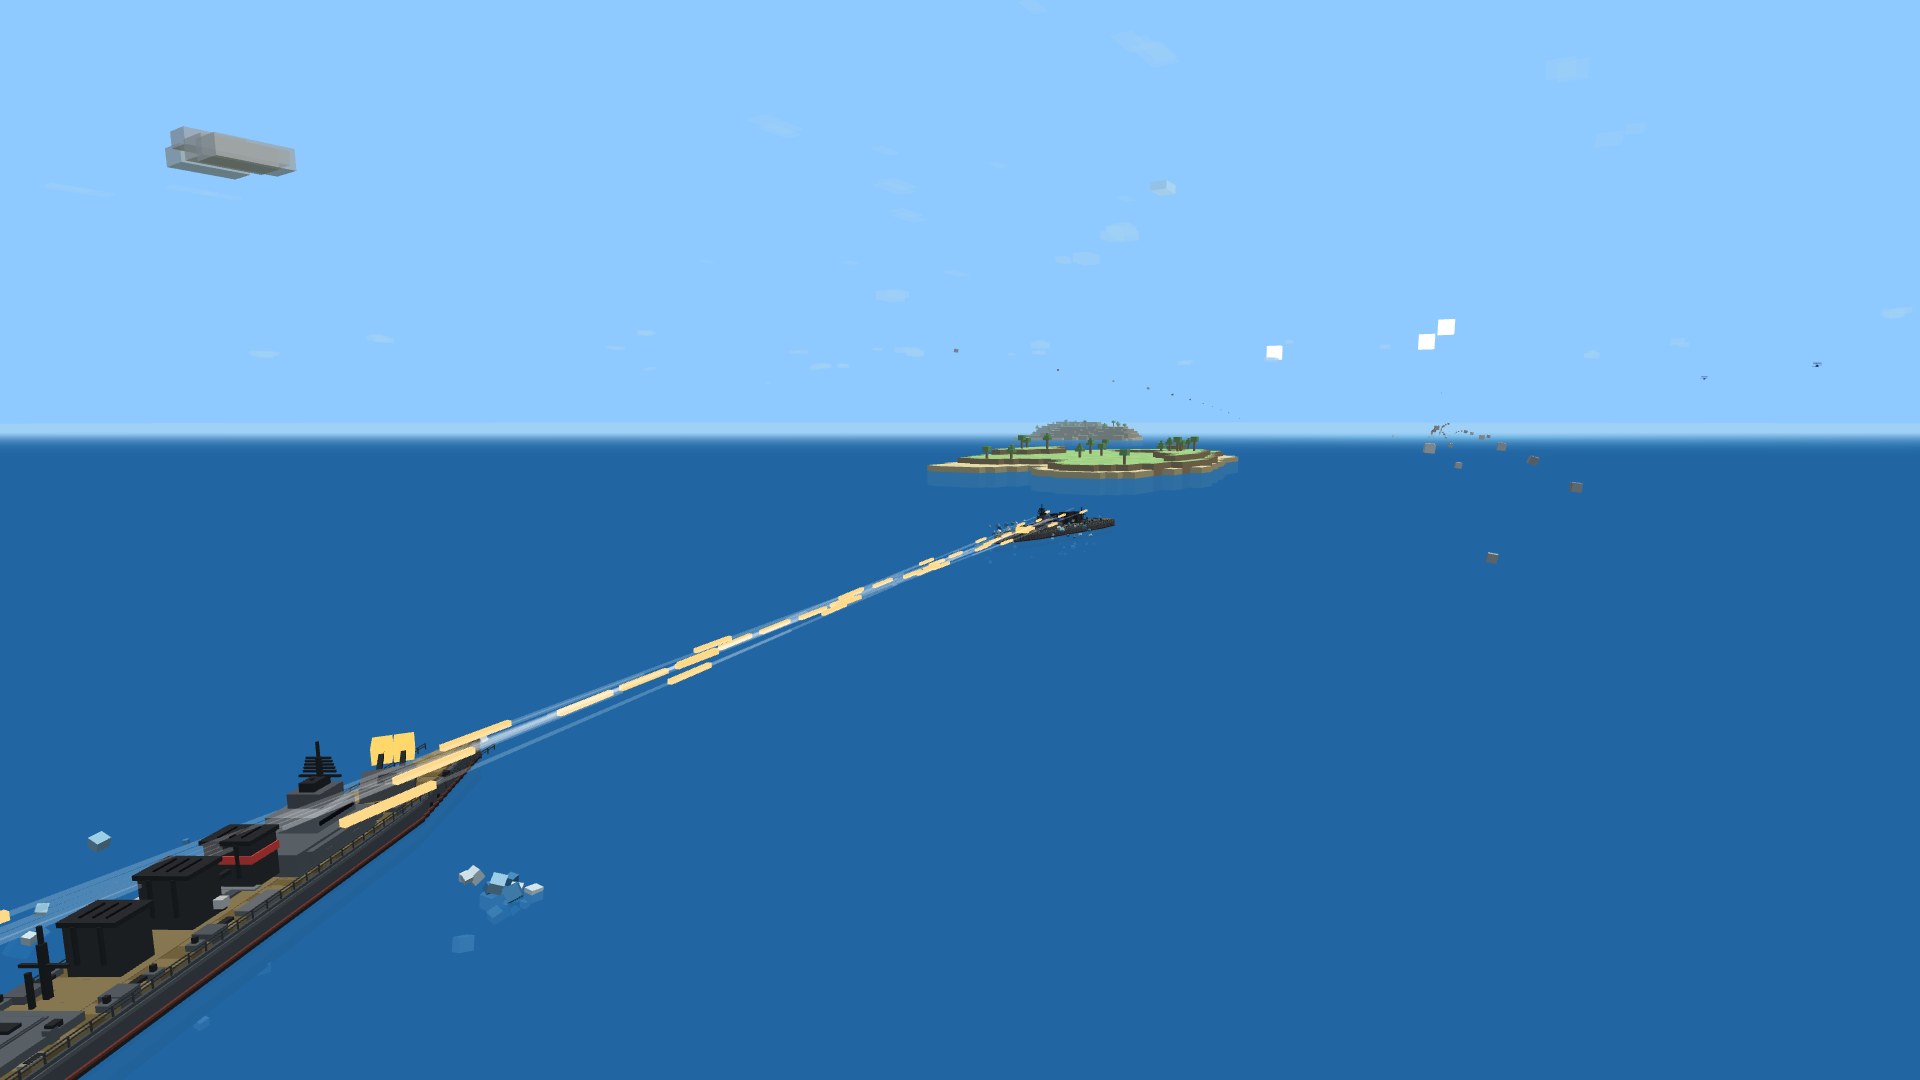
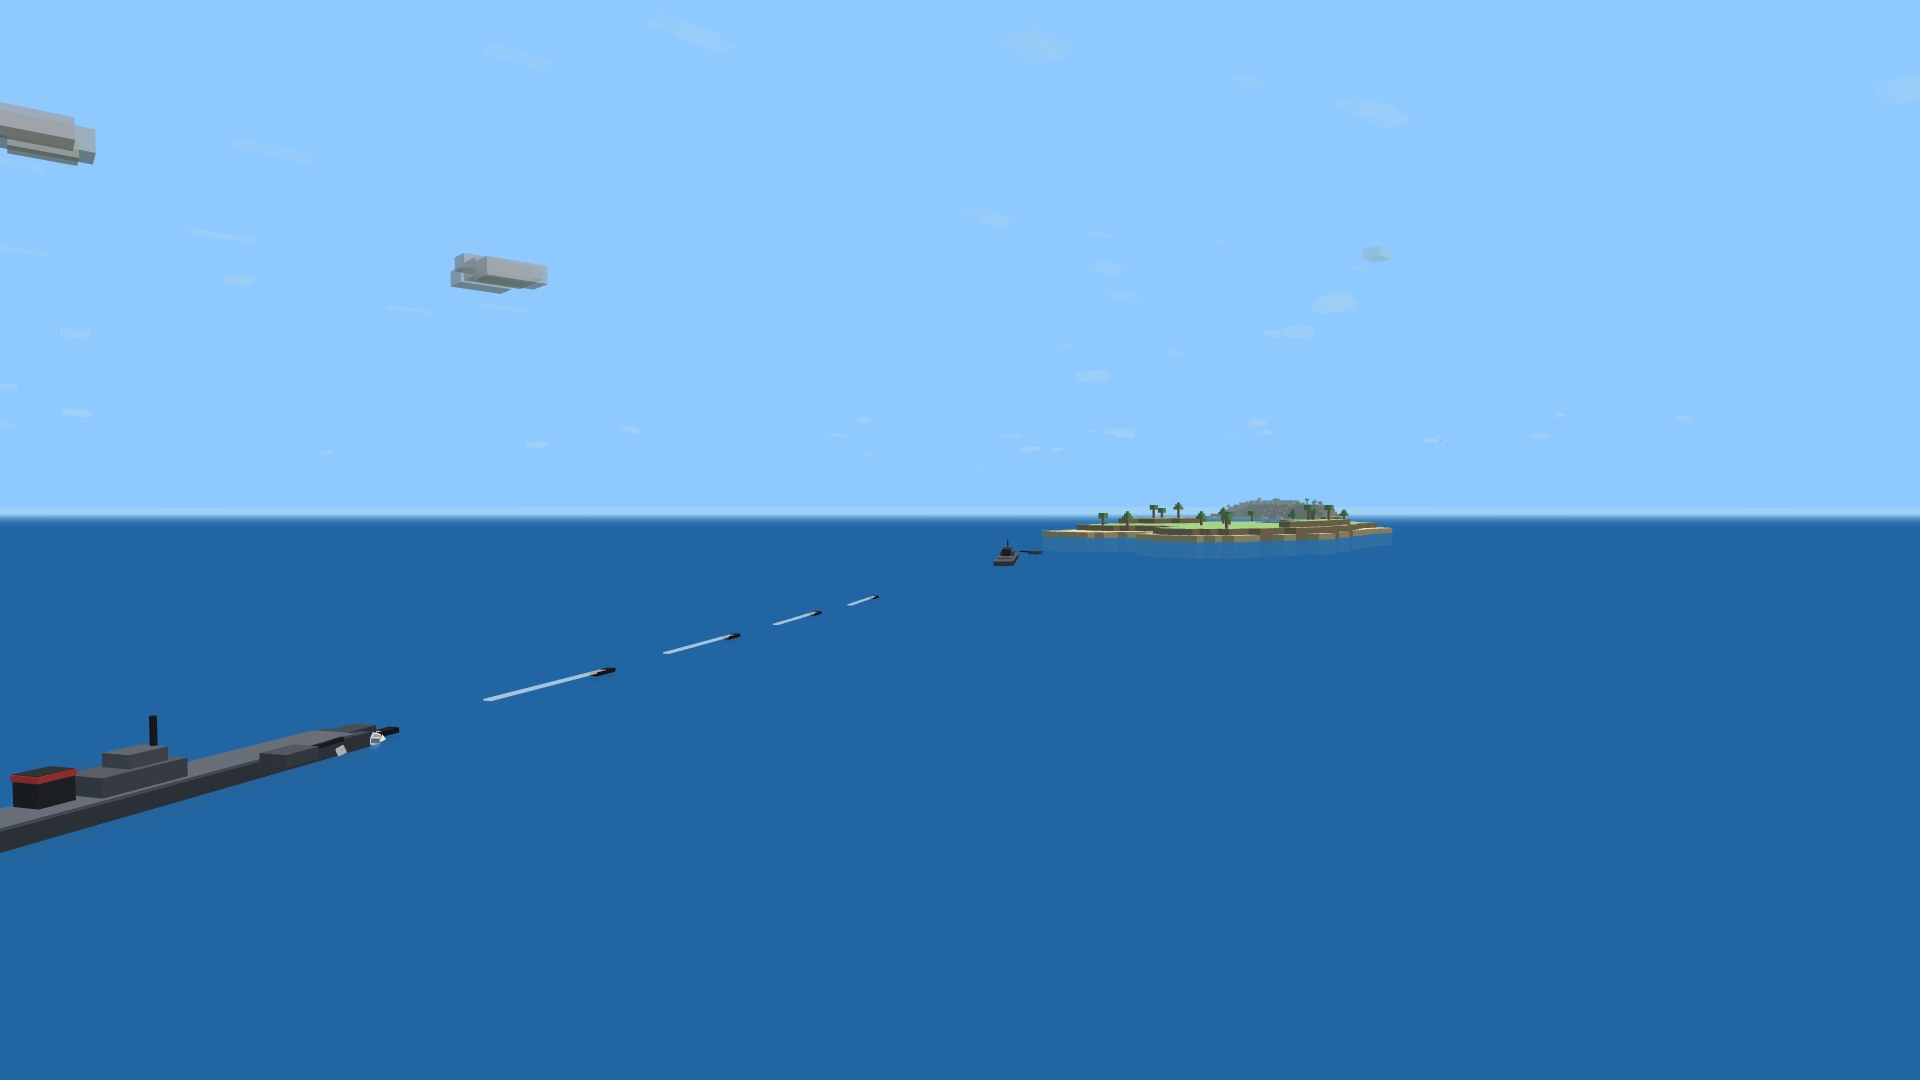
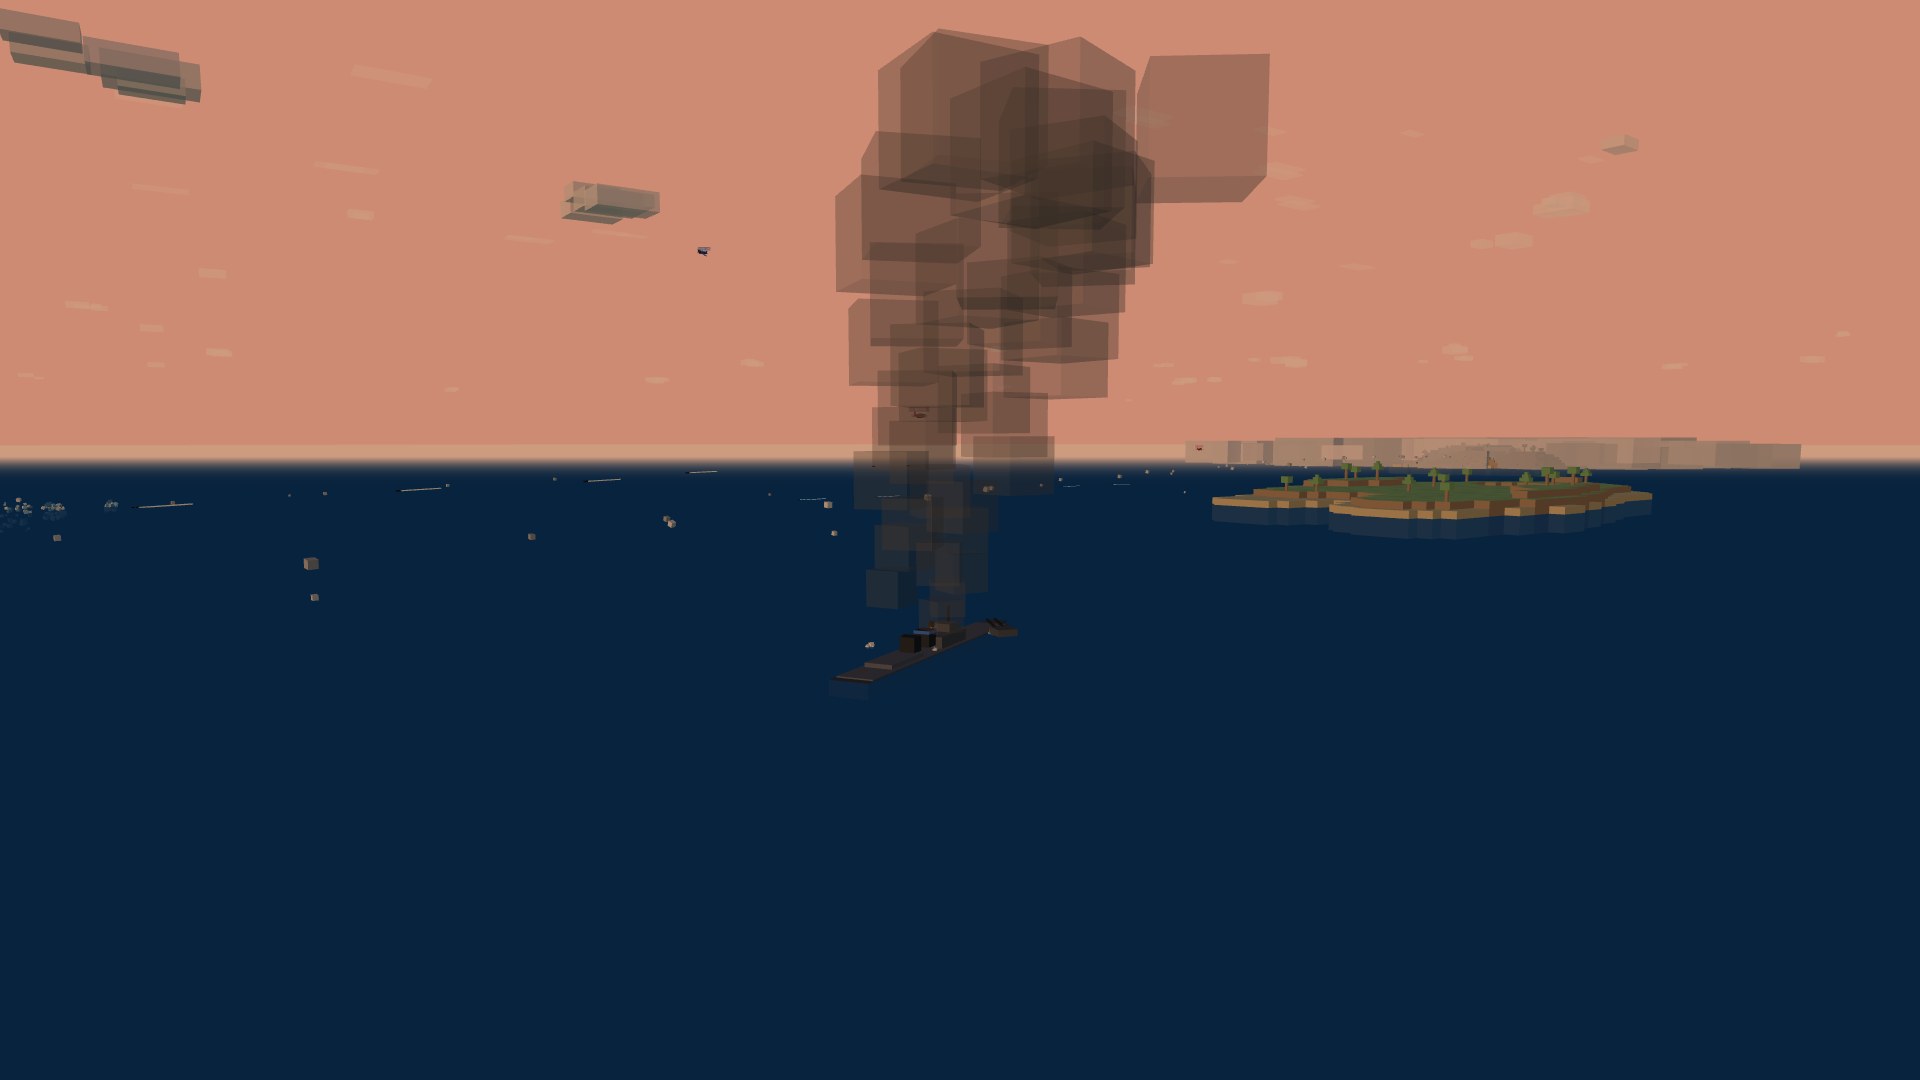
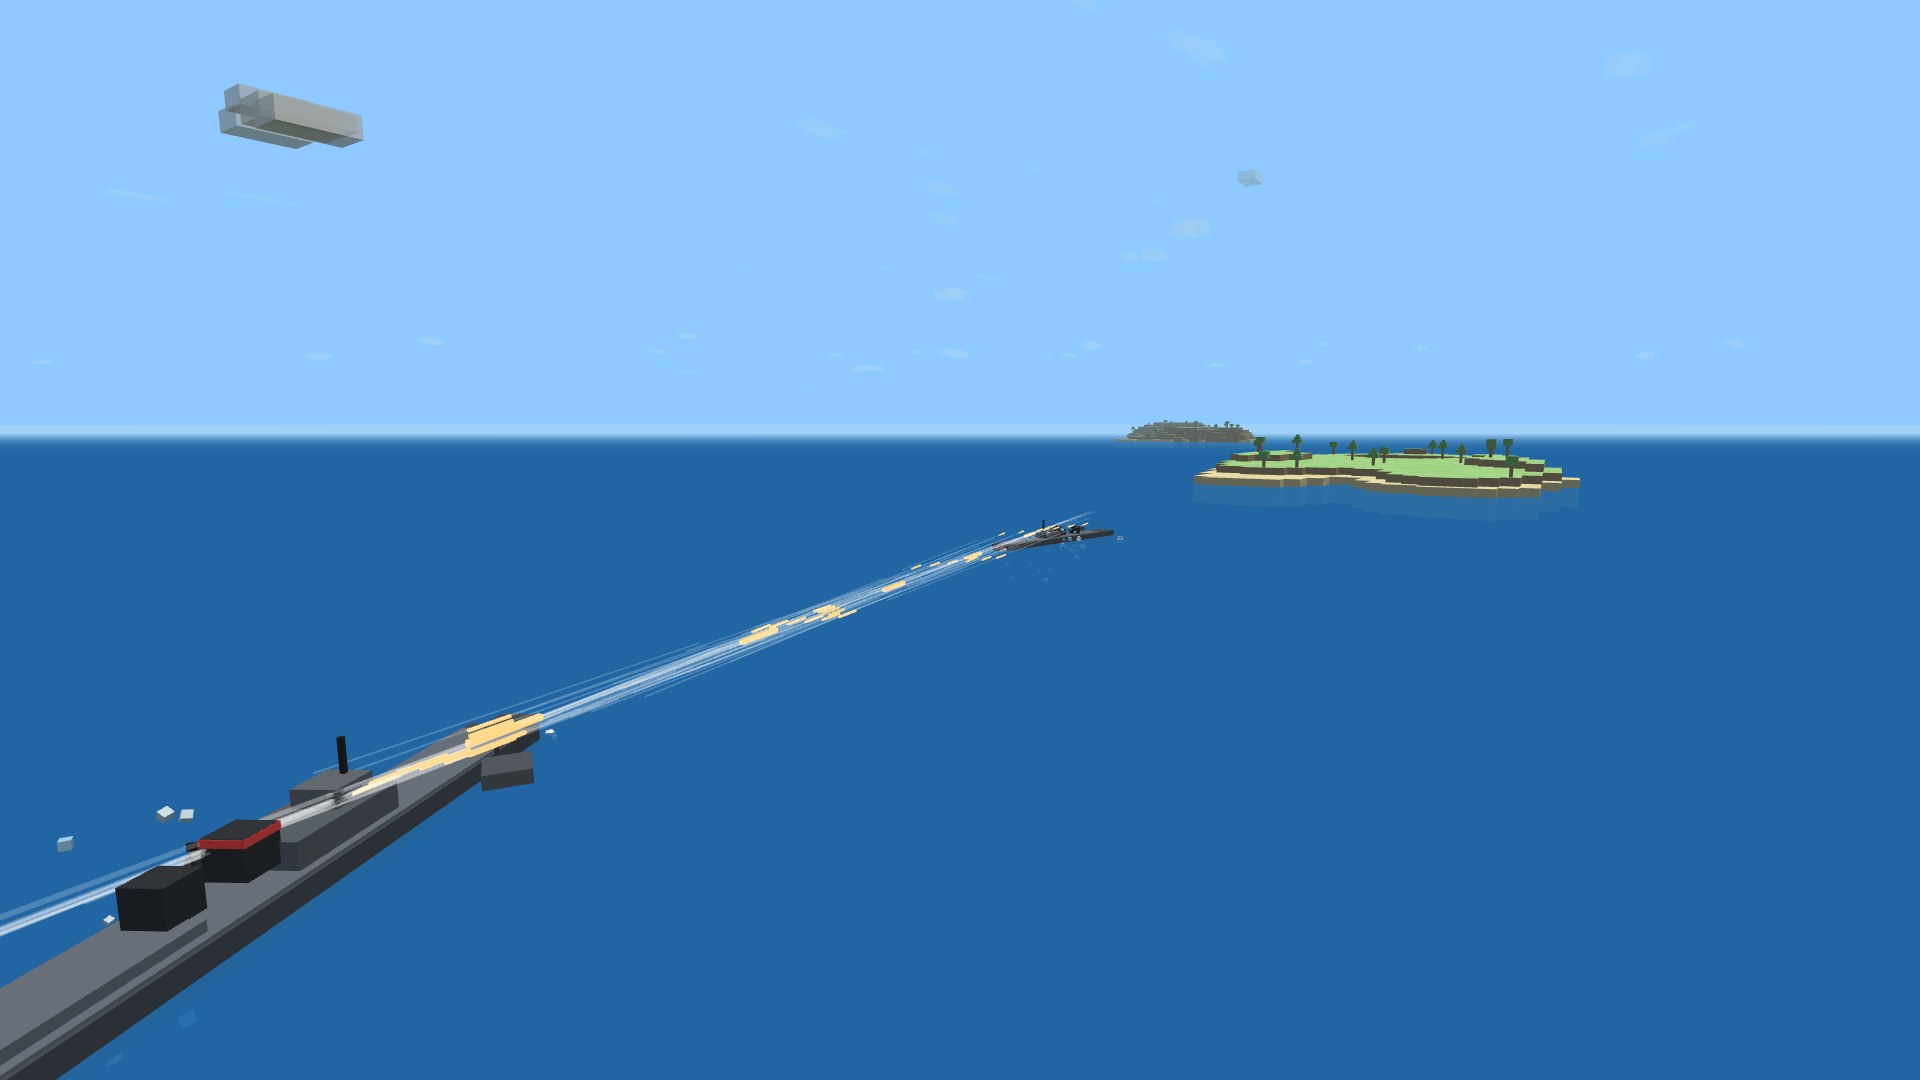
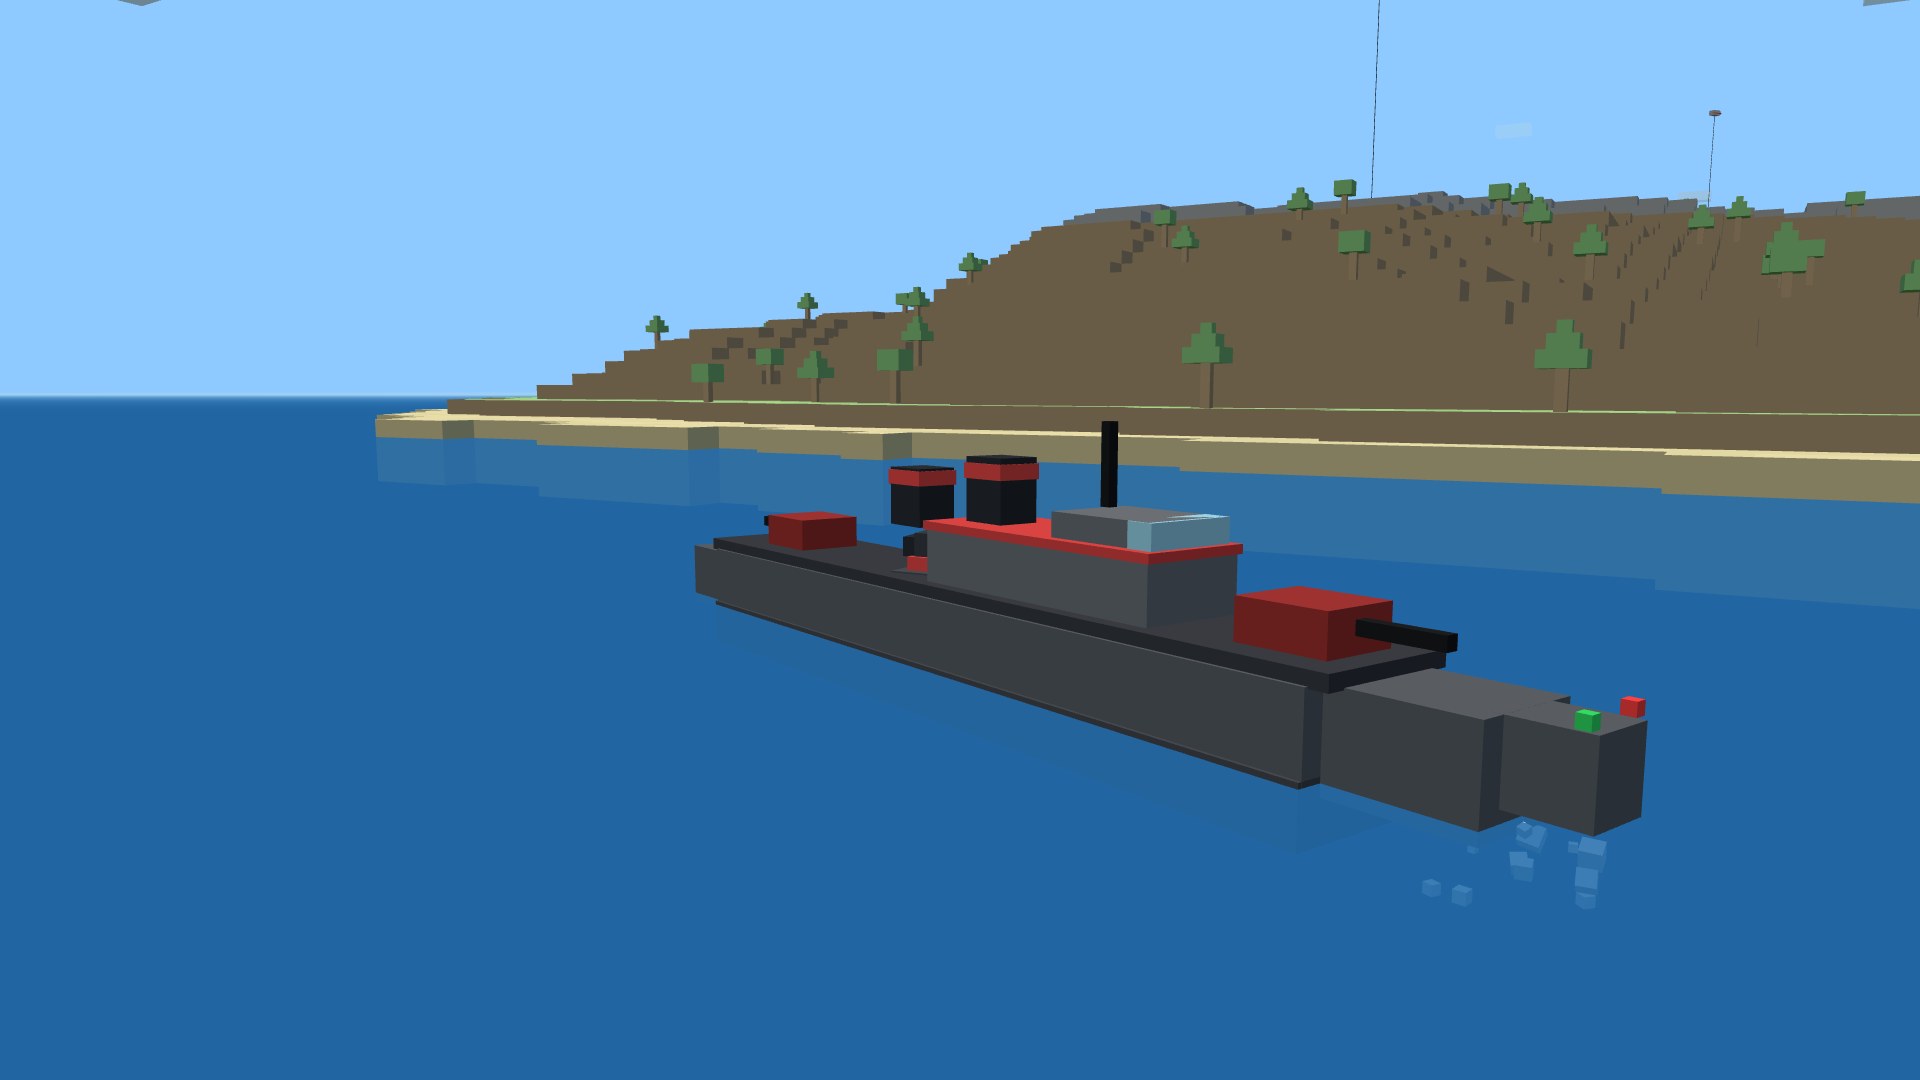
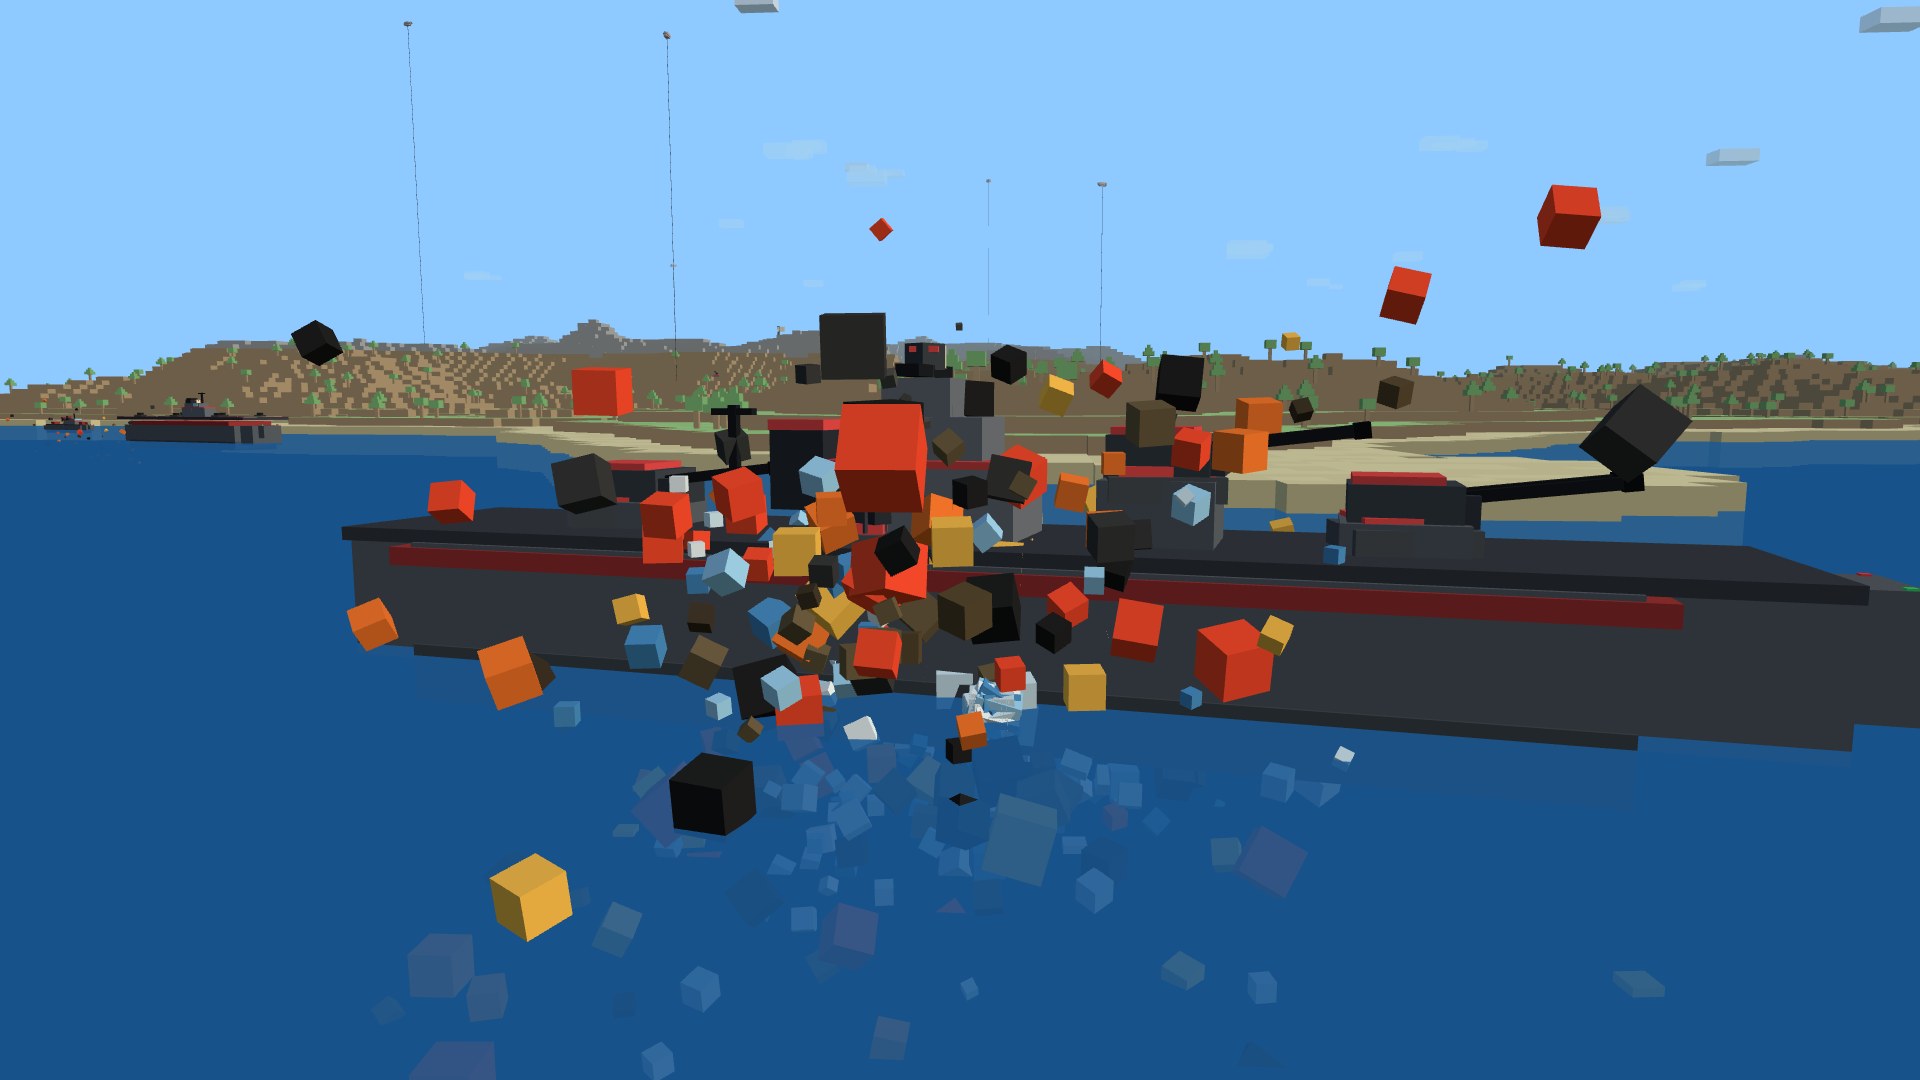
And they fight like ships. The main battery loads armor-piercing or high-explosive (swap with a key), and the choice is the whole duel: AP has to beat the target's belt armor to penetrate, and a hit on the citadel amidships is devastating — but AP shatters on armor it can't crack and over-penetrates a thin destroyer, so you load HE to start fires instead. Fires and flooding then bleed the hull until you spend your damage-control party to put them out — on a long cooldown, so timing it is its own decision. Two more consumables ride alongside: a repair party (T) that heals the hull back over a few seconds, and an engine boost (G) for a burst of flank speed to close, kite, or run from a torpedo spread — each on its own cooldown, so a captain is always juggling when to spend them. The destroyer also carries torpedoes (press B): a fan of fish that run dead straight and flood a hull they hit, so closing the range is a real threat. An AI warship patrol puts to sea on each side and fights as a fleet, not a loose mob: the hulls form into a division around their heaviest ship as flagship — the cruisers and battleship in the line, the destroyers thrown out ahead as a screen. They thread the islands to make for the capture zone together, concentrate fire on the one target the flagship picks, and fight to each class's strength: the battleship standing off at long range, the destroyers boring in to torpedo water and laying smoke to cover a hard-pressed heavy. Every captain has their own gunnery skill, so a division is no wall of identical marksmen — and a hull that's badly hurt slips behind an island to break contact, repairs, and rejoins the line.

An AI division steaming in line across open sea between two islands: several warships strung out in formation, the destroyer screen leading and the heavier ships trailing in the line, main-battery splashes bracketing a target mid-frame
Fleet doctrine. An AI division underway — the destroyer screen out ahead, the cruisers and battleship in the line astern, all making for the cap together and concentrating fire as they go.

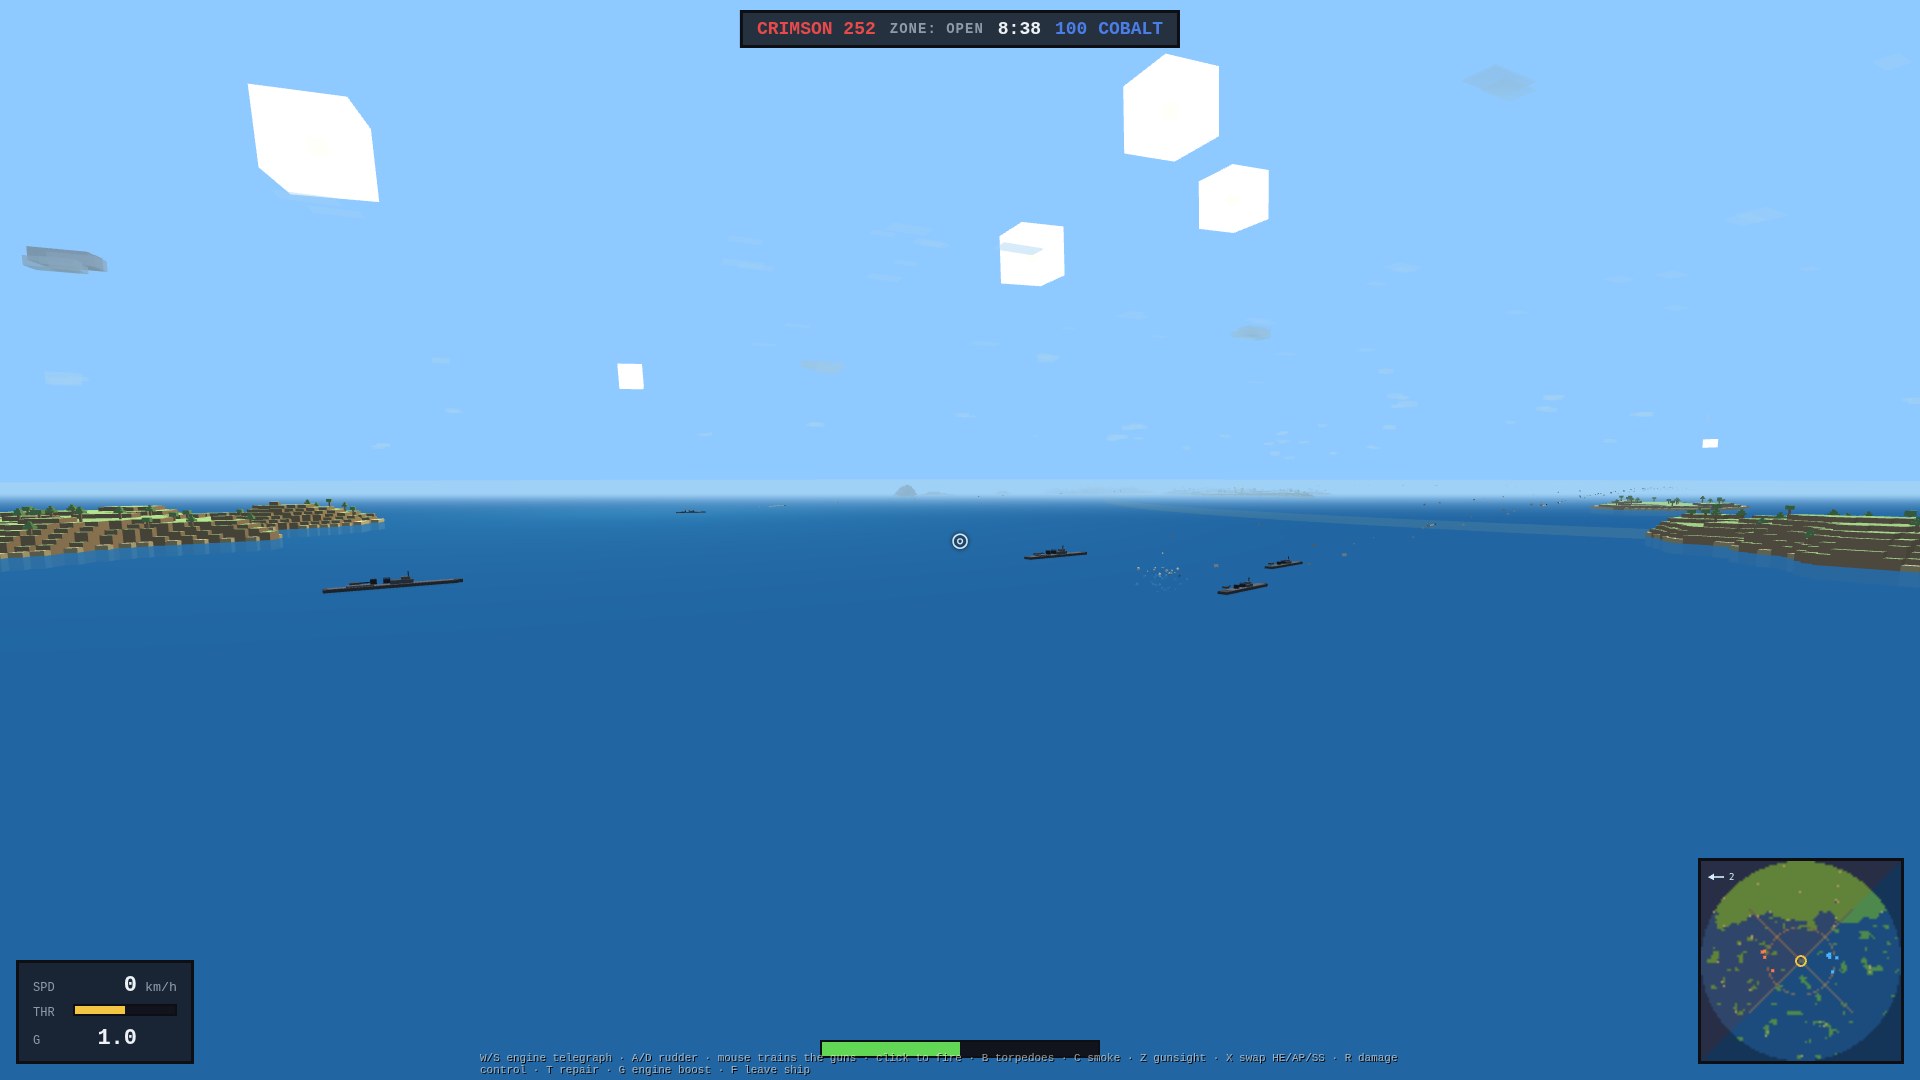
And it isn't only about sinking. Three capture zones — rings of gold light laid flat on the open sea, a contested one at the centre with a flank zone north and south of it — score points for whoever holds them: park a hull inside with no enemy contesting and the points tick your way, and holding more zones ticks faster, so a team can win on map control as well as kills. This is domination, and it forces a fleet to split — you can't hold the whole map with one massed line, so the destroyers race out to the flanks to grab and garrison those caps while the heavies fight for the centre. Each ring glows your colour when you hold it, the enemy's when they do, and gold when it's neutral or contested; the zones spread north–south so neither side has a nearer cap. A ZONES readout on the HUD counts who holds how many, the minimap rings show the whole picture at a glance, and a callout fires the moment a zone changes hands.

Three wide capture-zone rings spread across the open sea, coloured by who holds them — a red ring to the north, a gold contested ring at the centre, and a blue ring to the south — with warships fighting over them among scattered islands
Domination. Three capture zones strung north–south — here Crimson holds the north ring (red), the centre is contested (gold), and Cobalt holds the south (blue). Hold more than the enemy and the score runs your way.
A wide ring of red light laid flat on the open sea marking a capture zone, islands inside it, with a crimson cruiser holding the line and a cobalt cruiser crossing in to contest it
Holding a cap. Hold a ring to score — here Crimson holds (red) while Cobalt crosses the line to contest. Islands inside the zone are cover to fight around.
A warship's view on the open sea, the HUD's ZONES chip counting how many capture zones each side holds and the minimap showing the three zone rings
Reading the caps. The HUD's ZONES chip counts who holds how many, the minimap rings track all three at once, and a callout fires as a zone changes hands.
A blocky destroyer firing its main battery across open water, a shell trail leaving the guns and high-explosive rounds bursting on the target ahead
Steel rain. The main battery at work — a shell streaking off the guns and HE bursting where it lands.
The naval binocular gunsight: a magnified vignetted view of the sea horizon with a long horizontal lead scale of notched ticks, the gold dispersion ellipse riding the water at the aim point, the rangefinder reading RNG 5.2 km AUTO, and enemy silhouettes with shell trails on the horizon
Lay the guns. The fight plays out across kilometres of open sea, so press Z for the binocular gunsight — a spotter's-vantage view at 7° magnification with a World-of-Warships-style horizontal lead scale: notched ticks where one numbered unit is a hull's travel over one shell flight. The vertical axis is a range dial (the guns auto-range, snapping to a hull when the sight crosses one), and the gold dispersion ellipse rides the water at the exact point your salvo will land — walk it to the horizon and the guns lash out to maximum range (the readout flags MAX and the ring turns red), which is how you answer a ship shelling you from distance.
A battleship broadside-on with all three main turrets trained out at a distant enemy, a nine-shell salvo streaking across the sea toward a bow-on battleship that can only reply with her forward guns
Fight for the broadside. Turrets are real mounts with real firing arcs now: bow-on, your aft guns are masked behind the superstructure and only the forward pair fires — swing broadside and every turret trains out and joins the salvo. The HUD counts GUNS 4/6 under the sight so you always know your weight of fire, and the AI plays by the same arcs (and the same spotting rules — no more unseen fire from over the horizon).
A warship under engine boost on open water, its conning panel reading the loaded shell, smoke, repair party and engine boost active, and damage control ready
Consumables. The conning panel tracks them all — smoke, the repair party (T), the engine boost (G, “all ahead flank”), and the damage-control party (R), each on its own cooldown.
Two blocky cruisers trading broadsides across open water, salvos of main-battery shells streaking between them and one ship afire
Broadsides. Two cruisers settle into a gun duel — salvos crossing the water, splashes straddling the targets, one hull already burning.
A destroyer launching a fan of torpedoes across open sea, five parallel wakes streaking from her tubes toward a distant cruiser
Fish in the water. A destroyer swings broadside and looses a torpedo fan — five wakes running straight for a cruiser that has to comb them or flood.
A burning cruiser settled low in the water at dusk under a column of dark smoke, the sea and sky glowing gold
Going down. Fires and flooding win in the end — a cruiser settles by the head under a smoke column as the sun goes down.

It all fits in two thumbs. On a phone the naval HUD is laid out to stay out of its own way: the conning chips tuck into a compact block clear of the engine telegraph, the range readout, the DETECTED banner and fleet orders each get their own lane instead of stacking on top of each other, and the gunnery status drops into a quiet corner. Raise the gunsight and the range dial takes the top-right corner while the minimap steps aside — every control a labelled, thumb-sized target.

The naval theater on a phone in landscape: a compact conning panel of tappable chips at top-left, the loaded shell / torpedo / repair / boost / damage-control readouts, a DETECTED banner and RNG rangefinder stacked cleanly under the score bar, the binocular gunsight's lead scale across the sea, a range dial on the right edge, and thumb-sized ZOOM / BOMB / FIRE buttons bottom-right
Two thumbs at sea. The whole warship — drive, guns, gunsight, torpedoes and consumables — on a phone screen without the pile-up: readouts in their own lanes, chips you tap, and a range dial parked where the minimap was.

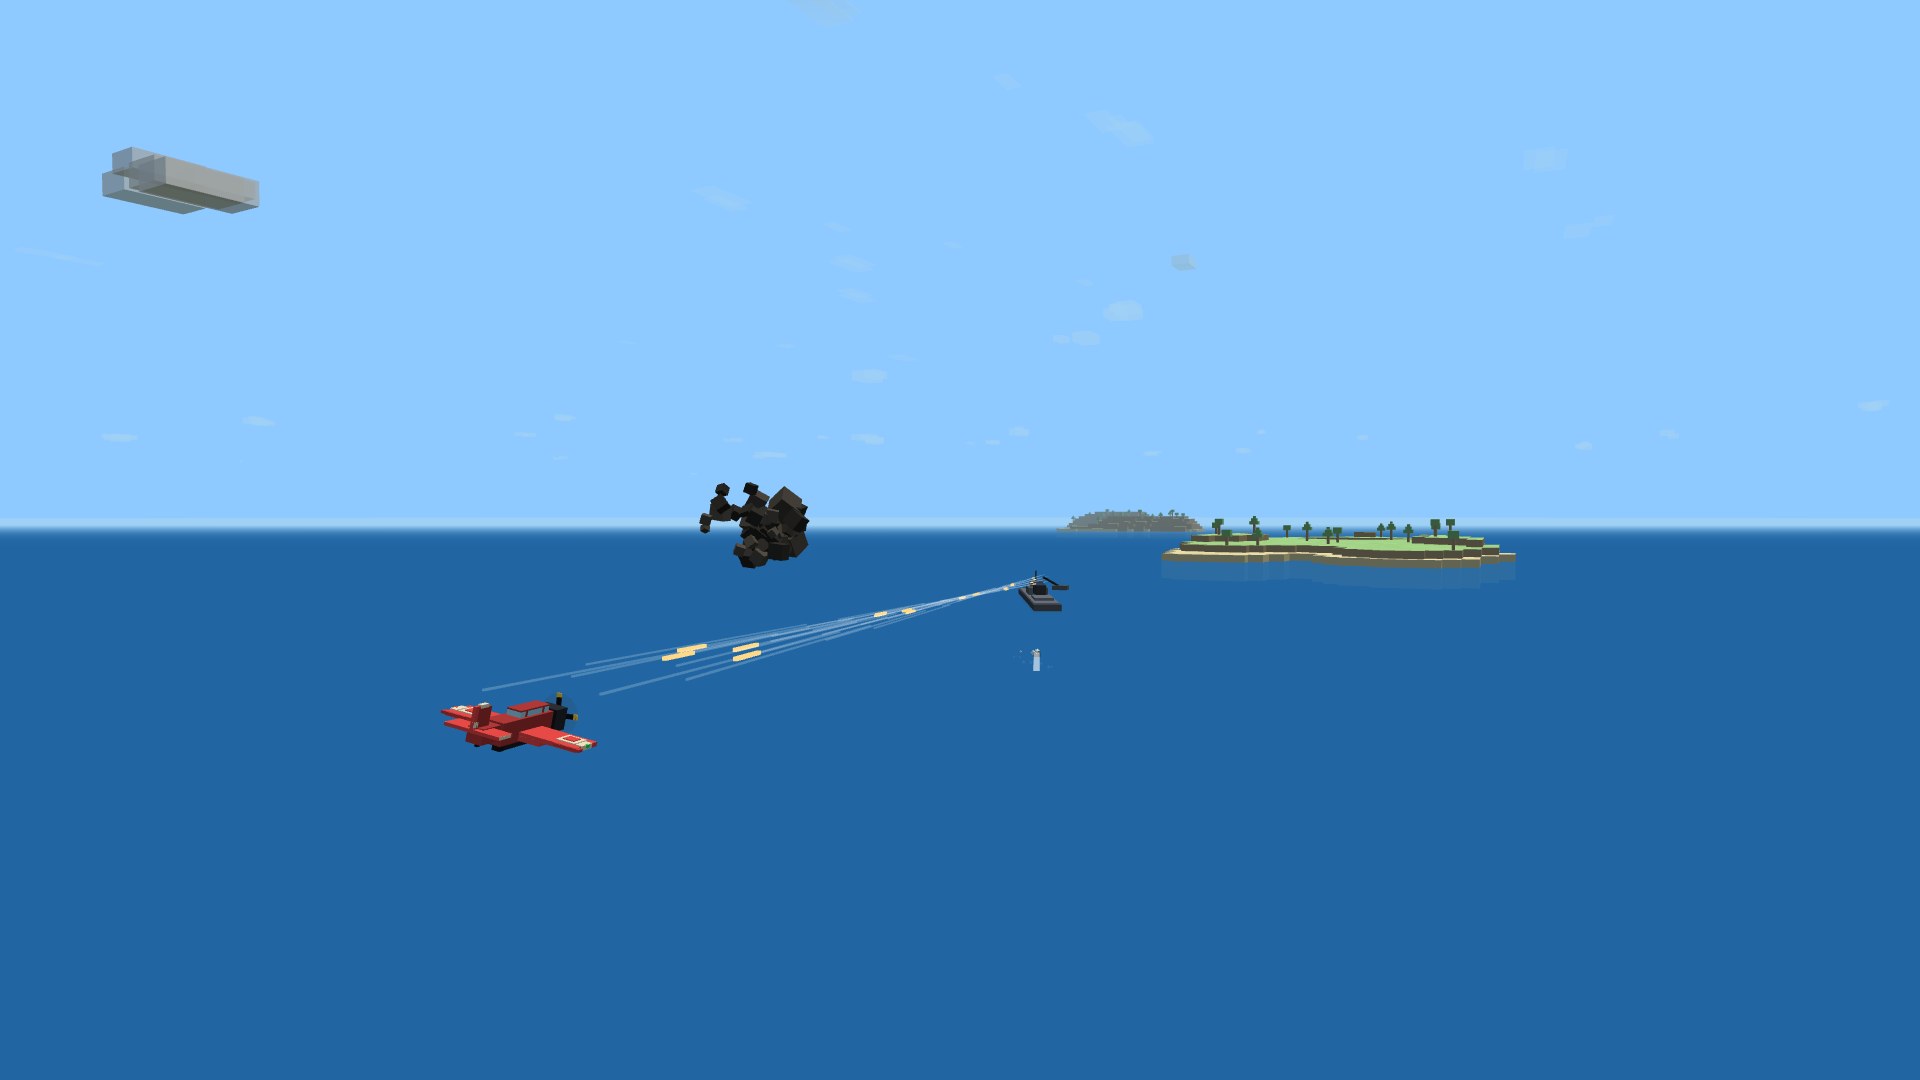
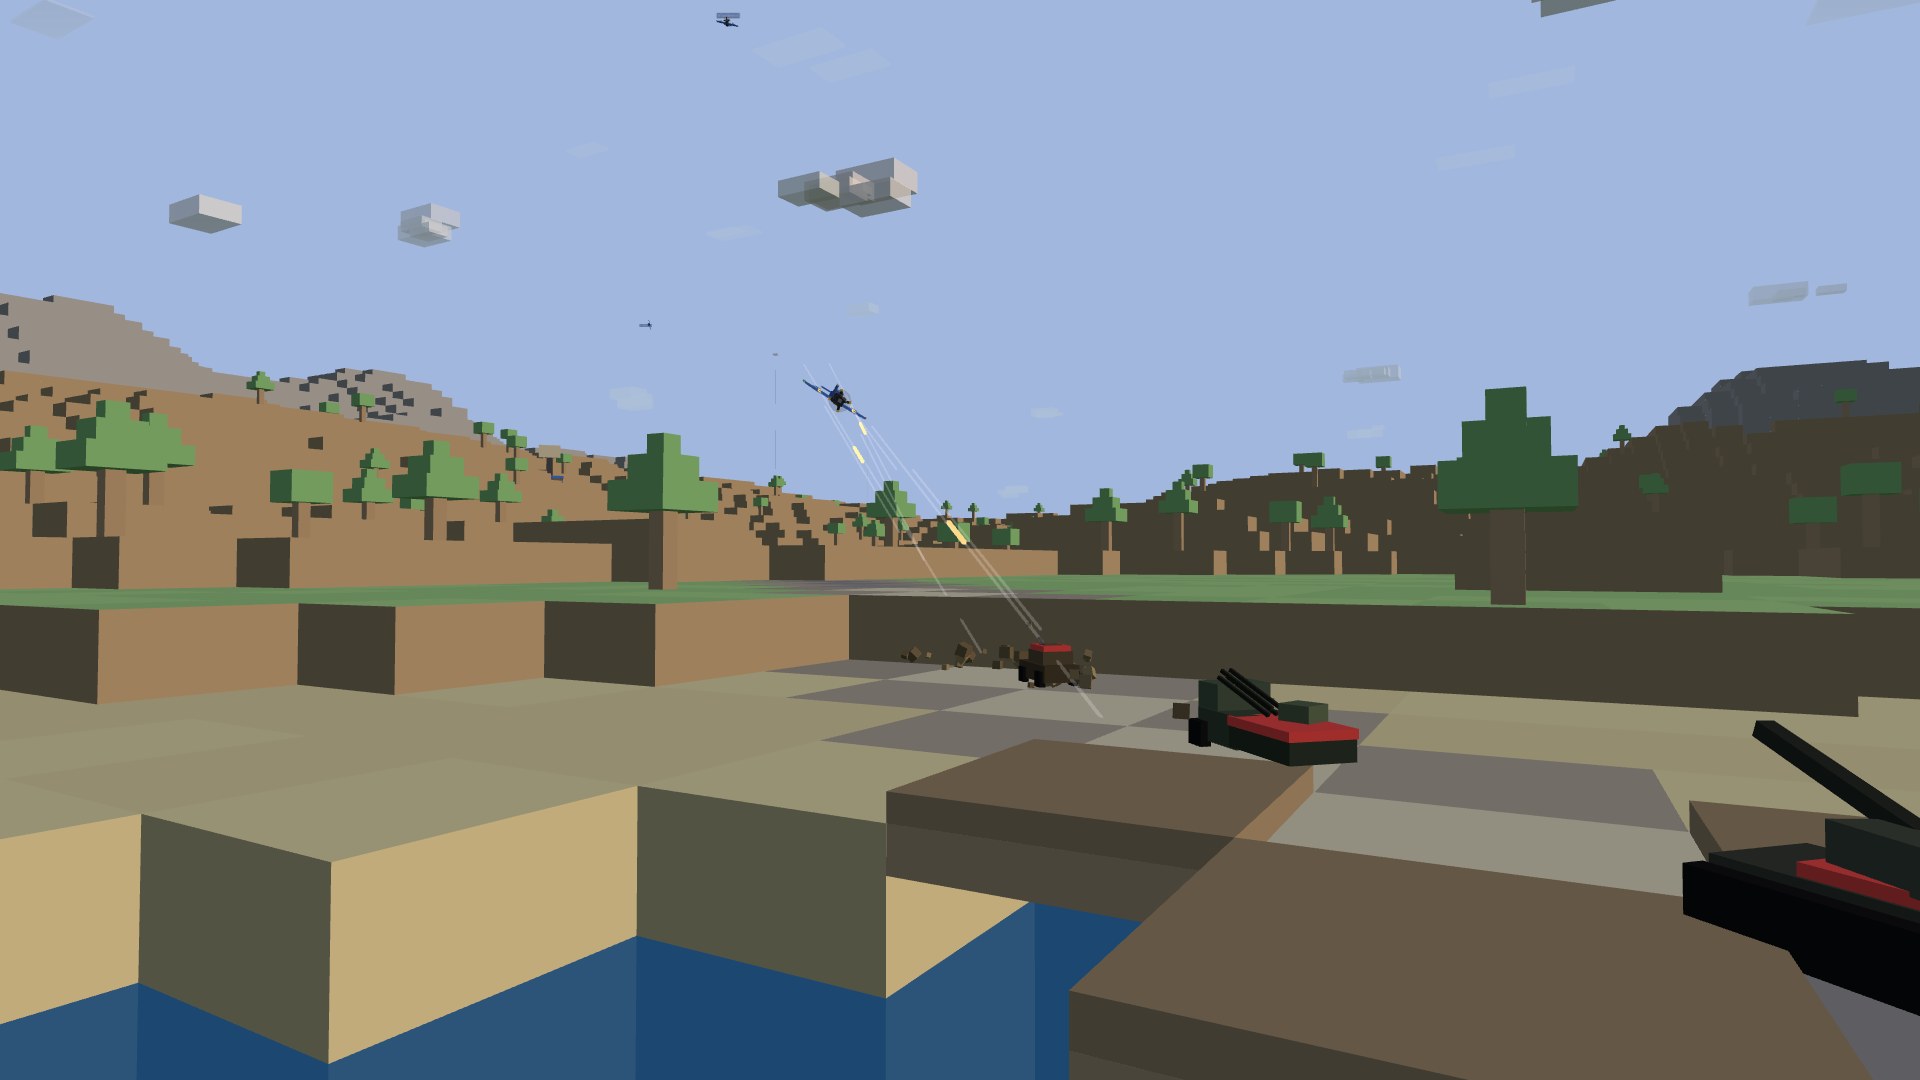
Not every gun is yours to aim. Around the main turrets, the crew works a secondary battery on its own — once an enemy ship closes inside range, it throws a hail of rapid-fire HE at it without you, each round with a chance to start a fire. It's shorter-ranged than the main guns, so it only speaks in a brawl: closing for the kill (or a torpedo run) means eating a stream of small shells the whole way in. Every hull also carries an anti-air battery — a twin flak mount that tracks and leads aircraft exactly like the airfield and battleship flak, standing ready for when the sea war gets planes of its own.

Two blocky warships circling at close range on open water, streams of small high-explosive shells crossing the gap between them as their secondary batteries open fire
Into the brawl. Inside secondary range the small guns open up on their own — a dense stream of HE between main salvos, the price of closing the distance.

And the sea has a sky over it. Each side keeps a wing of AI carrier torpedo bombers aloft: they hunt the nearest enemy hull, run in at wavetop height, and drop a fish that floods the ship it hits — so the threat isn't only on the surface. The run-in takes them straight down the throat of the ships' anti-air flak, which tracks and leads them and throws up bursting fire to break the attack: the guns finally have their targets, and a careless bomber doesn't come home.

A red torpedo bomber running in low over the sea toward a warship, the ship reaching back at it with streams of anti-air tracer fire and bursting flak, a torpedo already running in the water
Carrier air. A torpedo bomber bores in at wavetop height, its fish already in the water, while the warship's flak reaches up to break the run.

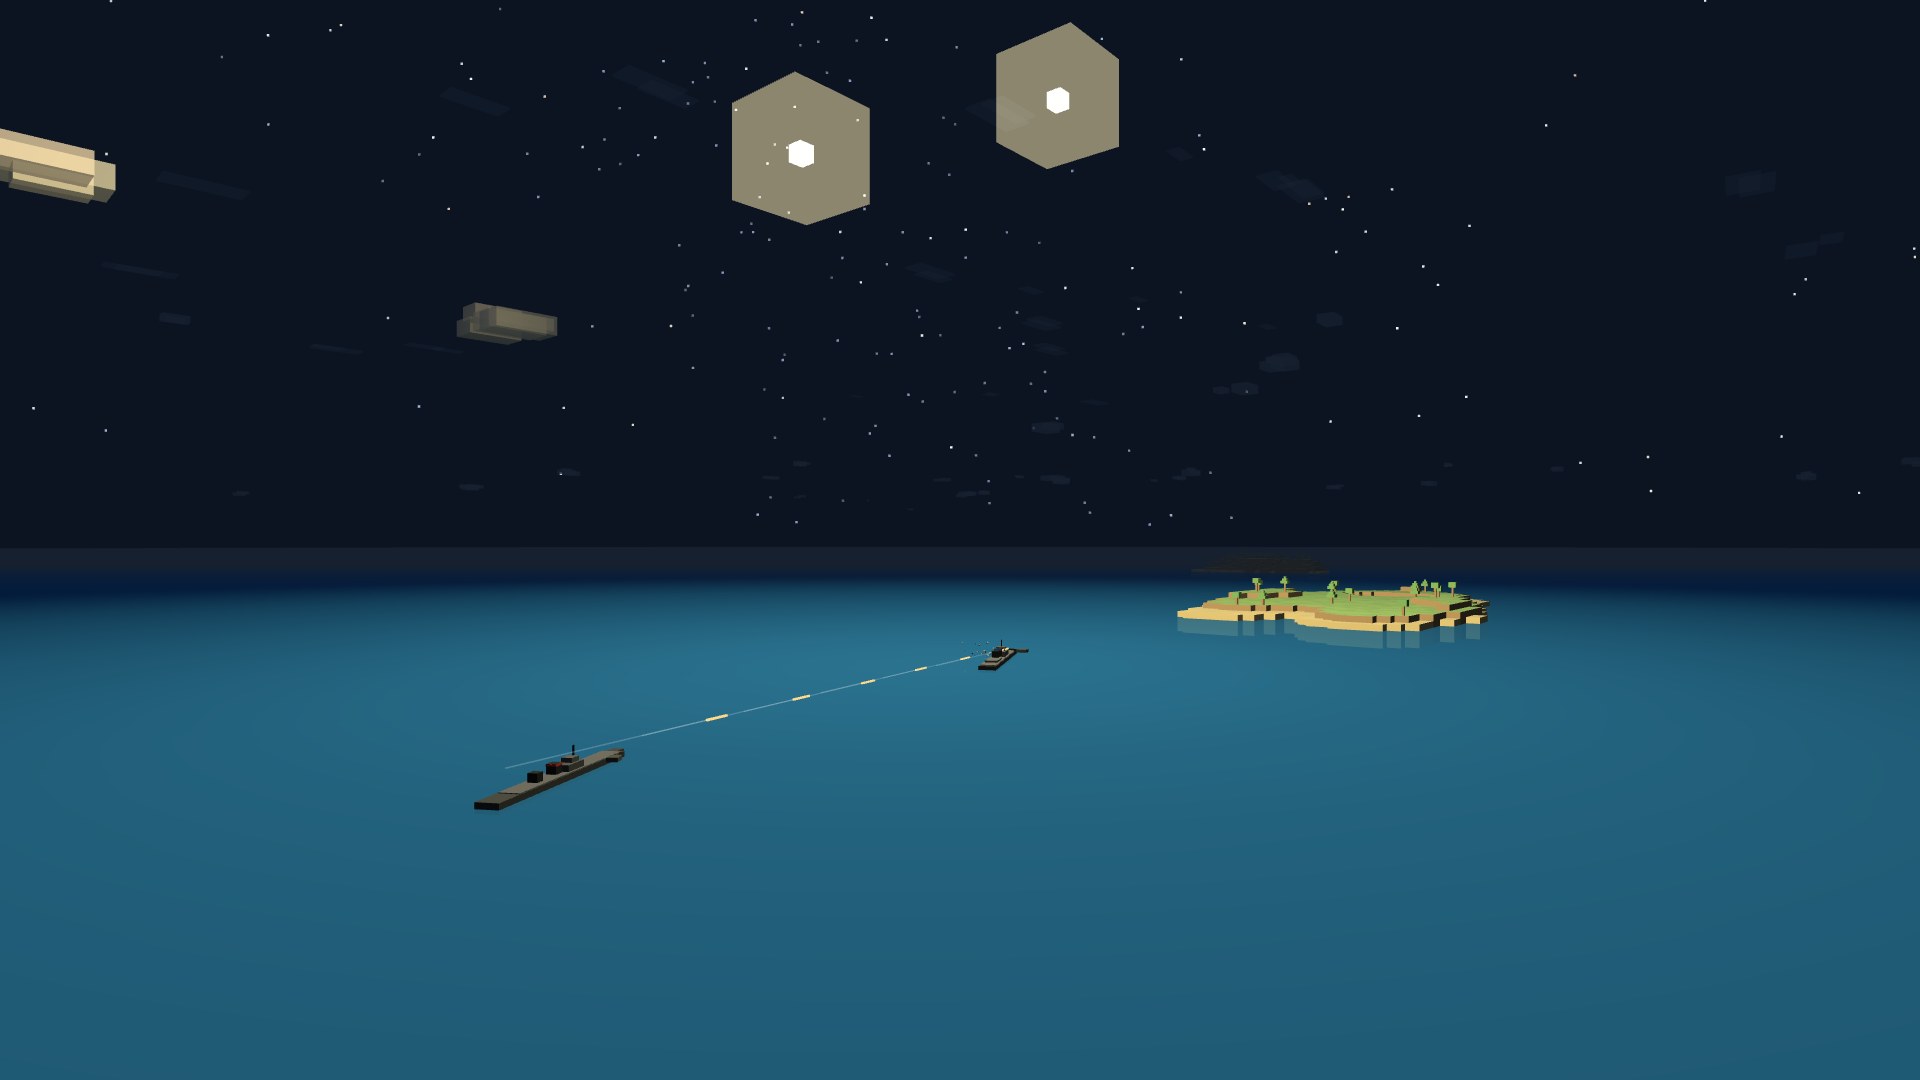
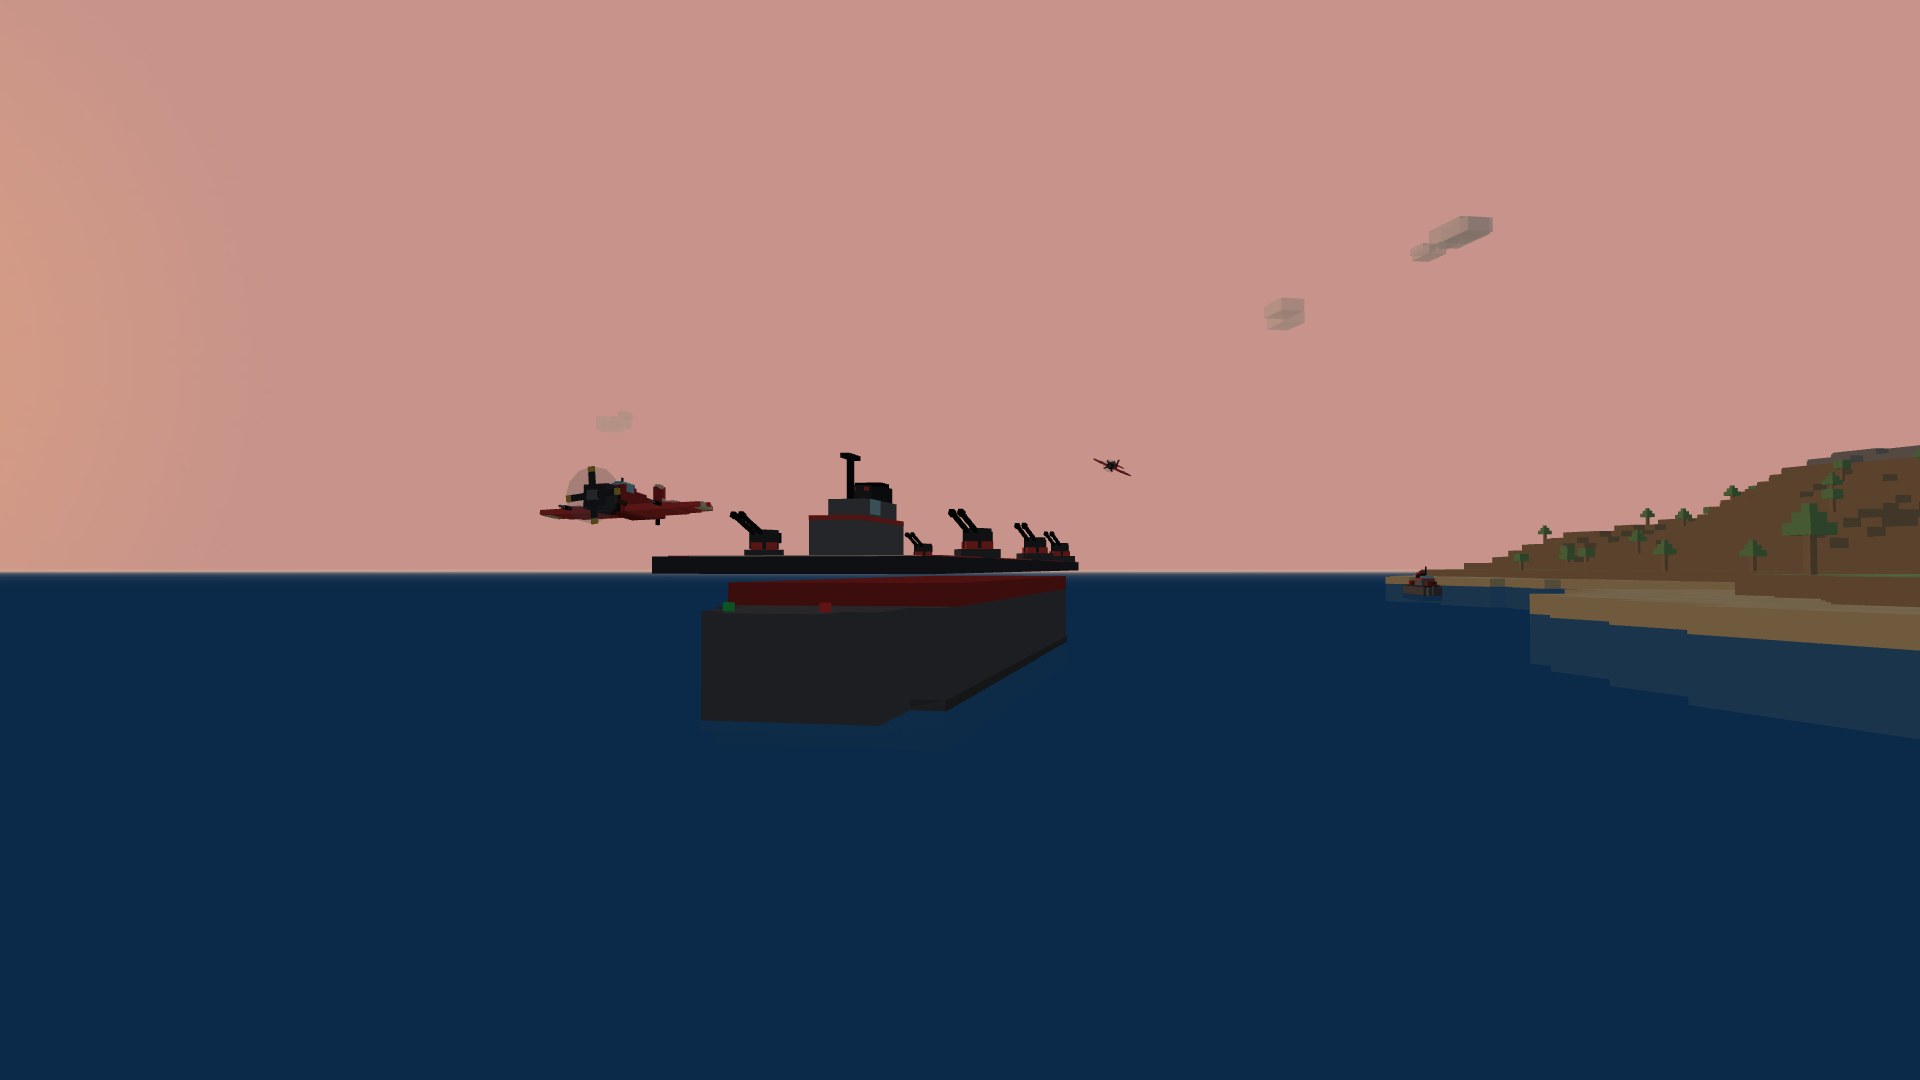
And the sea fights through the night. Battles run across kilometres, so when it's dark the warships loft star shells — illumination rounds that climb and burst into drifting flares, casting a pool of light over the water that lifts the enemy hulls out of the black. The AI fires them on its own once night falls, so the fight is always lit enough to lay your guns.

Two star-shell flares hanging in the night sky over the open sea, their light pooling across the water and lifting two warships out of the dark as one fires on the other
Star shells. Illumination rounds hang over the night sea, their light pooling across the water so the fleets can fight in the dark.

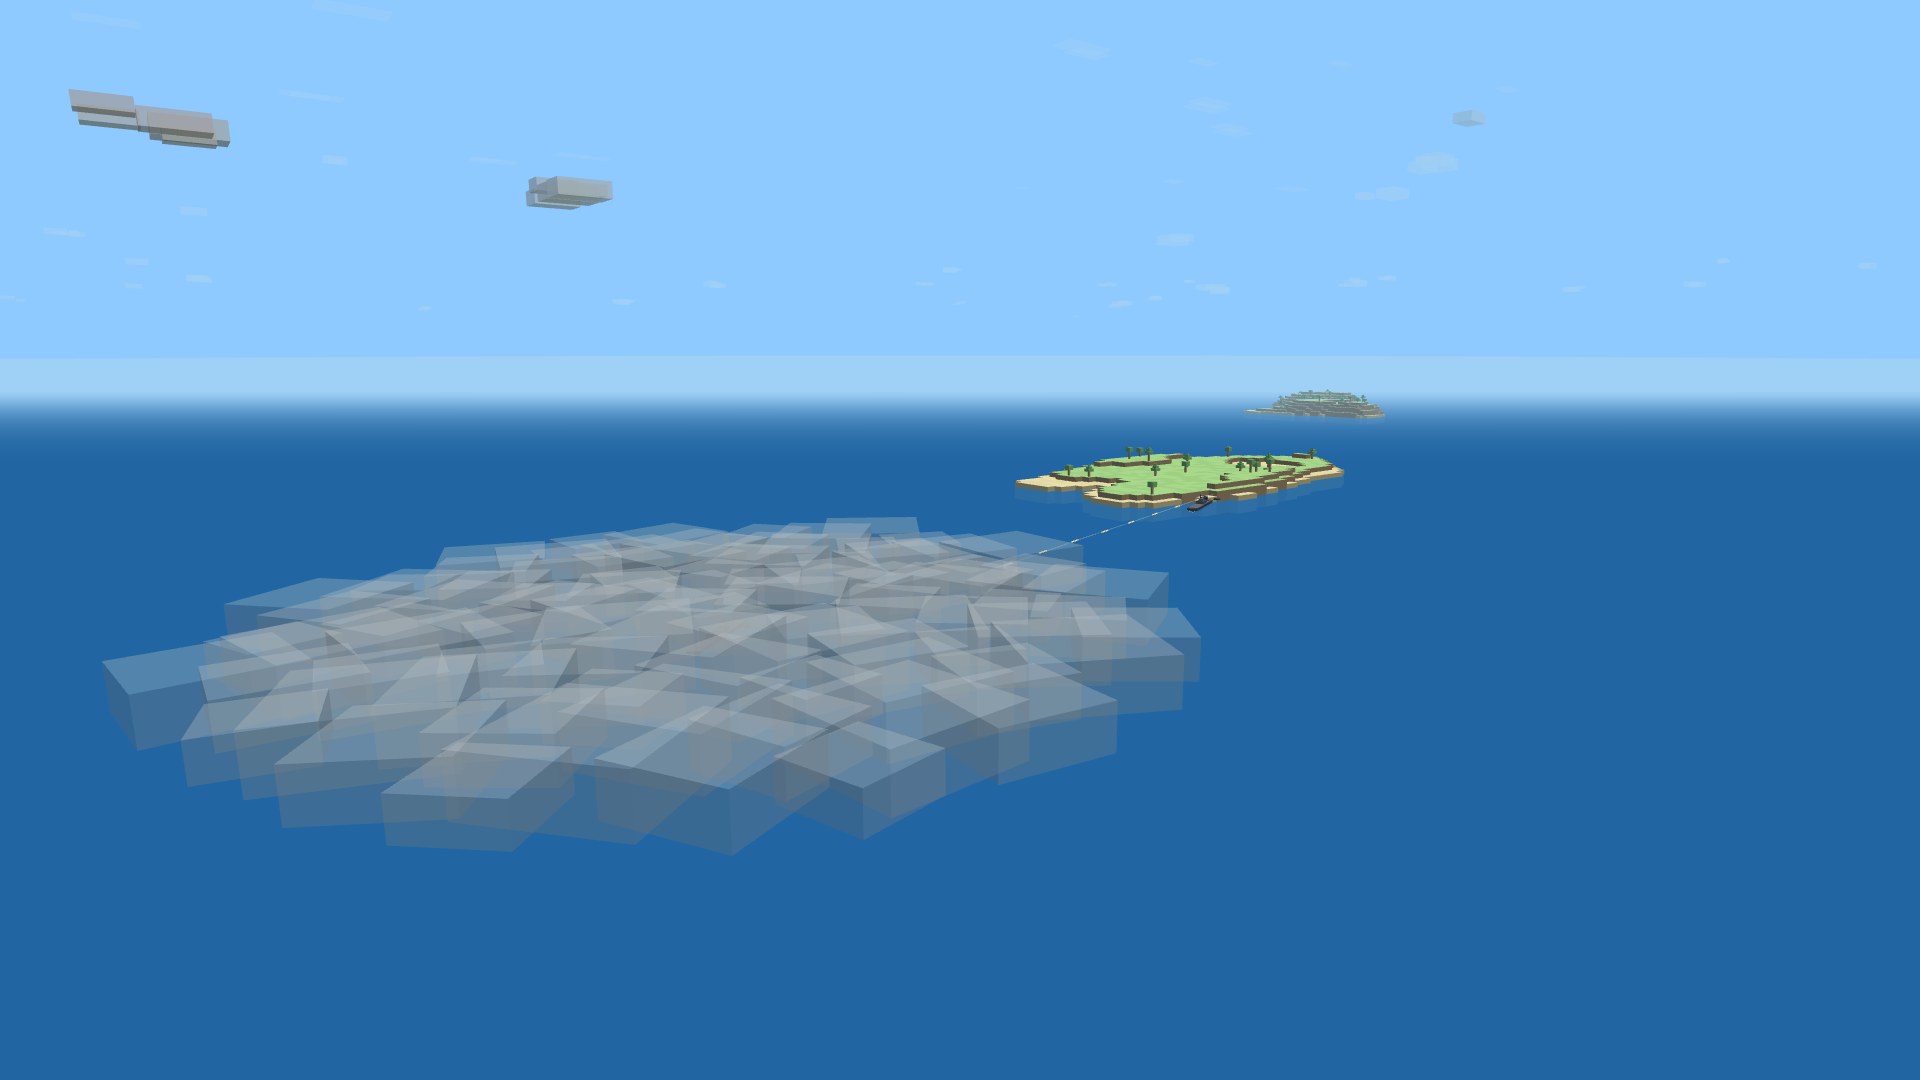
And the sea keeps secrets. A ship is hidden beyond its spotting range — a destroyer slips far closer than a cruiser before anyone sees it — until it opens fire (the muzzle bloom gives you away), a star shell lights it, or an enemy closes in. And the islands are cover now: terrain breaks the sightline, so a hull tucked behind an island is hidden from anyone on the far side — duck behind one to slip a lock or set an ambush. Caught in the open? Press C to lay a smoke screen and vanish into the bank, shooting from cover while spotters do the seeing. It's the game of ambush and nerve that makes a sea fight a sea fight.

Two warships on opposite sides of a wooded island on the open sea — a destroyer to one side and a cruiser to the other, the island's high ground breaking the line of sight between them
Island cover. The island breaks the sightline — the destroyer on the near side has slipped behind it, hidden from the cruiser searching on the far side.
A low bank of grey smoke spread across the blue sea, a warship standing off to one side firing into it while another hides within
Smoke & concealment. A destroyer vanishes into a smoke screen while the cruiser shells its last-known position blind.

The fight

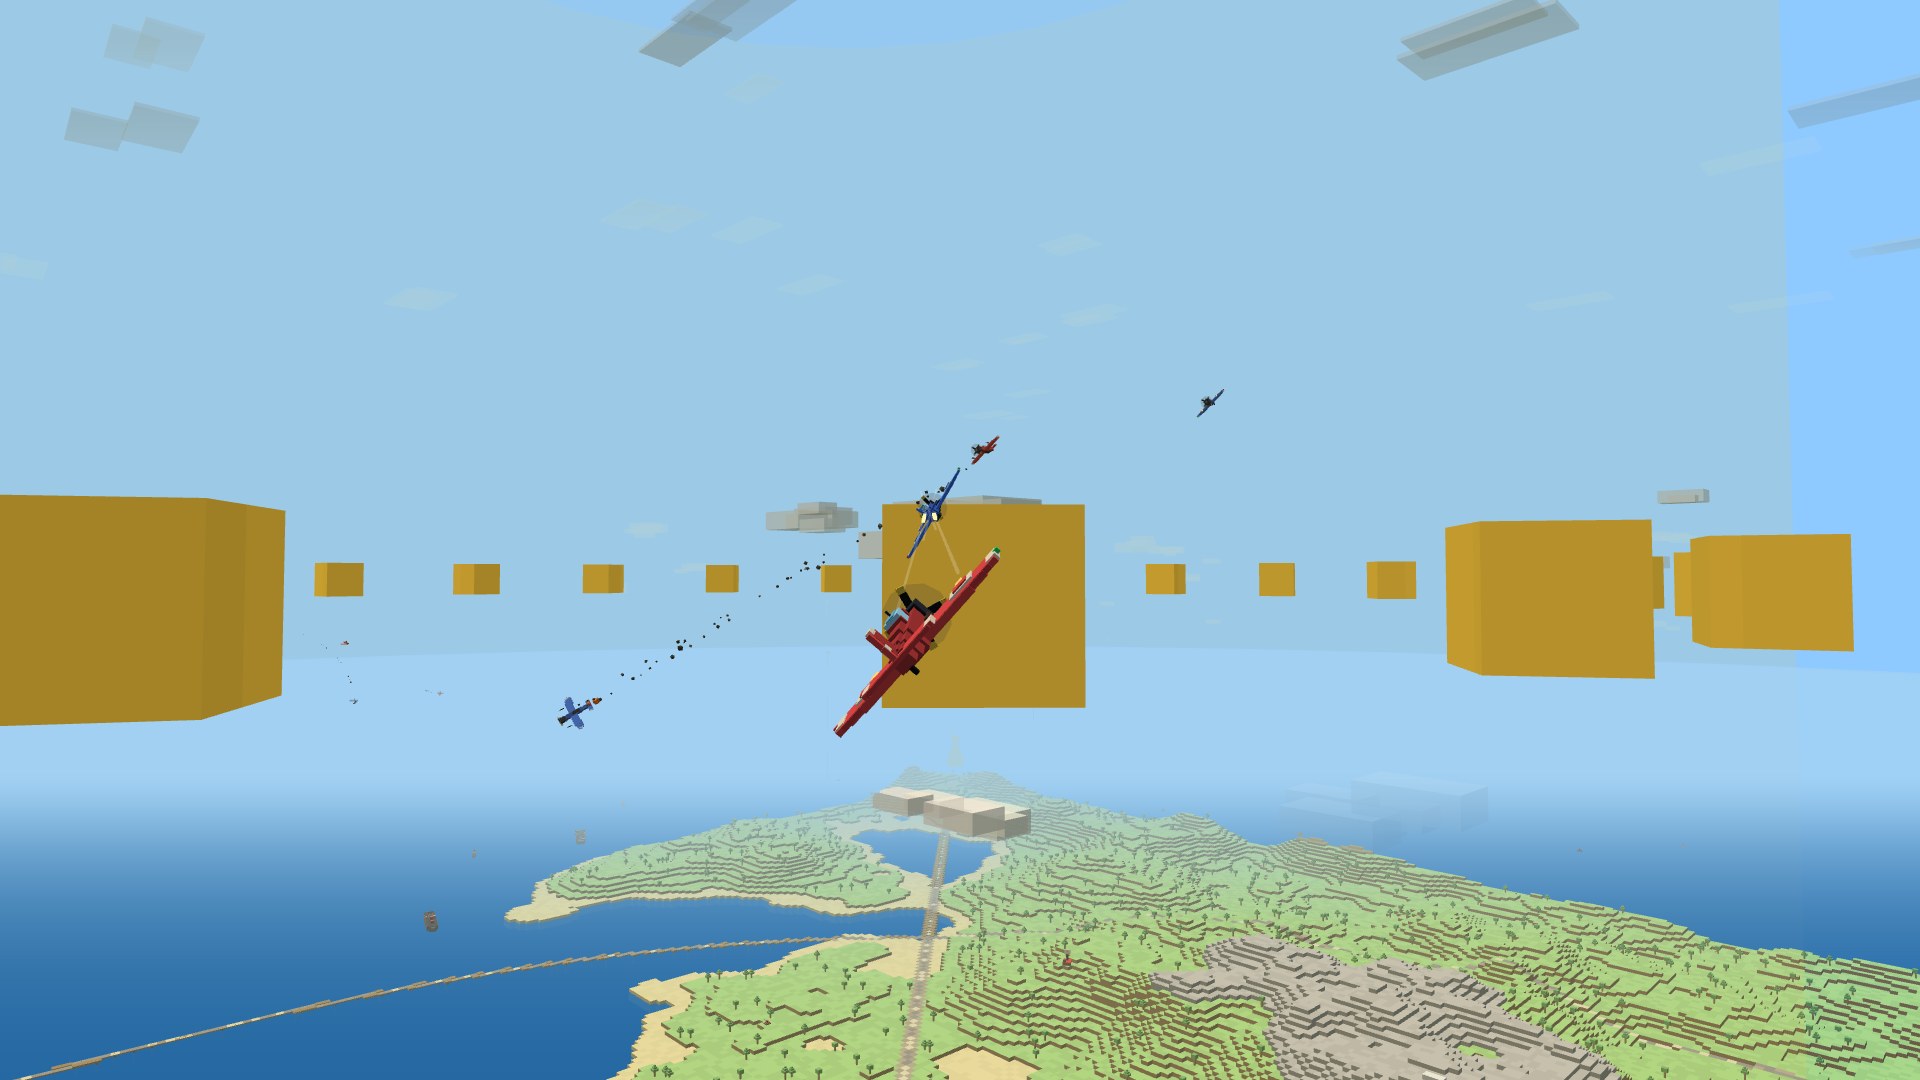
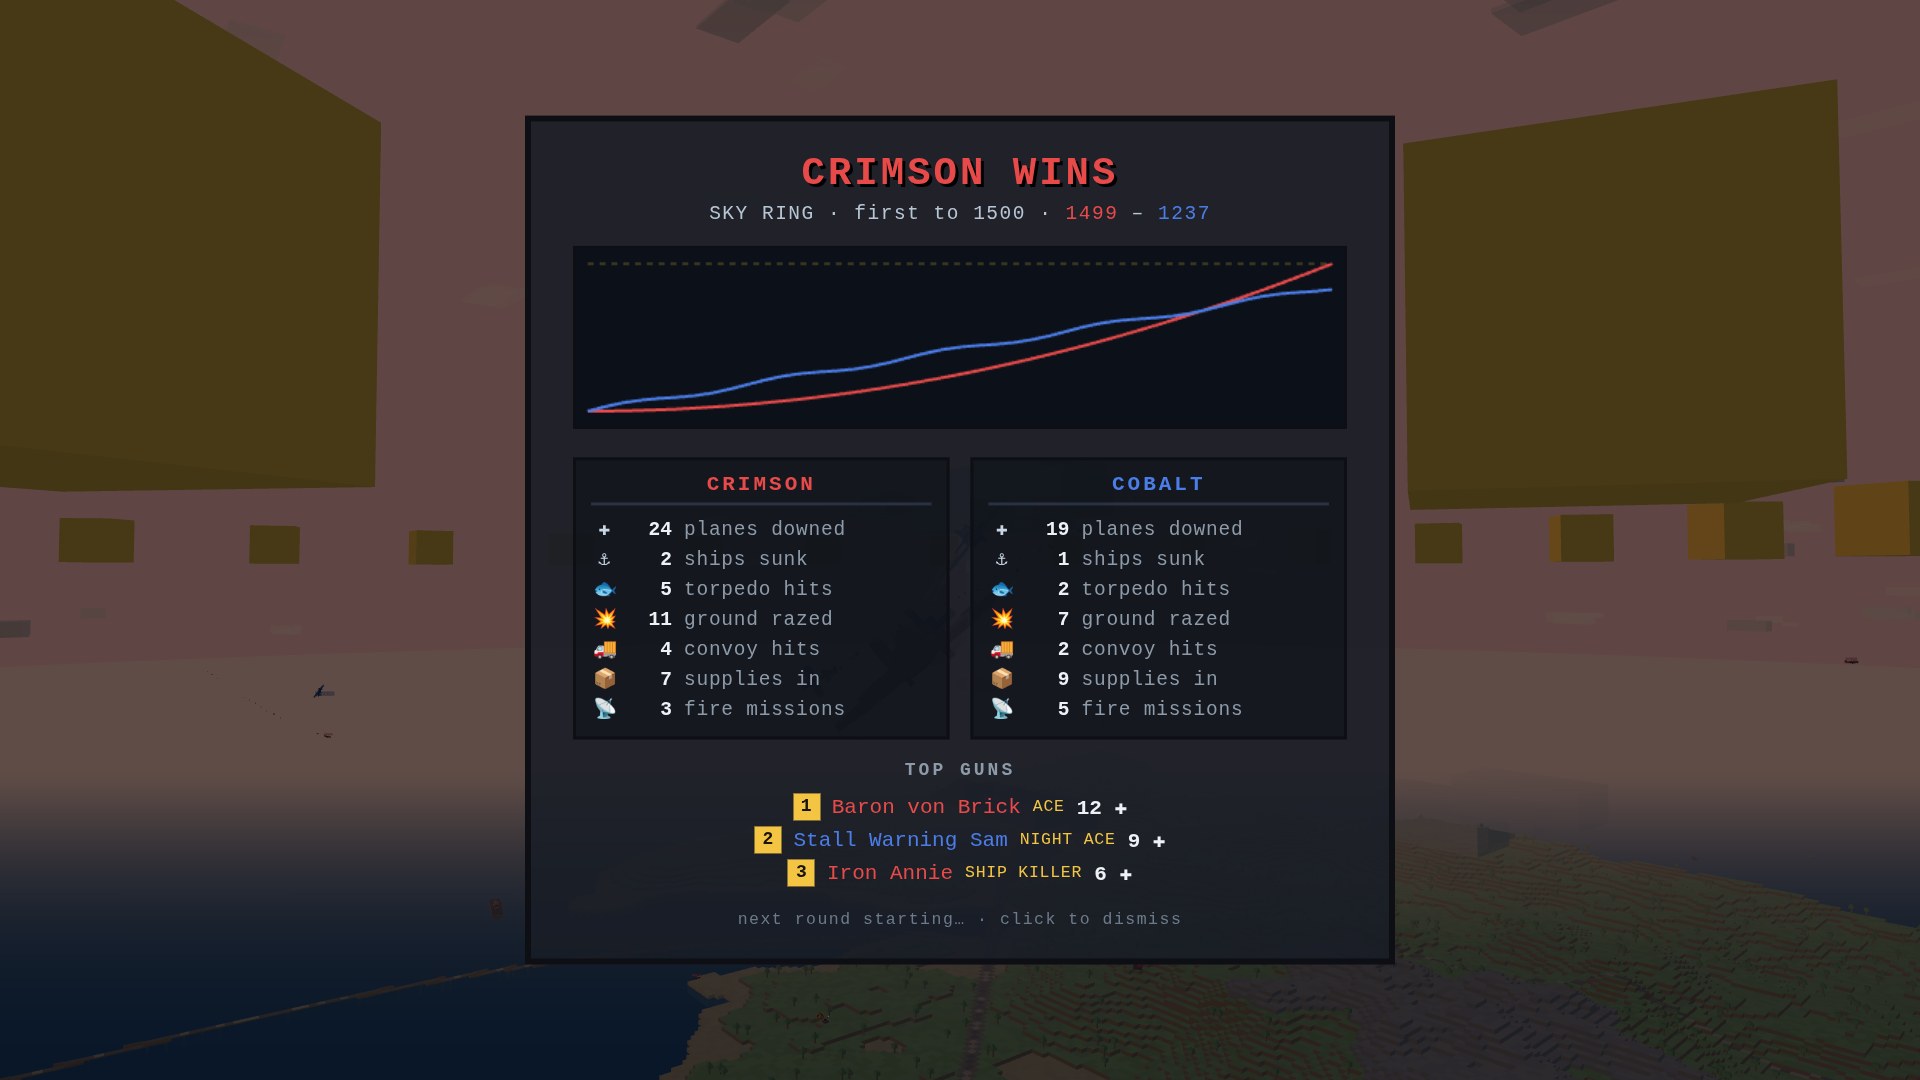
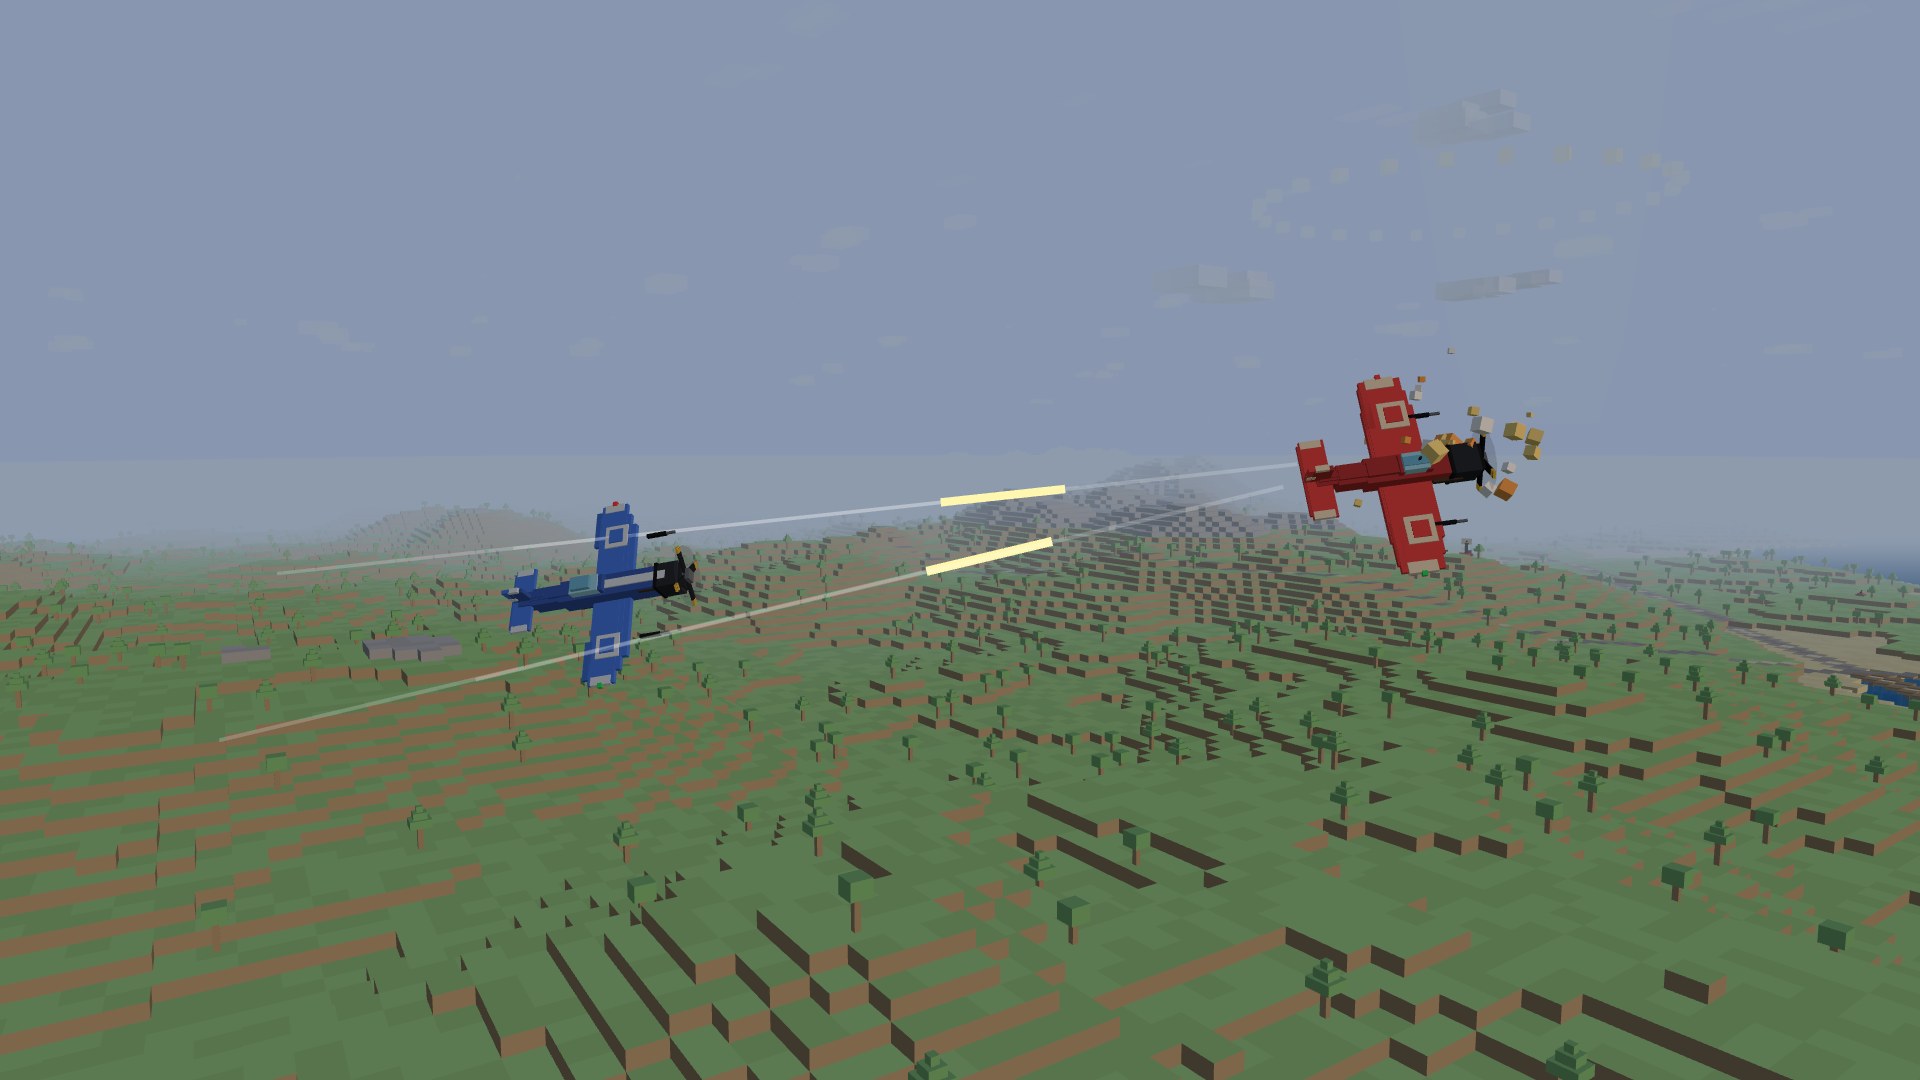
Two squadrons — CRIMSON and COBALT — battle for the golden SKY RING floating above the central island. Hold the ring to bleed points out of the sky, shoot down enemy planes for bounties, strafe the flak guns ringing the enemy base, and reach 1500 points before the round clock runs out. Crashing into the scenery is canon.
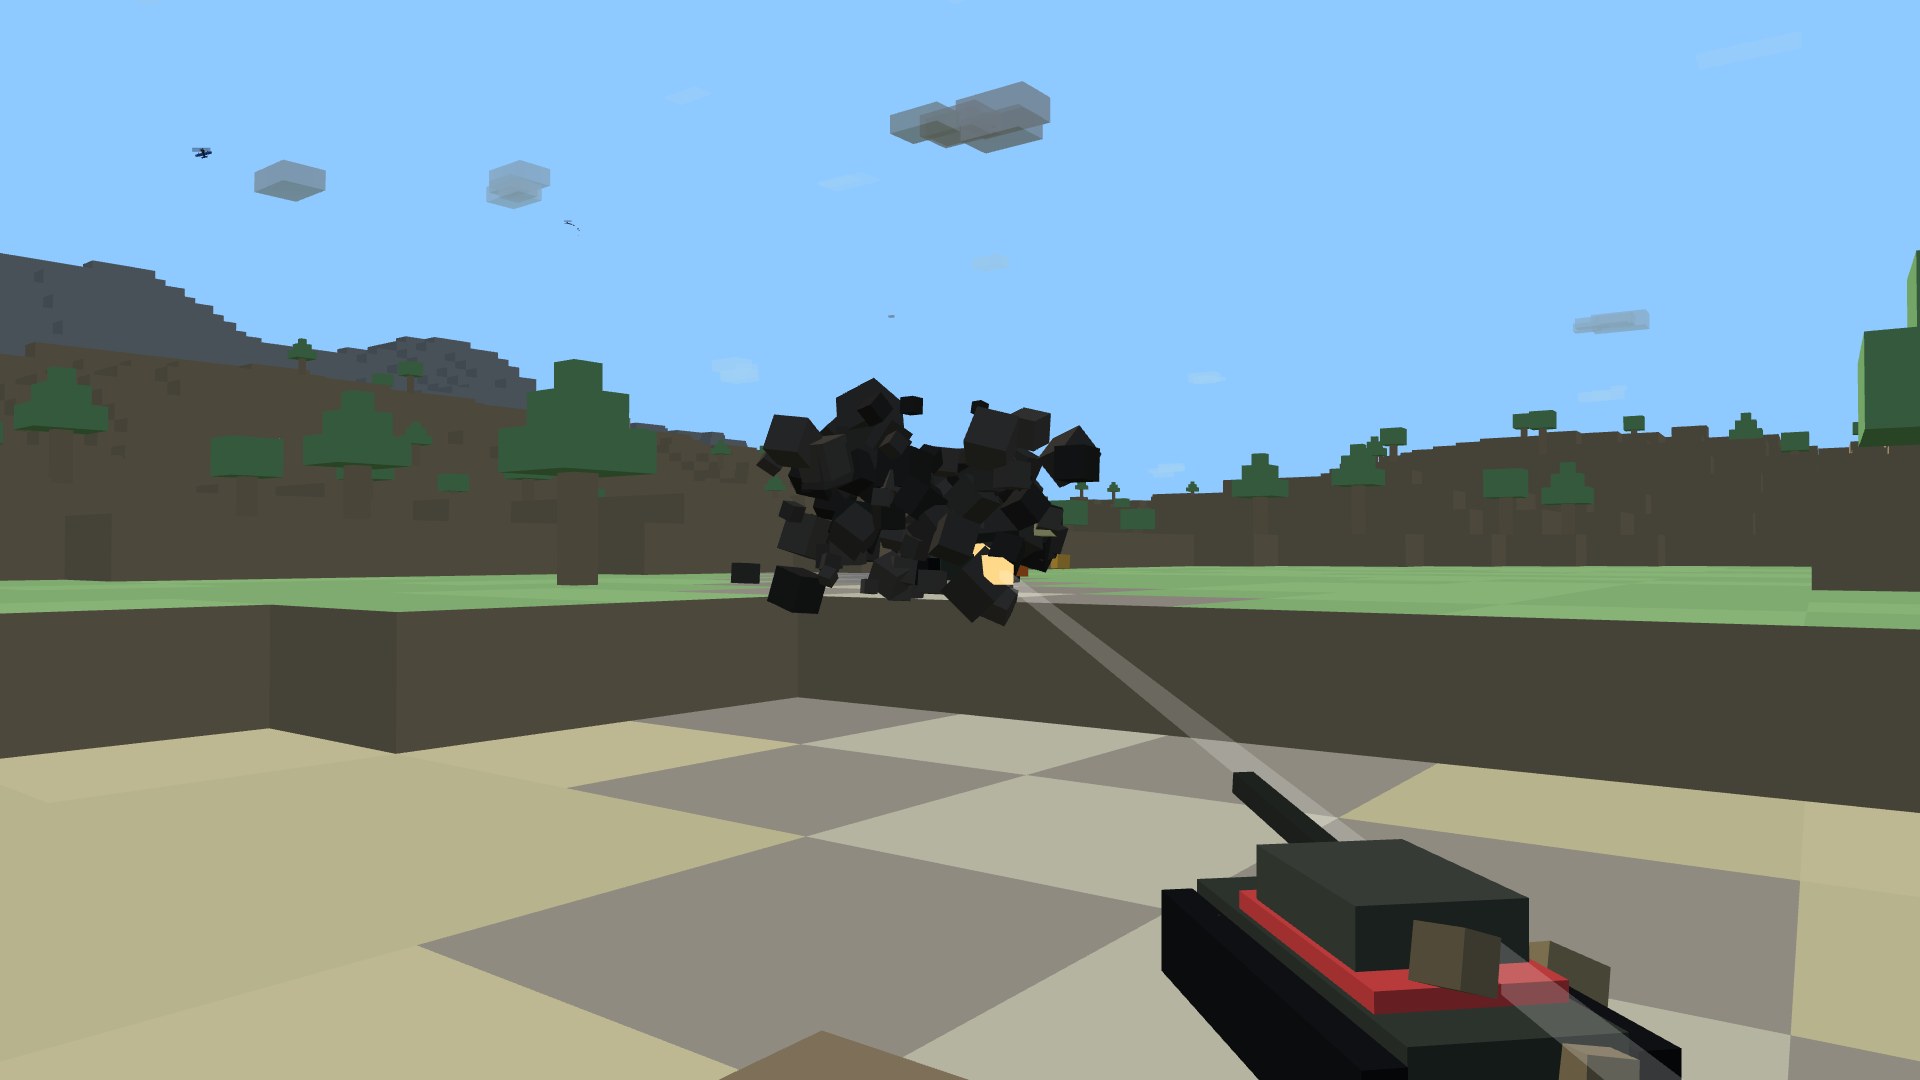
A crimson Sparrowhawk firing on a cobalt Thunderhead beside the Sky Ring's golden blocks
High noon at the SKY RING — hold it to bleed the enemy's points out of the sky.
The end-of-round intel summary card showing a score timeline, per-team tallies and the round's top guns
When the bell rings, the round intel card tells the story: the score timeline, who downed whom, ships sunk, ground razed — and the round's top guns.

Battle damage

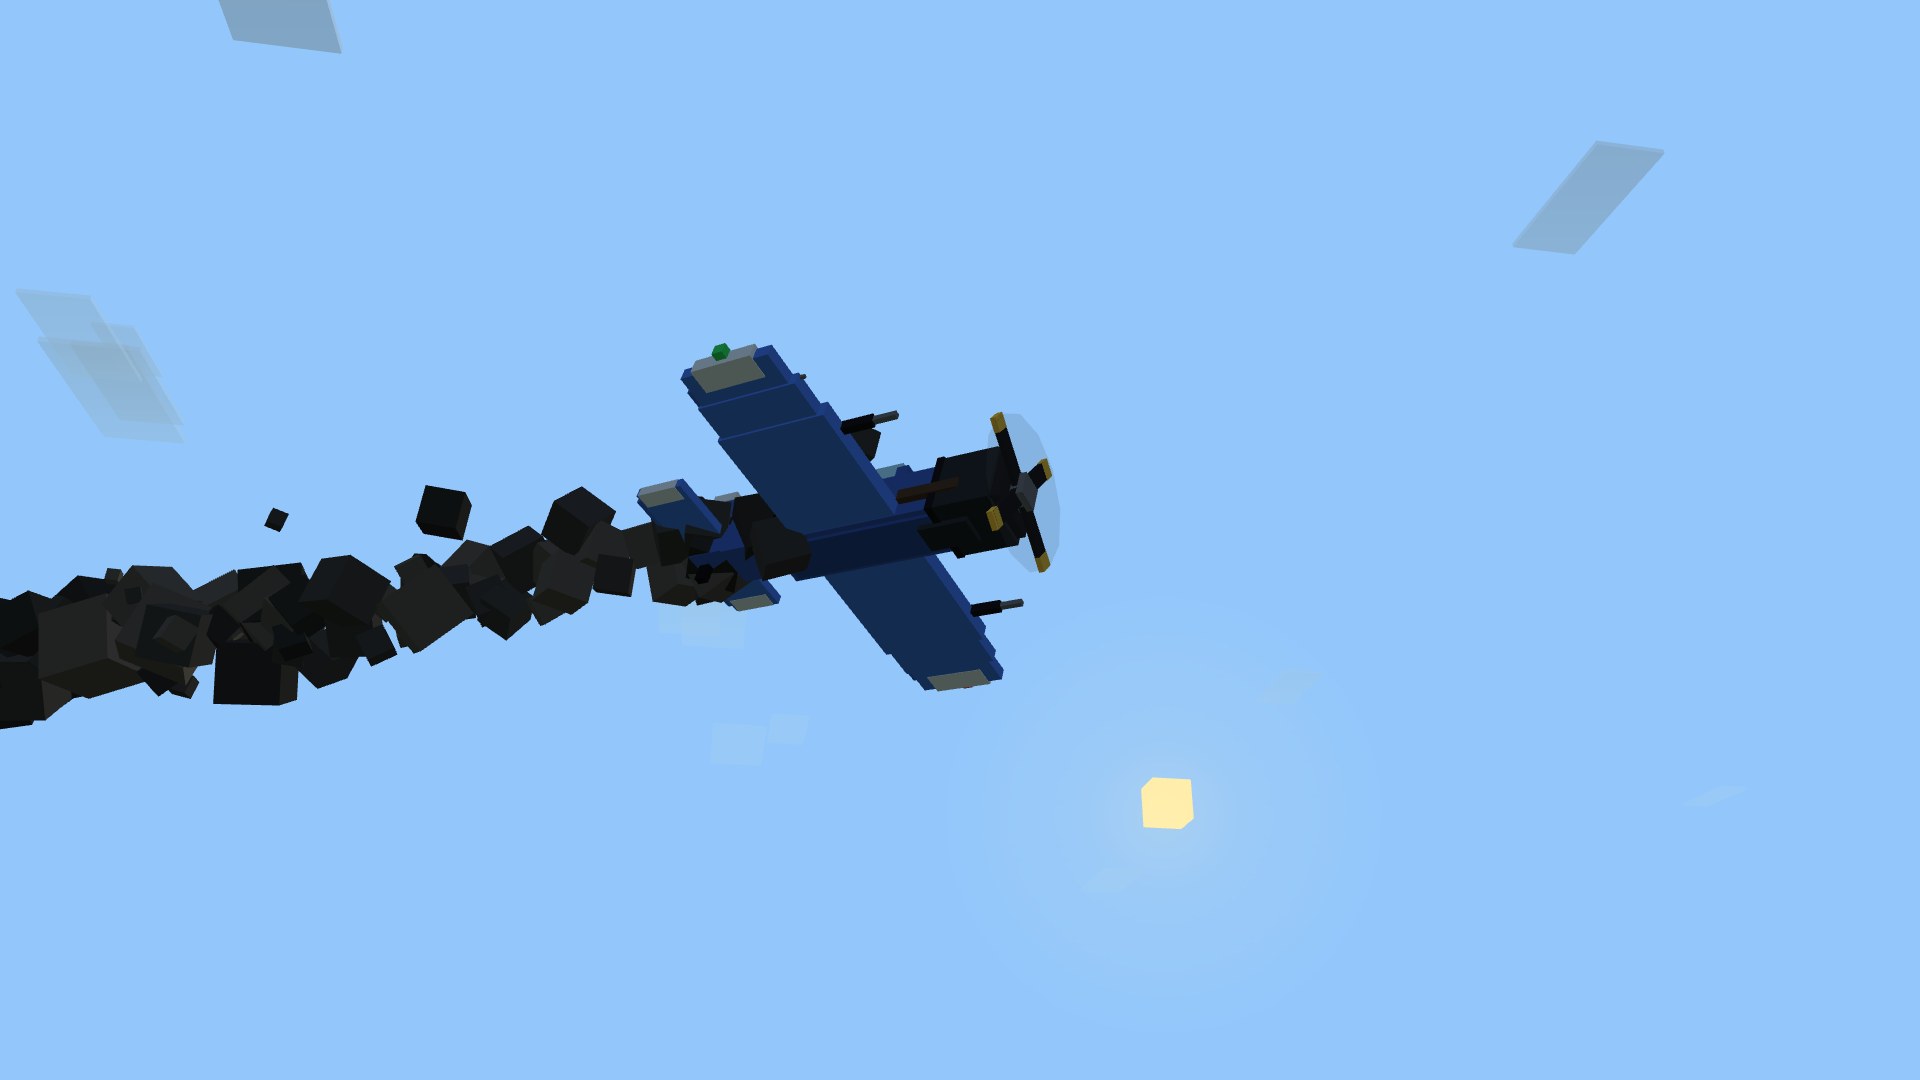
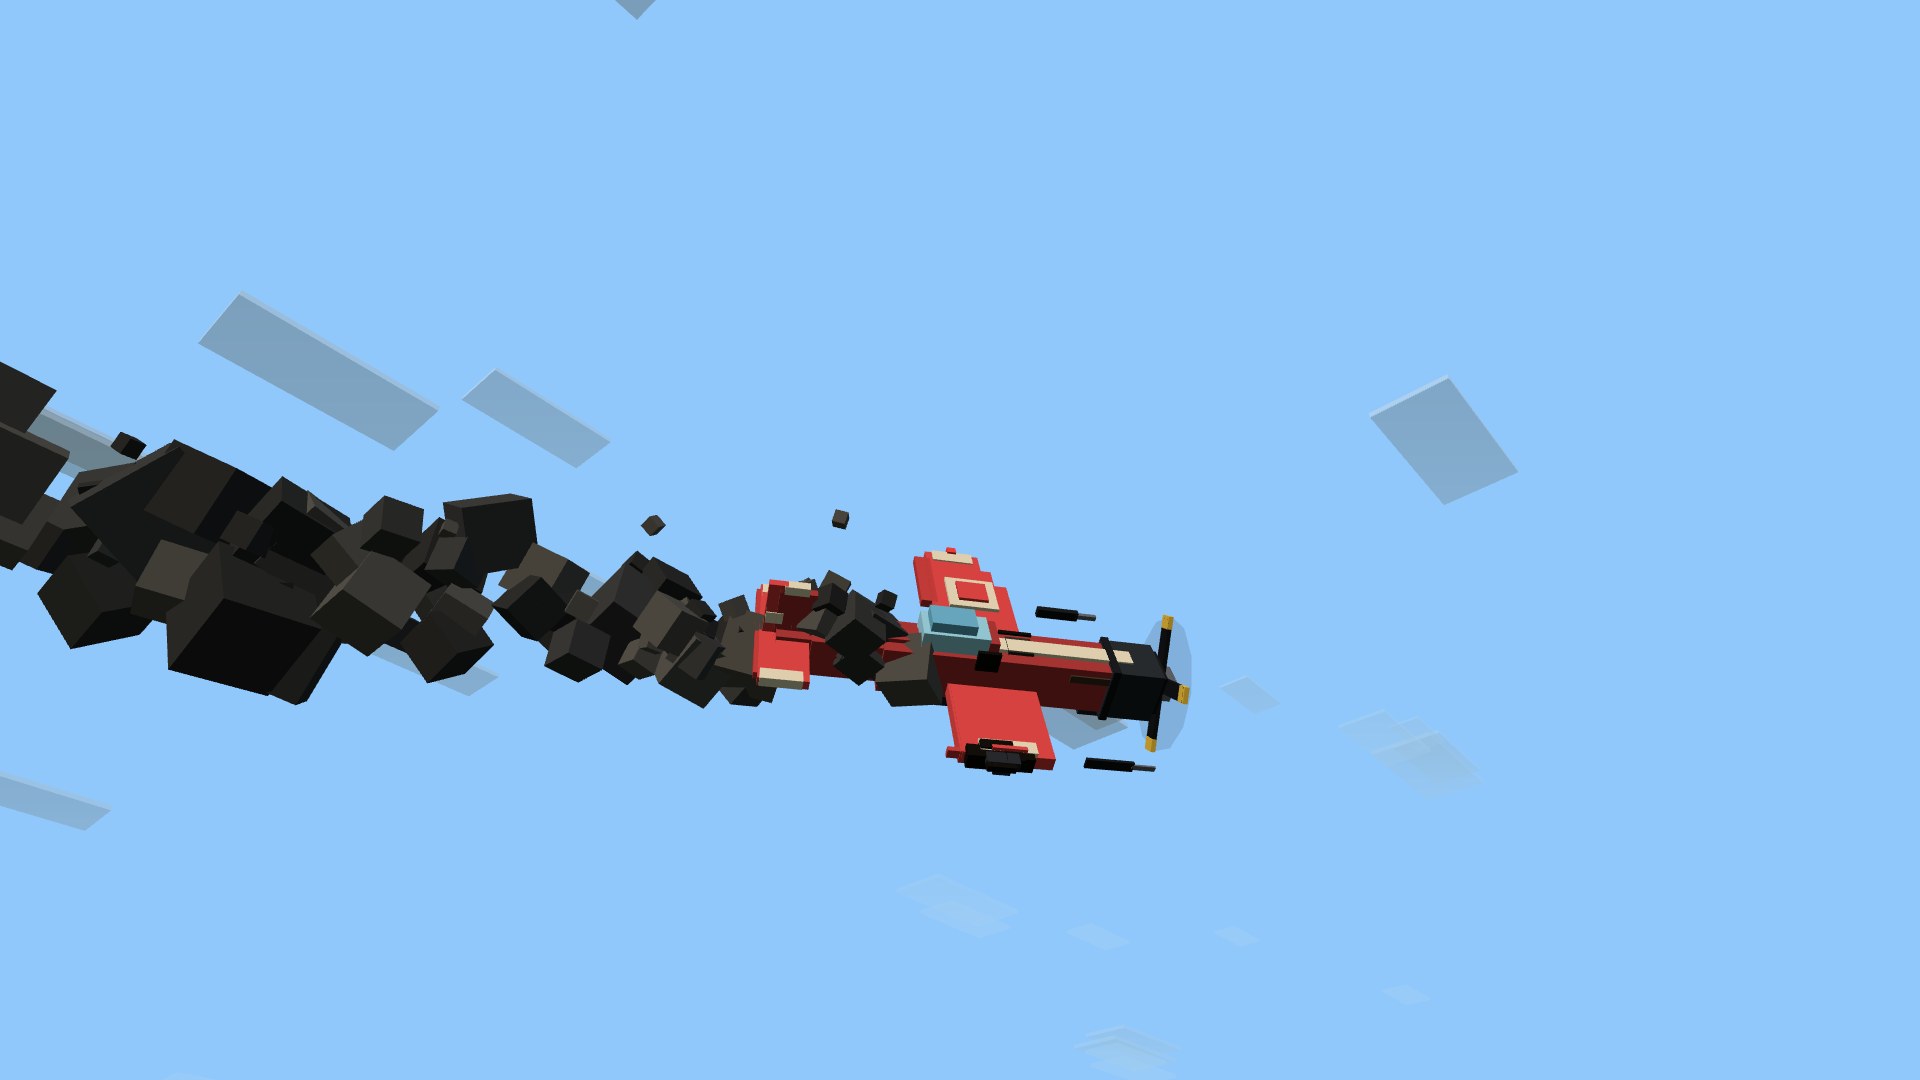
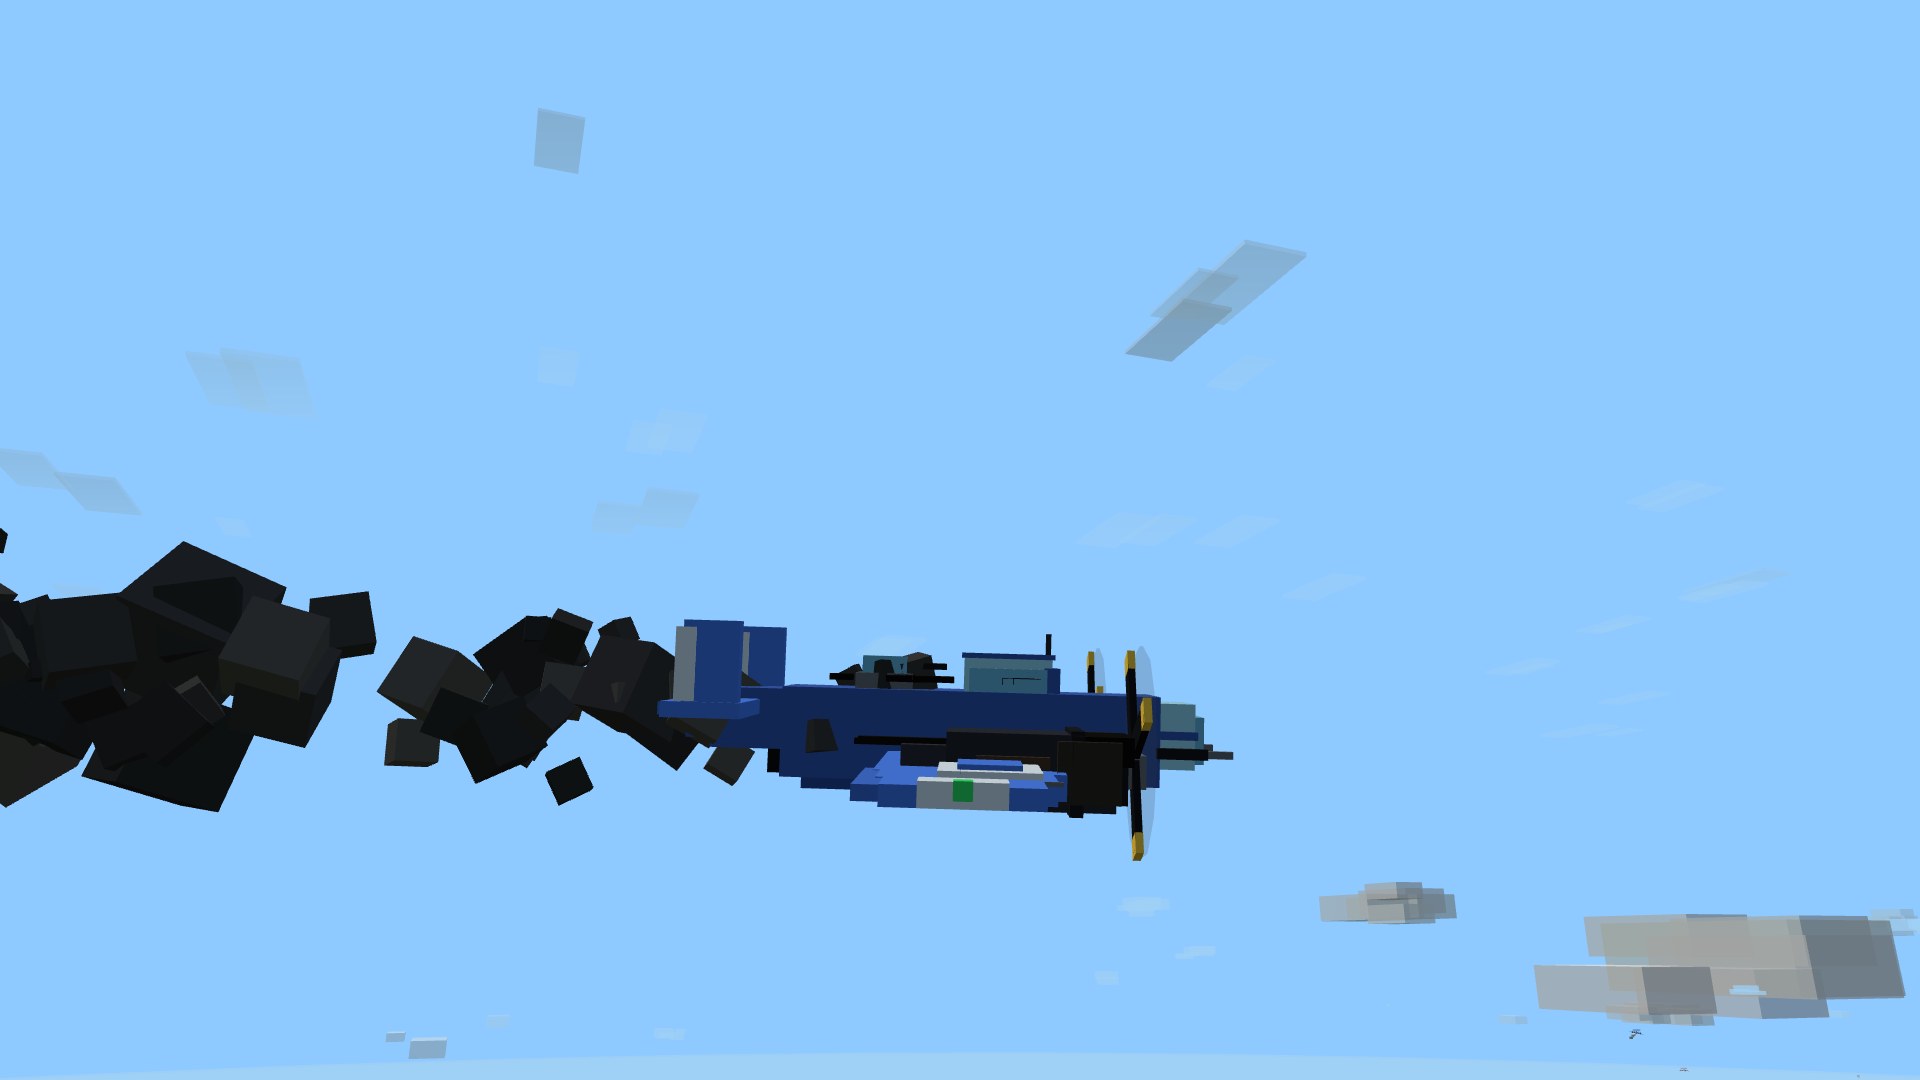
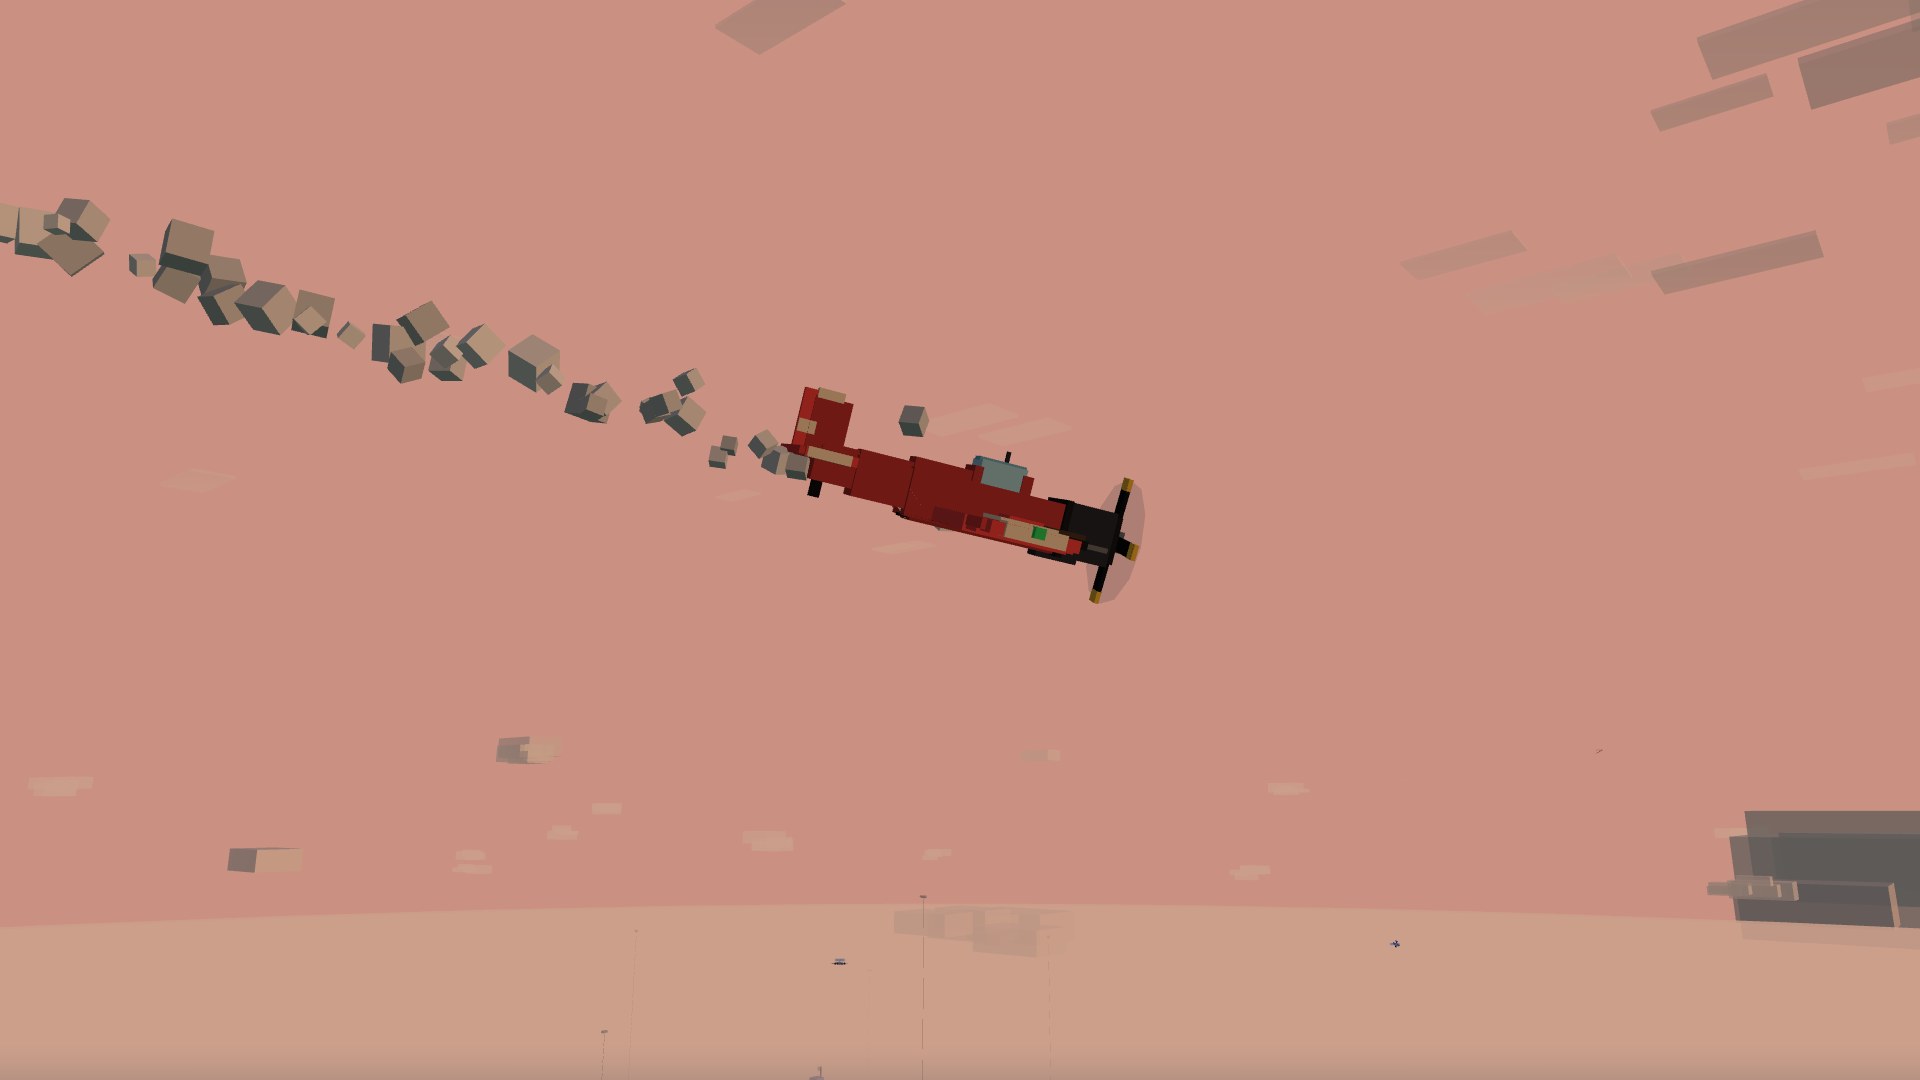
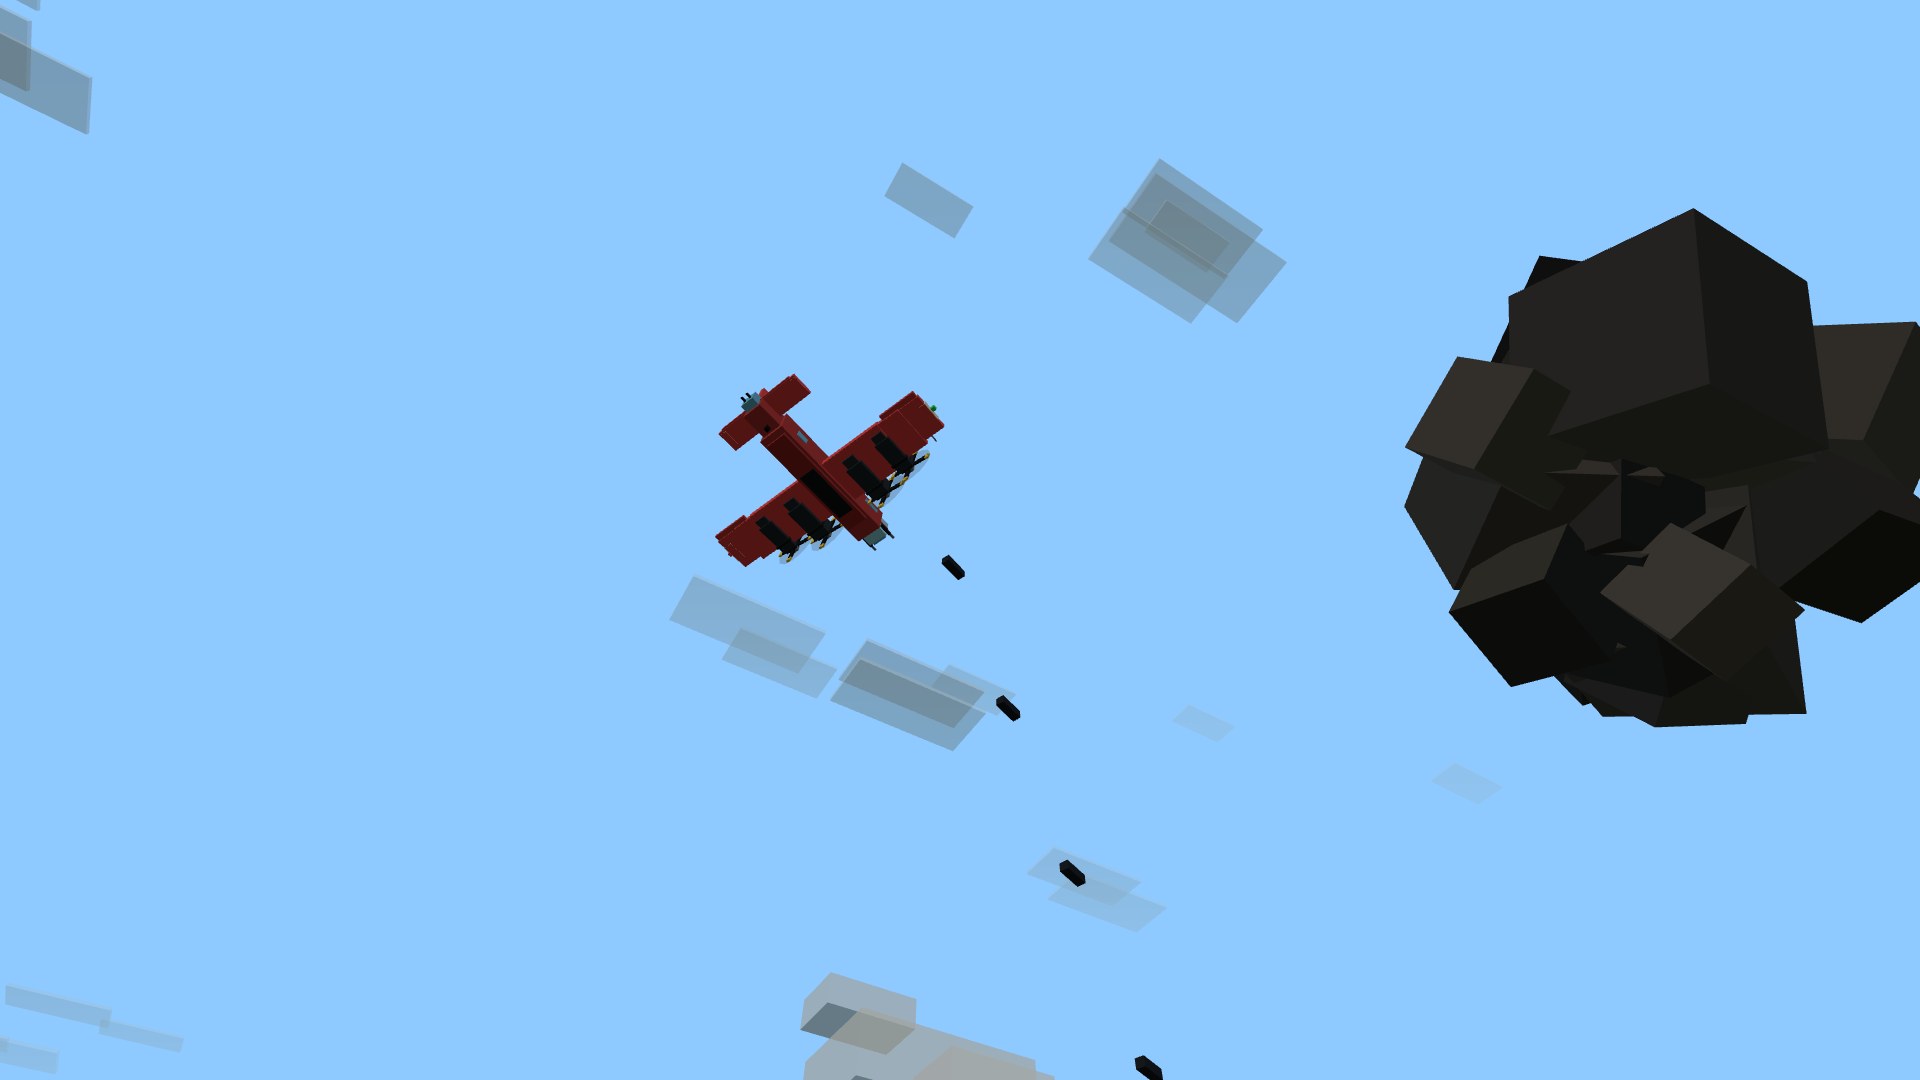
Hits are localized. Every round that finds you is routed to a component — engine, a wing, the fuel tank, the cockpit, or just the airframe — and you wear it: a scorched engine smokes and loses power, a shot-up wing sheds its tip and drags your roll, a punctured tank streams fuel, a cockpit hit greys the pilot out. So a mauled plane limps home trailing smoke instead of simply falling out of the sky, and you can read an enemy's damage on his airframe and finish the job.
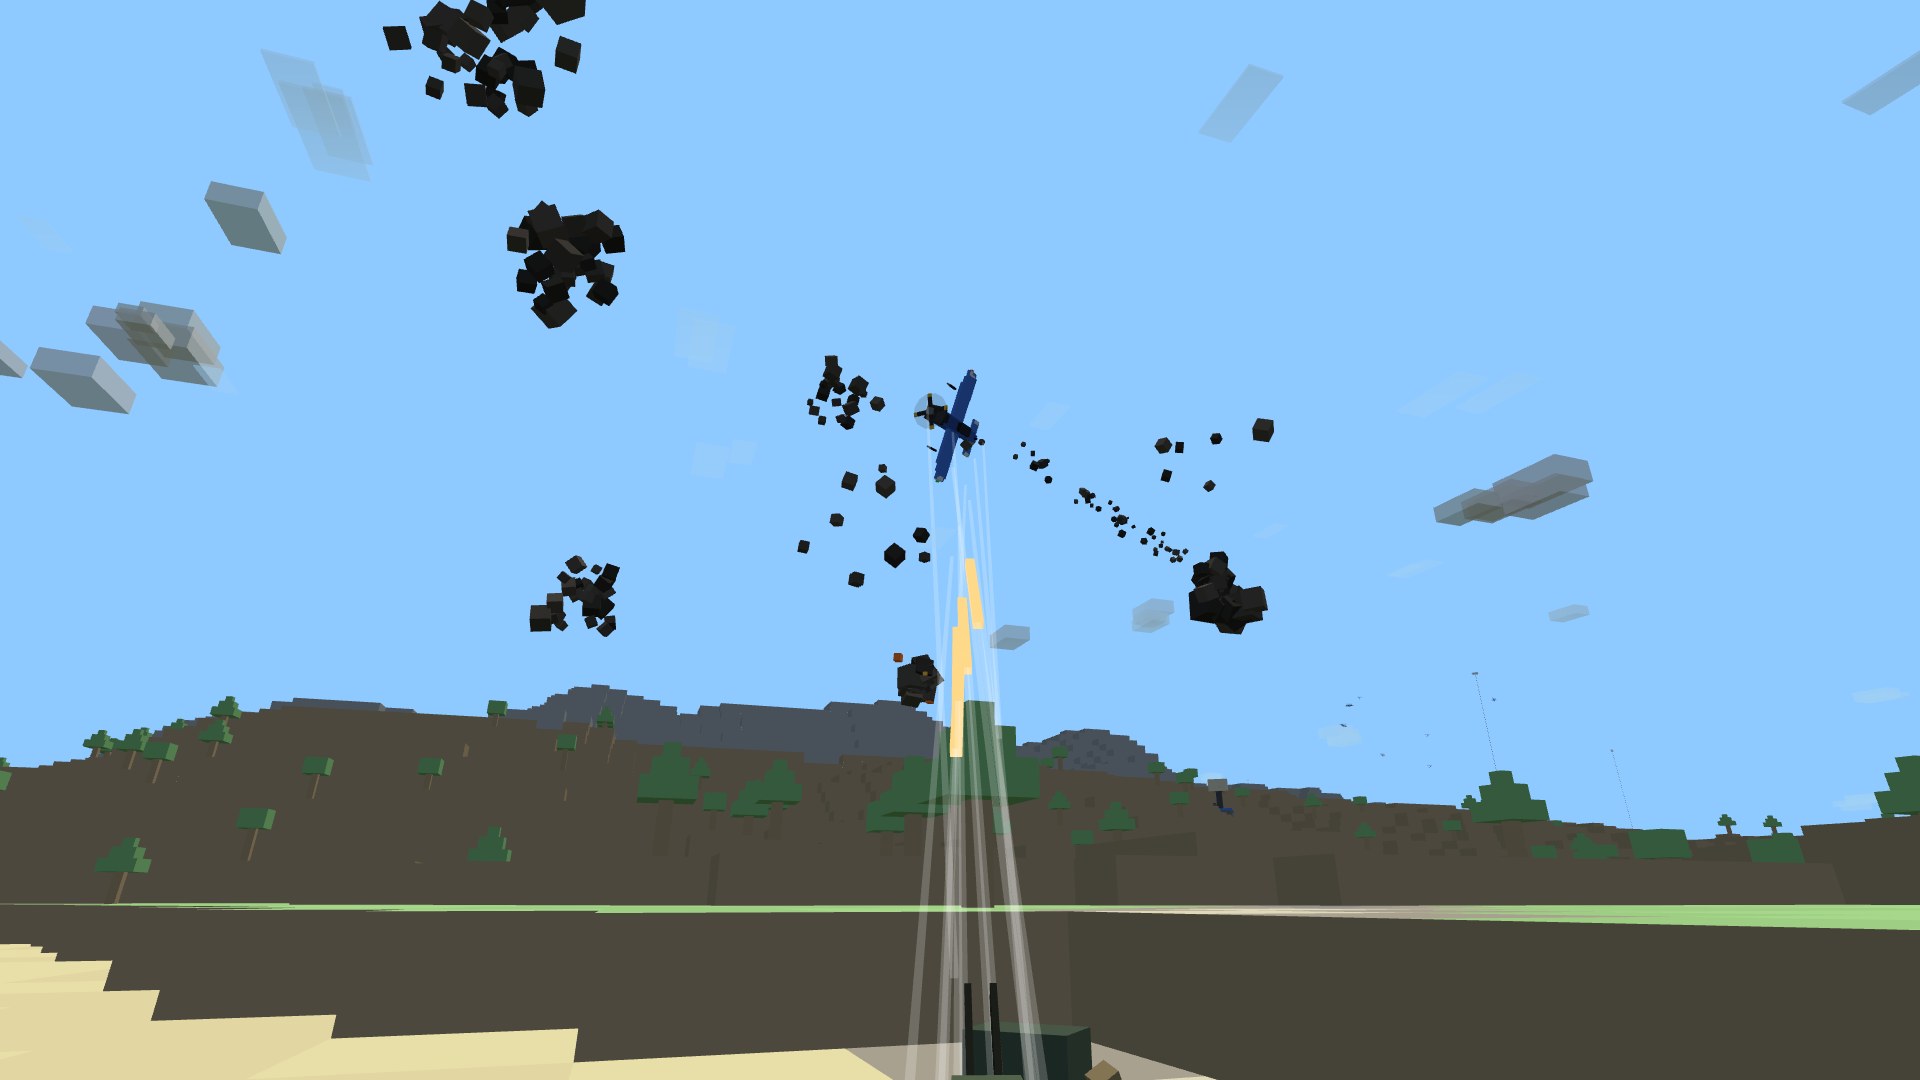
A battle-damaged crimson Thunderhead trailing engine smoke and a pale fuel-vapor streak, listing toward its shot-up wing over the sea at sunset with a carrier on the horizon
Run home smoking: dead engine pouring smoke, a punctured tank streaming fuel, listing on a shredded wing — nursing a mauled plane back to the carrier is a fight of its own.
A cobalt Sparrowhawk with a blackened, soot-streaked engine cowl pouring a column of smoke against the open sky
Engine. The cowl scorched black, smoke boiling off it, dragging home on what power's left.
A crimson Thunderhead with its right outer wing torn clean off at the spar, the severed tip tumbling away, rolling onto the stump
Wing. Push it far enough and the outer panel tears clean off at the spar — the severed tip tumbling away as the fighter rolls helplessly onto the stump.
A cobalt Ironclad in side profile with scorch and flak holes punched the length of its fuselage and one engine trailing smoke
Airframe. Flak walked the length of the fuselage — scorch and punched-through holes down the flank.
A crimson Sparrowhawk nosing down at sunset trailing a long pale streak of vaporizing fuel, with no fire
Fuel. No fire — just a pale streak of vaporizing fuel bleeding away as you nose down for the deck before the tank runs dry.

Killcam

Get shot down and the server ships you the last several seconds of the fight, replayed from the killer's high three-quarter — the camera rides off their firing line so their plane holds the edge of the frame while yours, and the tracer stream between you, fills it. At the instant of the kill it lets the killer fly on and settles into a slow orbit of your falling wreck. It plays at full speed, not a fast-forward blur, and a persistent KILLCAM badge names the shooter the whole time, so there's never any doubt who put you in the dirt. Seen enough? Click to skip straight back to the action.

The killcam: a crimson Sparrowhawk at the frame's edge with guns firing on a cobalt Thunderhead burning ahead, seen from the killer's high three-quarter, the gold KILLCAM badge naming RED BARON across the top
Who got you, and how. The death replay rides the killer's shoulder, off the gun–target line so shooter, tracers and your last seconds share the frame — then orbits the wreckage — with the KILLCAM badge naming the shooter until you respawn.

Back in the fight

The killcam runs to the end before anything covers it — only once the replay finishes does the spawn screen appear, so the death cam is never obscured. And there's no separate “you died” card: the killcam already named who got you, so the spawn screen is simply the join screen again, pixel for pixel. The full unit picker — every warbird, the flak and naval mounts, the battleship turret, the ground vehicles — the base-or-carrier launch choice, and today's daily missions with your live progress. Line up your next ride and hit TAKE OFF to drop back in — same button you launched with. A short respawn timer just keeps you from spawning instantly; once it lifts, you go when you're ready, not a moment before.
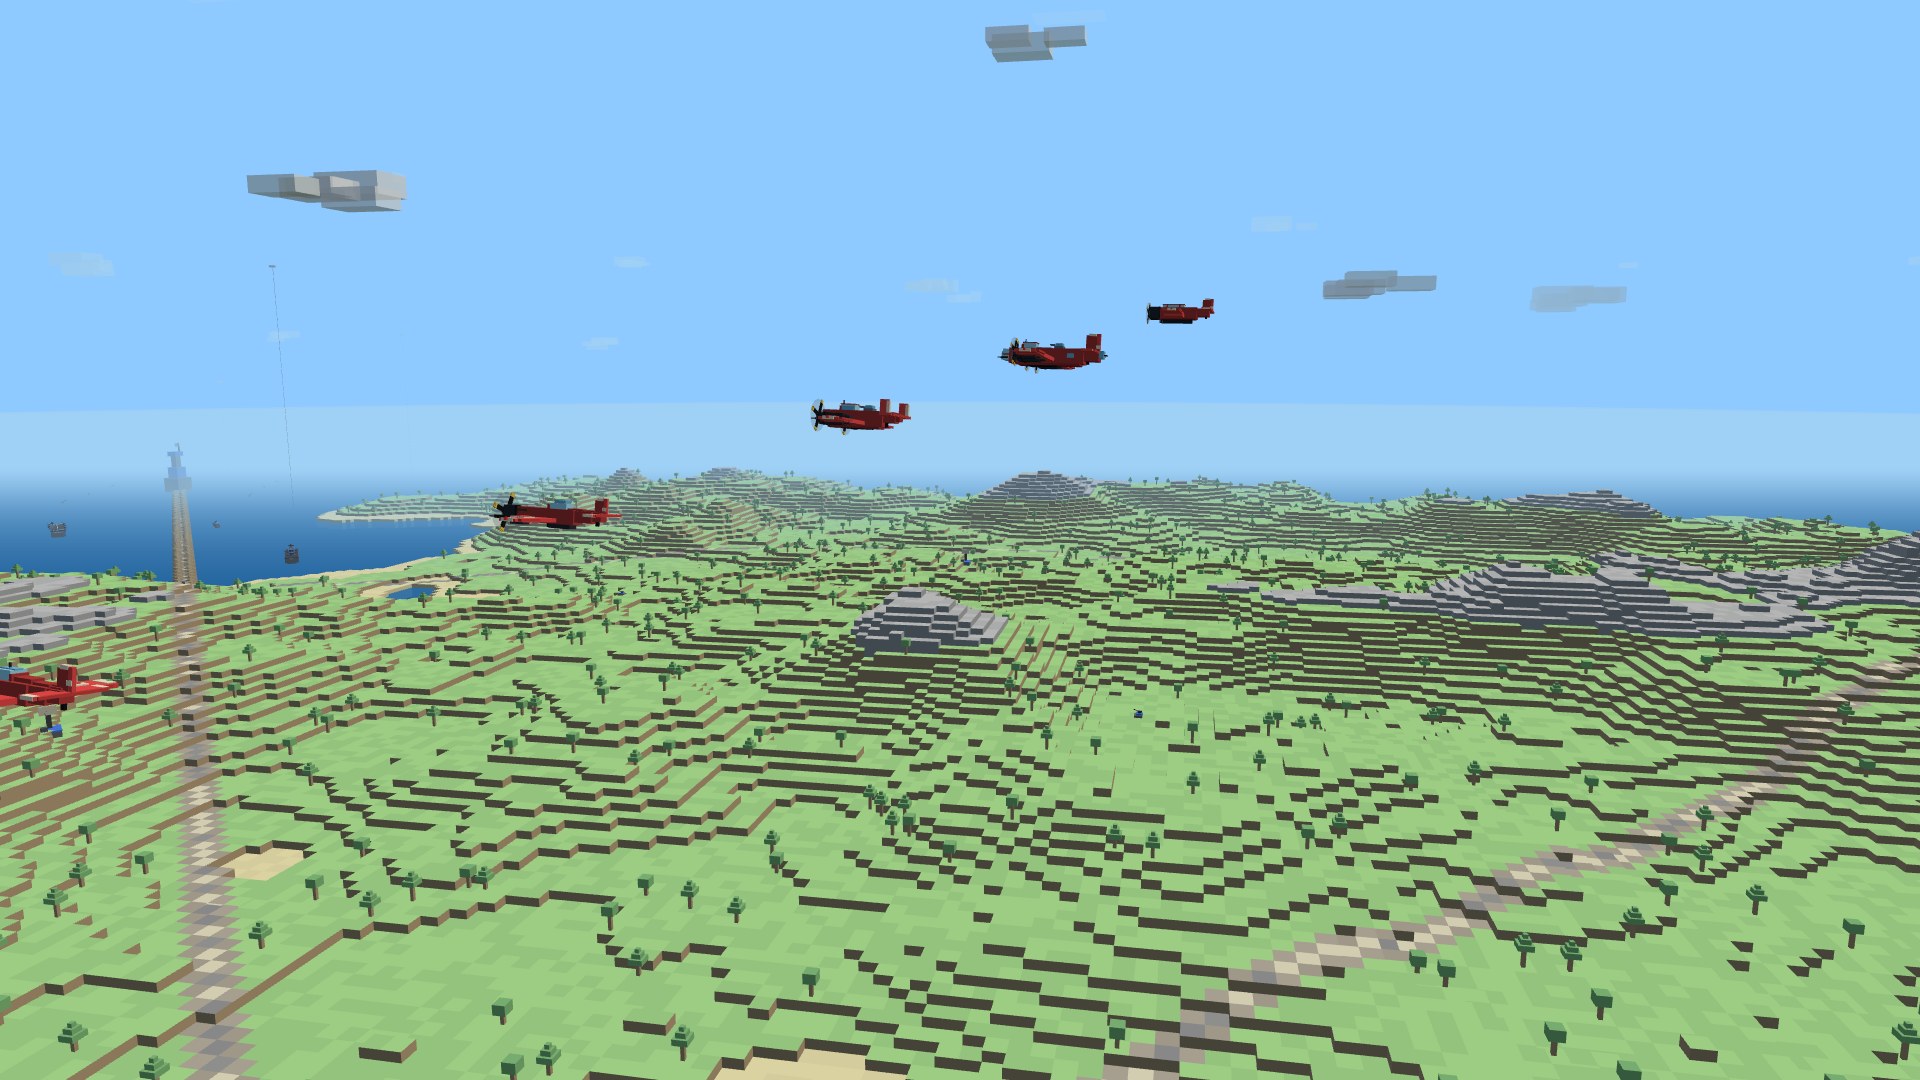
The spawn screen after a death: identical to the join screen, with the WARBIRDS.IO masthead, the AIRCRAFT/AAA/NAVY/GROUND VEHICLES unit picker, five aircraft stat cards, a BASE or CARRIER DECK launch choice, the callsign and TAKE OFF row, controls help, and today's daily missions
One screen, join or respawn. Go down, watch the killcam, and you're back at the exact hangar you launched from — same picker, same launch choice, same daily missions. No death banner; the replay already showed you who to blame.

The world

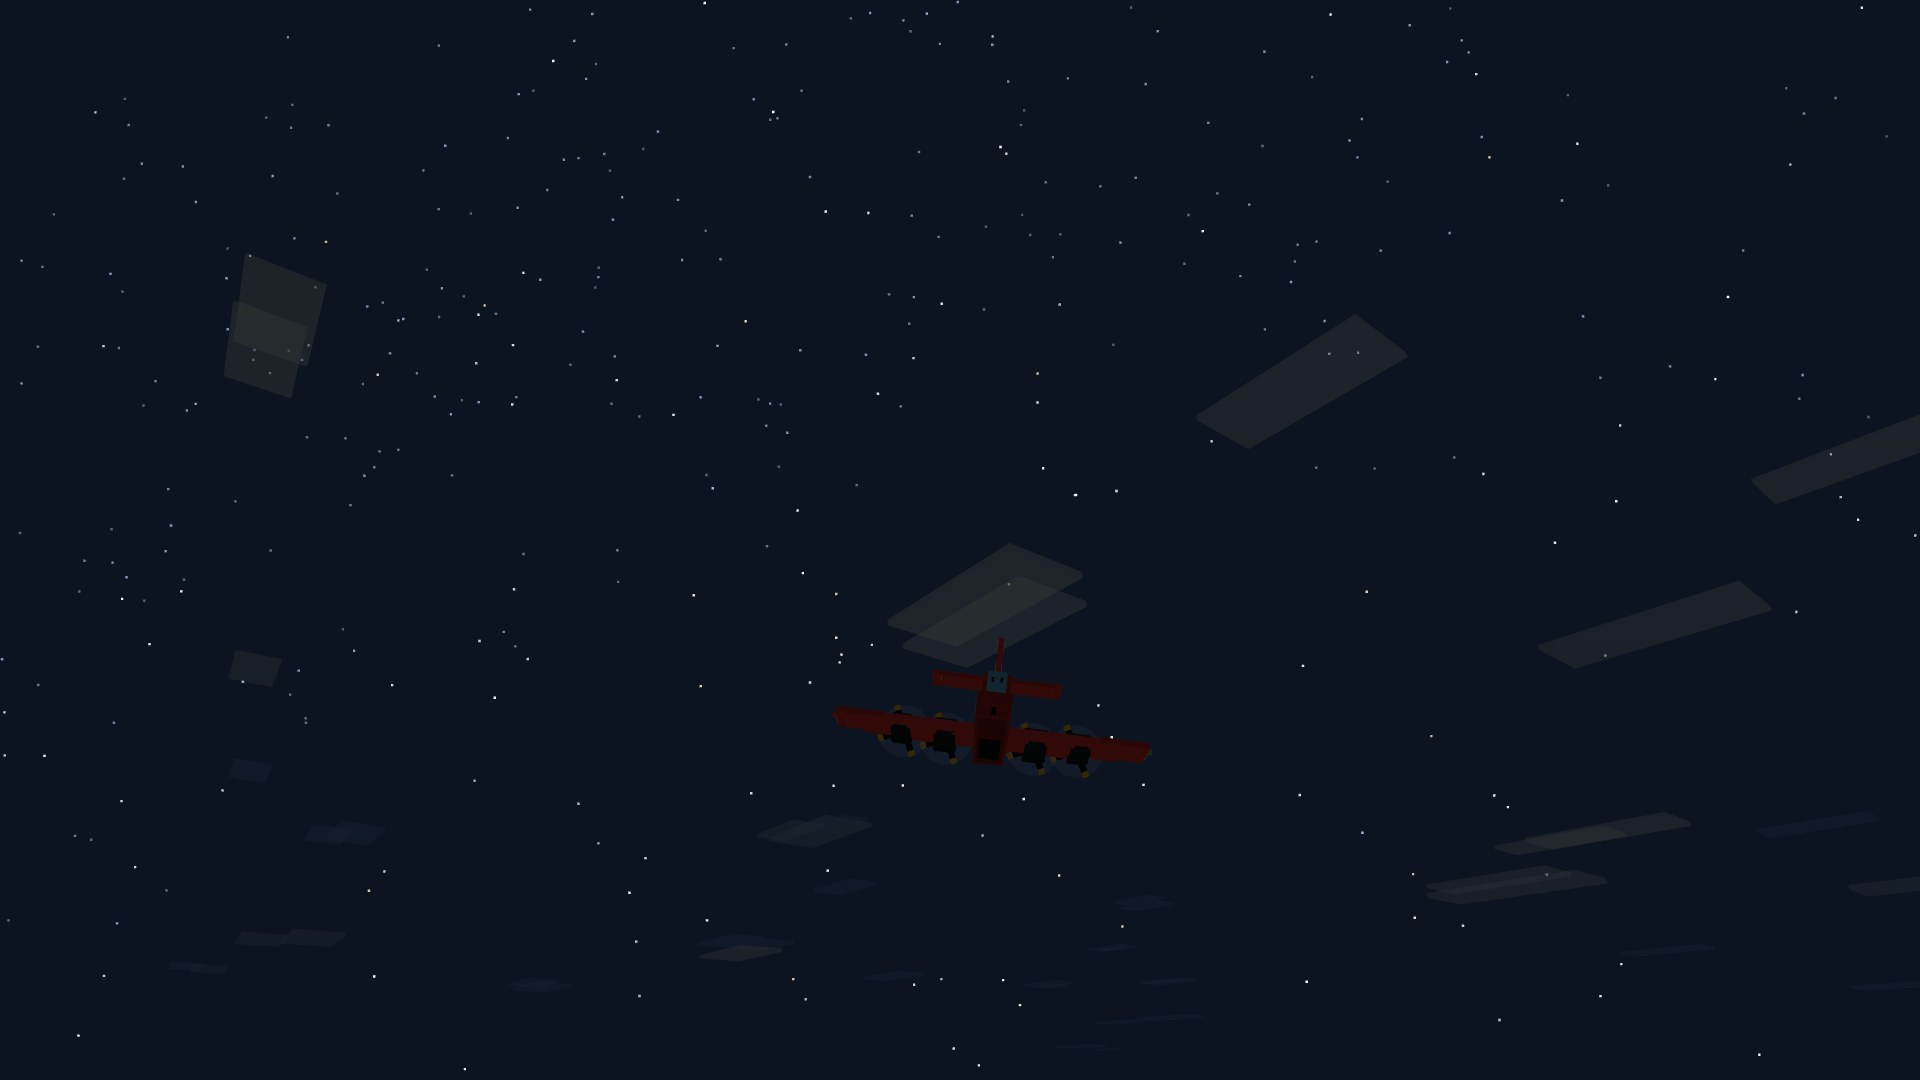
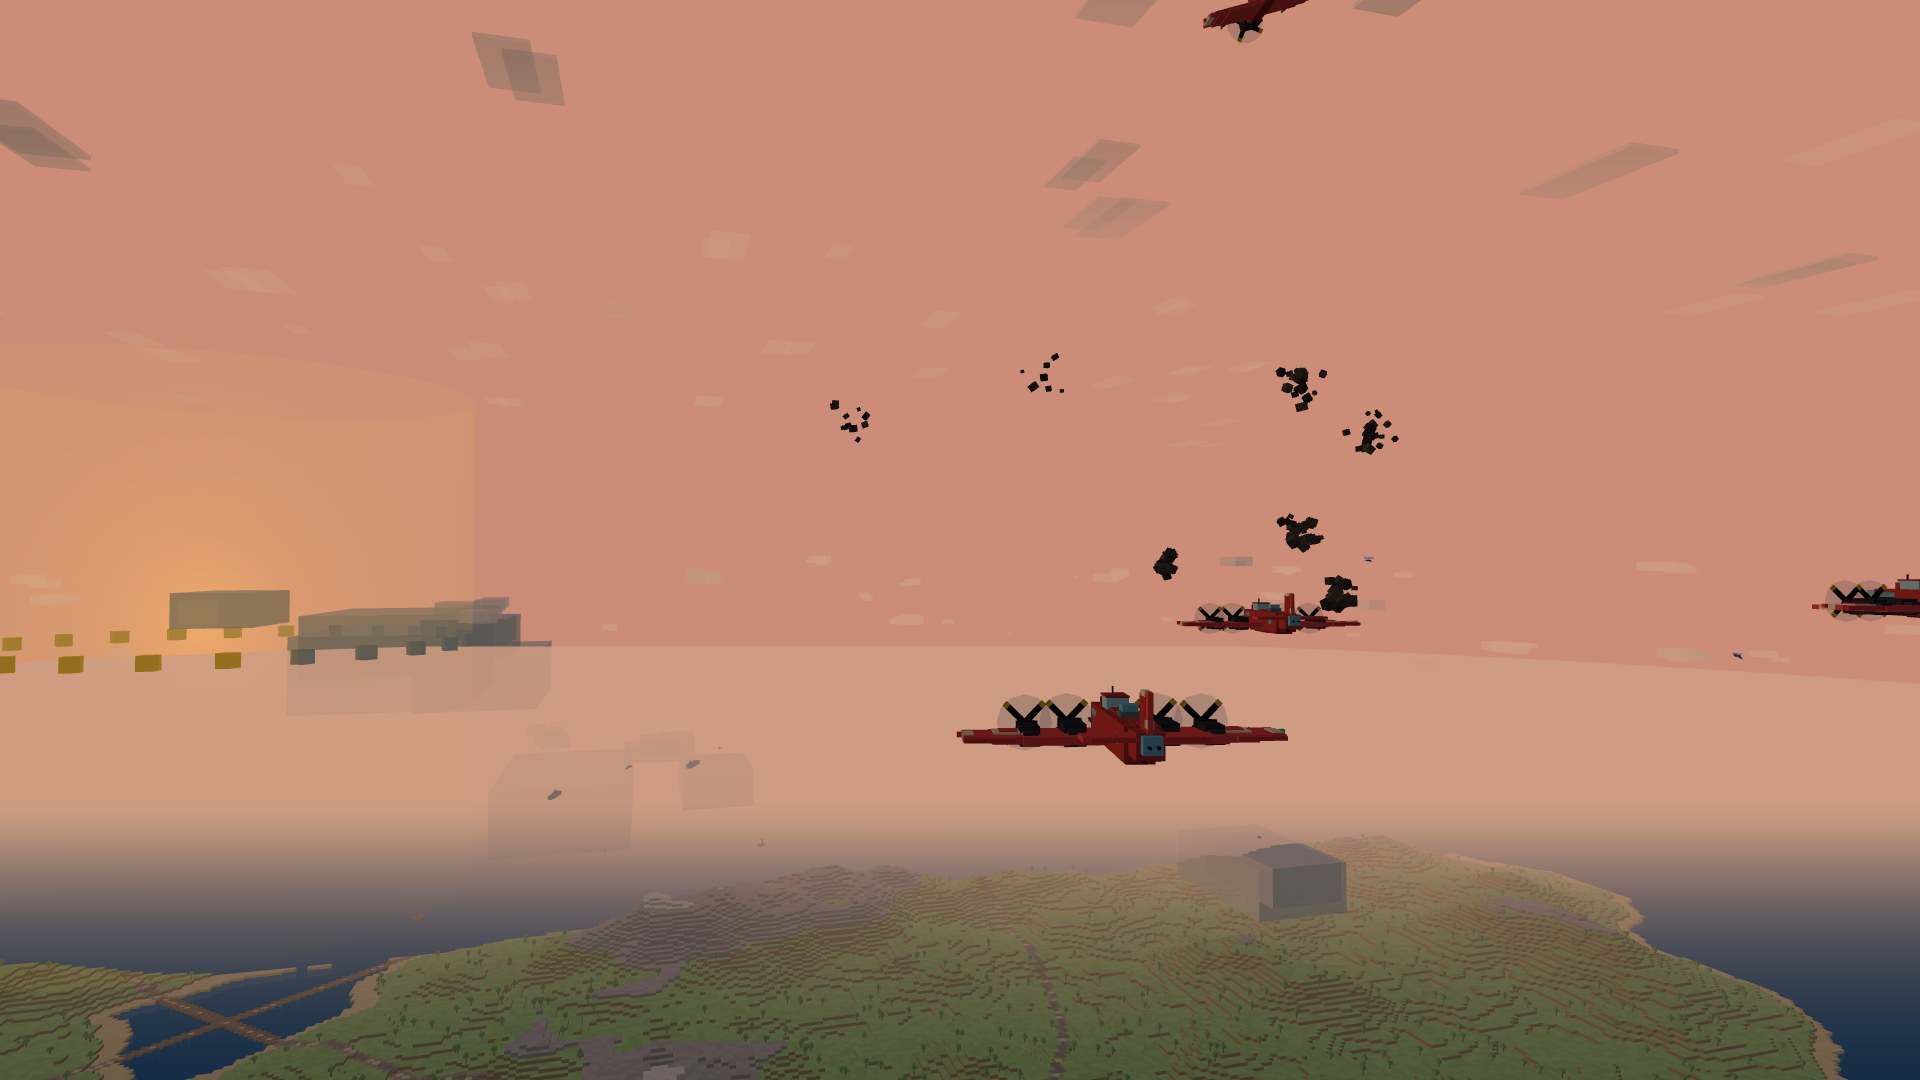
A charming, Minecraft-inspired voxel world stretches across the Brick Sea, kept lively by charmingly-named bot pilots that fill empty seats, dogfight for real, run home smoking when shot up, and contest the ring when their team falls behind. Rounds roll random weather — clear skies, a golden haze, or a storm that pulls the fog into knife-fight range — all riding a shared day/night cycle where the moon, stars, and Milky Way come out after dark.

A Sparrowhawk chasing a Thunderhead low over the island hills in a warm dawn haze
Dawn rounds hang a golden haze over the hills all day — one of the random weathers every round rolls.
A Thunderhead firing point-blank into a Sparrowhawk under a gray storm sky
Storm rounds pull the fog into knife-fight range. 20 mm at twenty meters.
A bomber silhouetted against the moon, stars and Milky Way at midnight
After dark the moon, stars and Milky Way come out over a shared day/night cycle.

Pick your ride

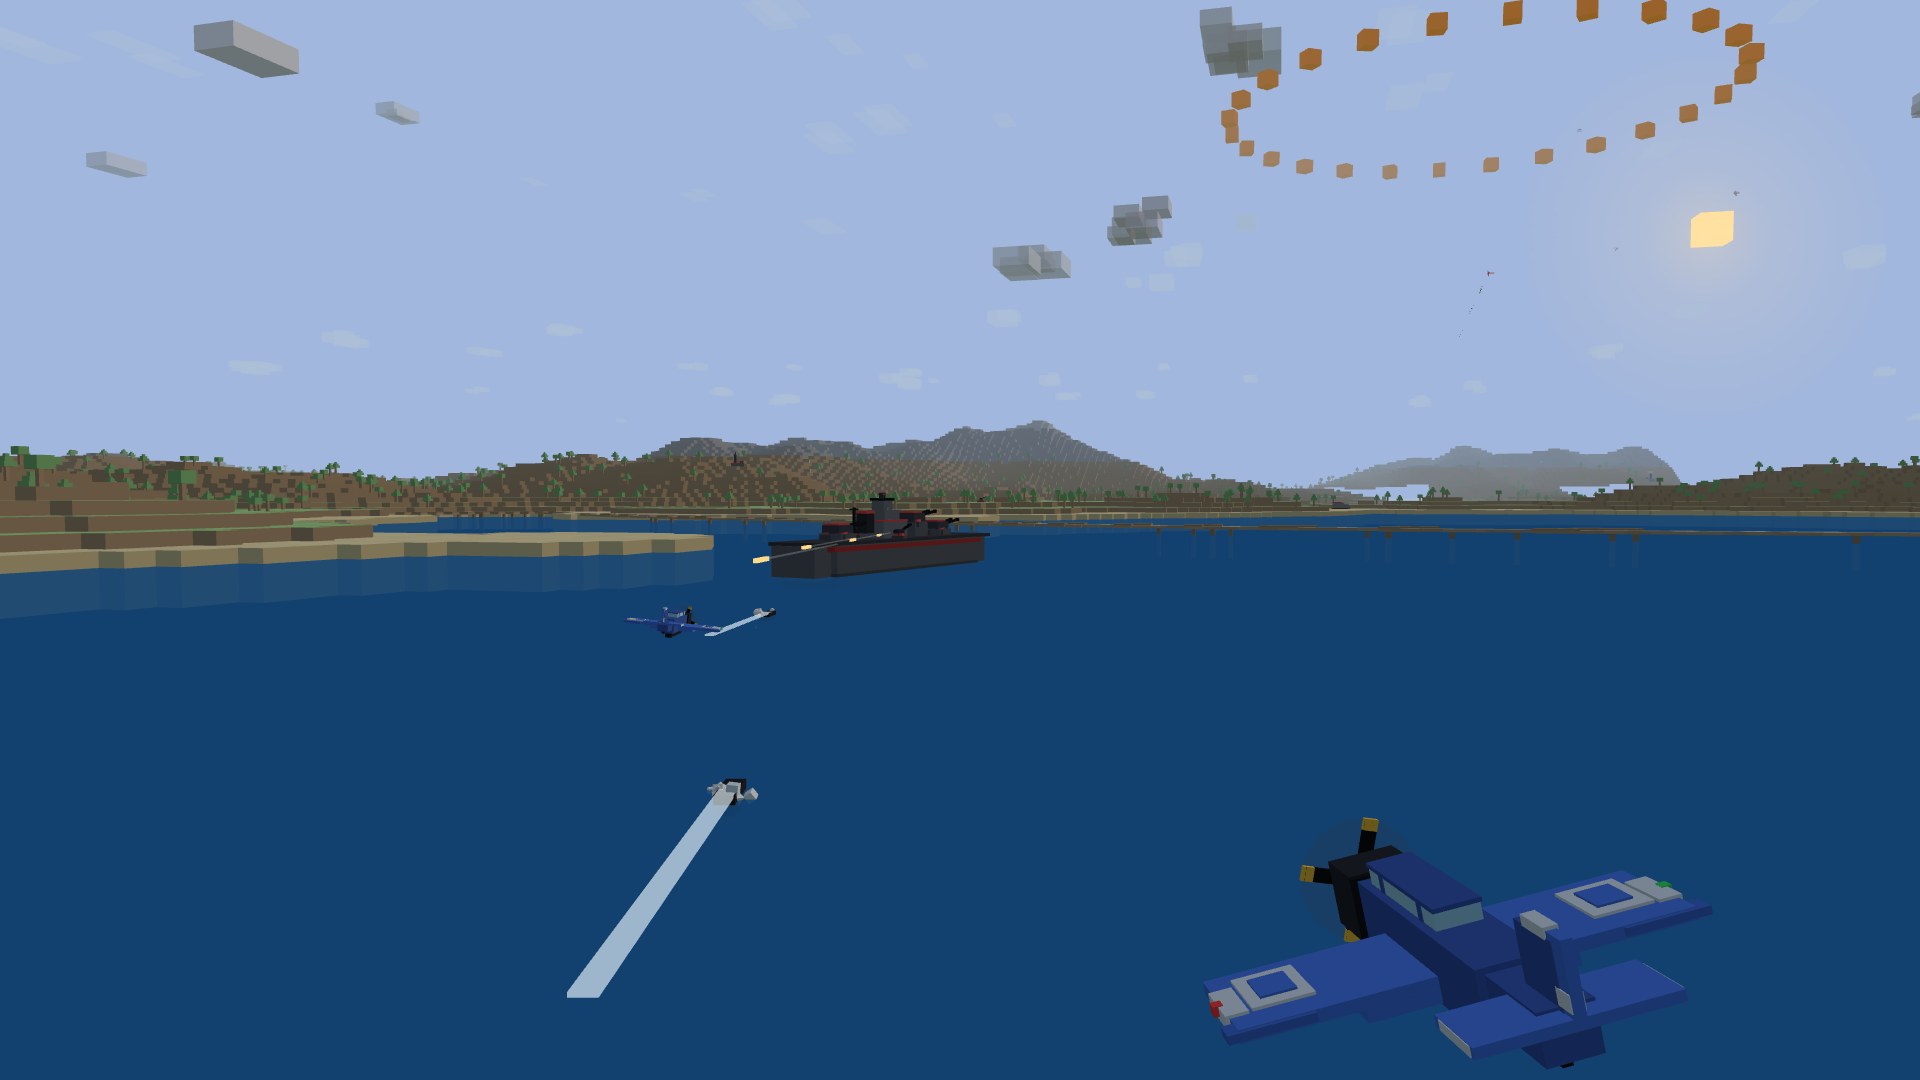
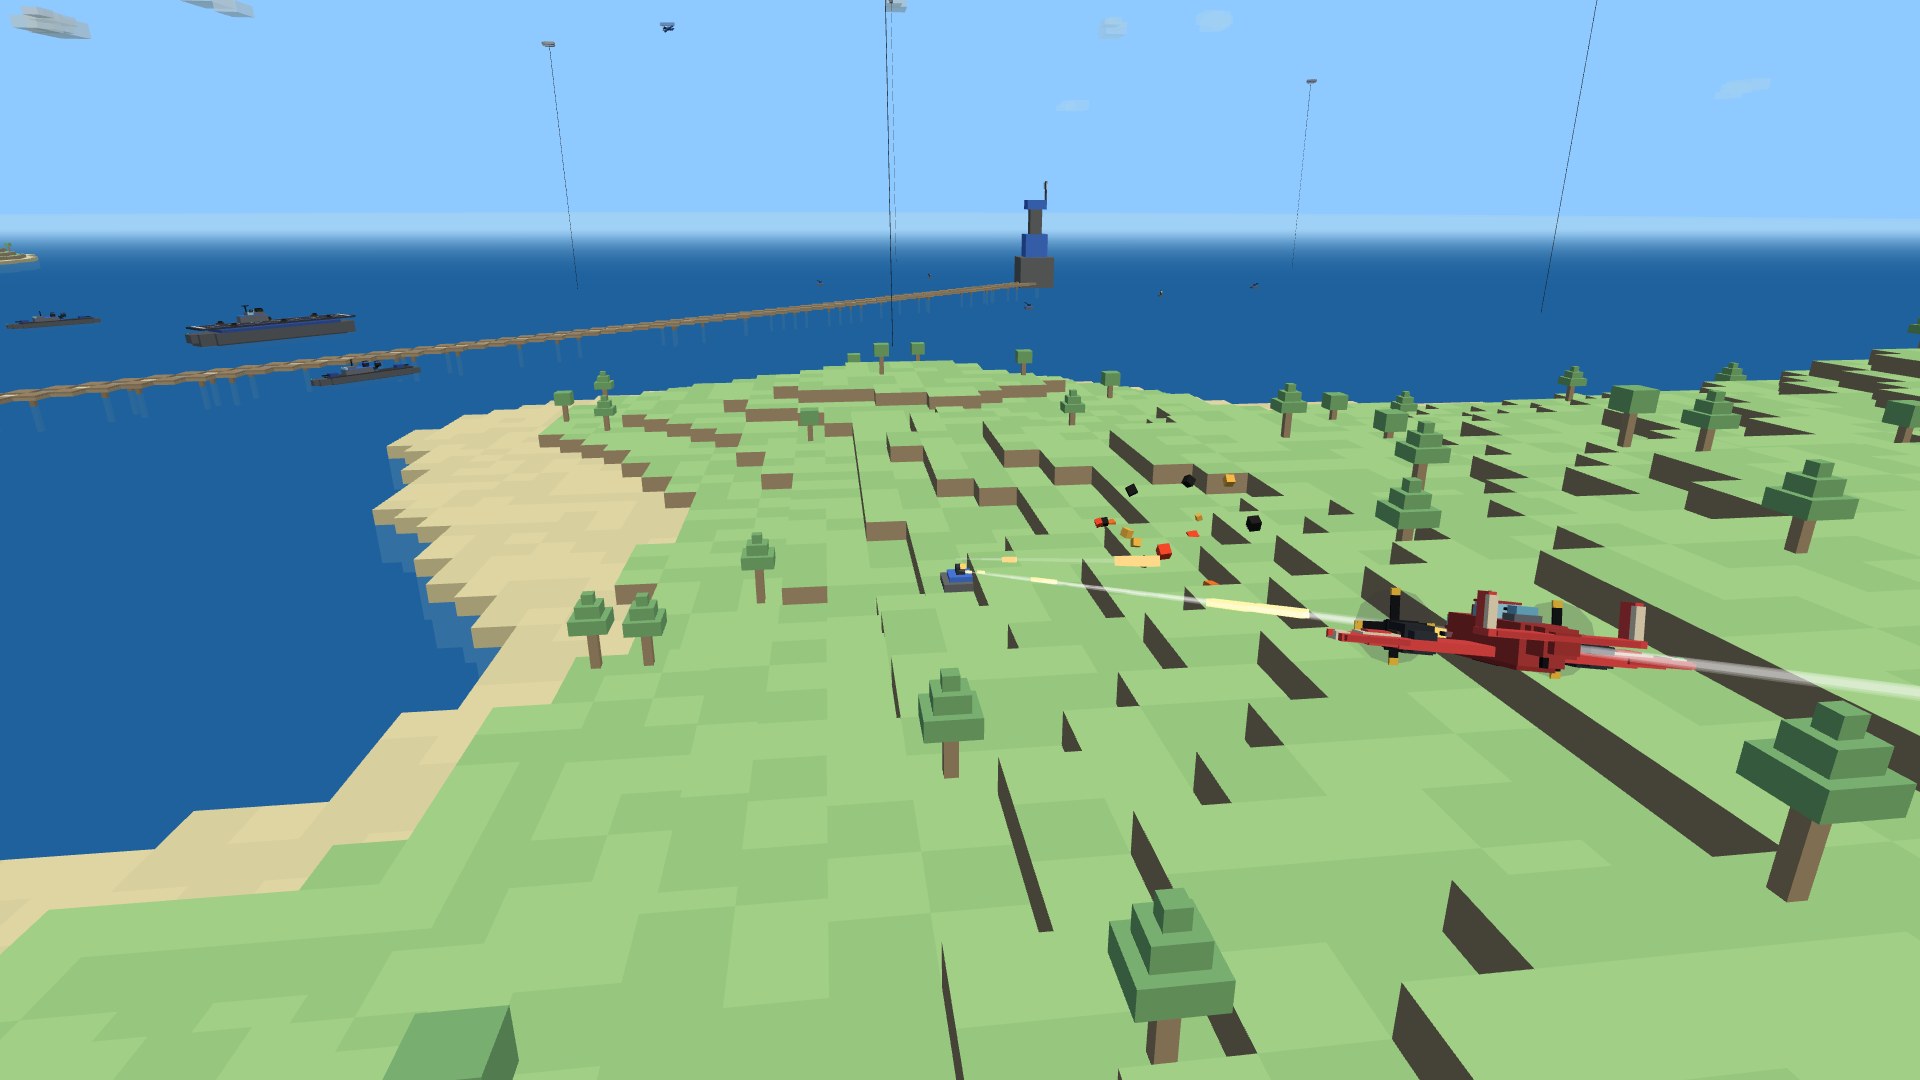
Choose your warbird in the hangar: the Sparrowhawk turnfighter, the Thunderhead boom-and-zoom fighter, the Ironclad twin-engine heavy, the Leviathan four-engine heavy bomber, or the Swordfin torpedo bomber — each a distinct flight model, hull, gun package, and ordnance loadout. The Leviathan hauls a 12-bomb bay and exists to flatten flak nests from altitude; the Swordfin trades bombs for two ship-killing torpedoes. Make a slow pass over your own carrier's flight deck and the crews patch you up and hand fresh ordnance aboard.
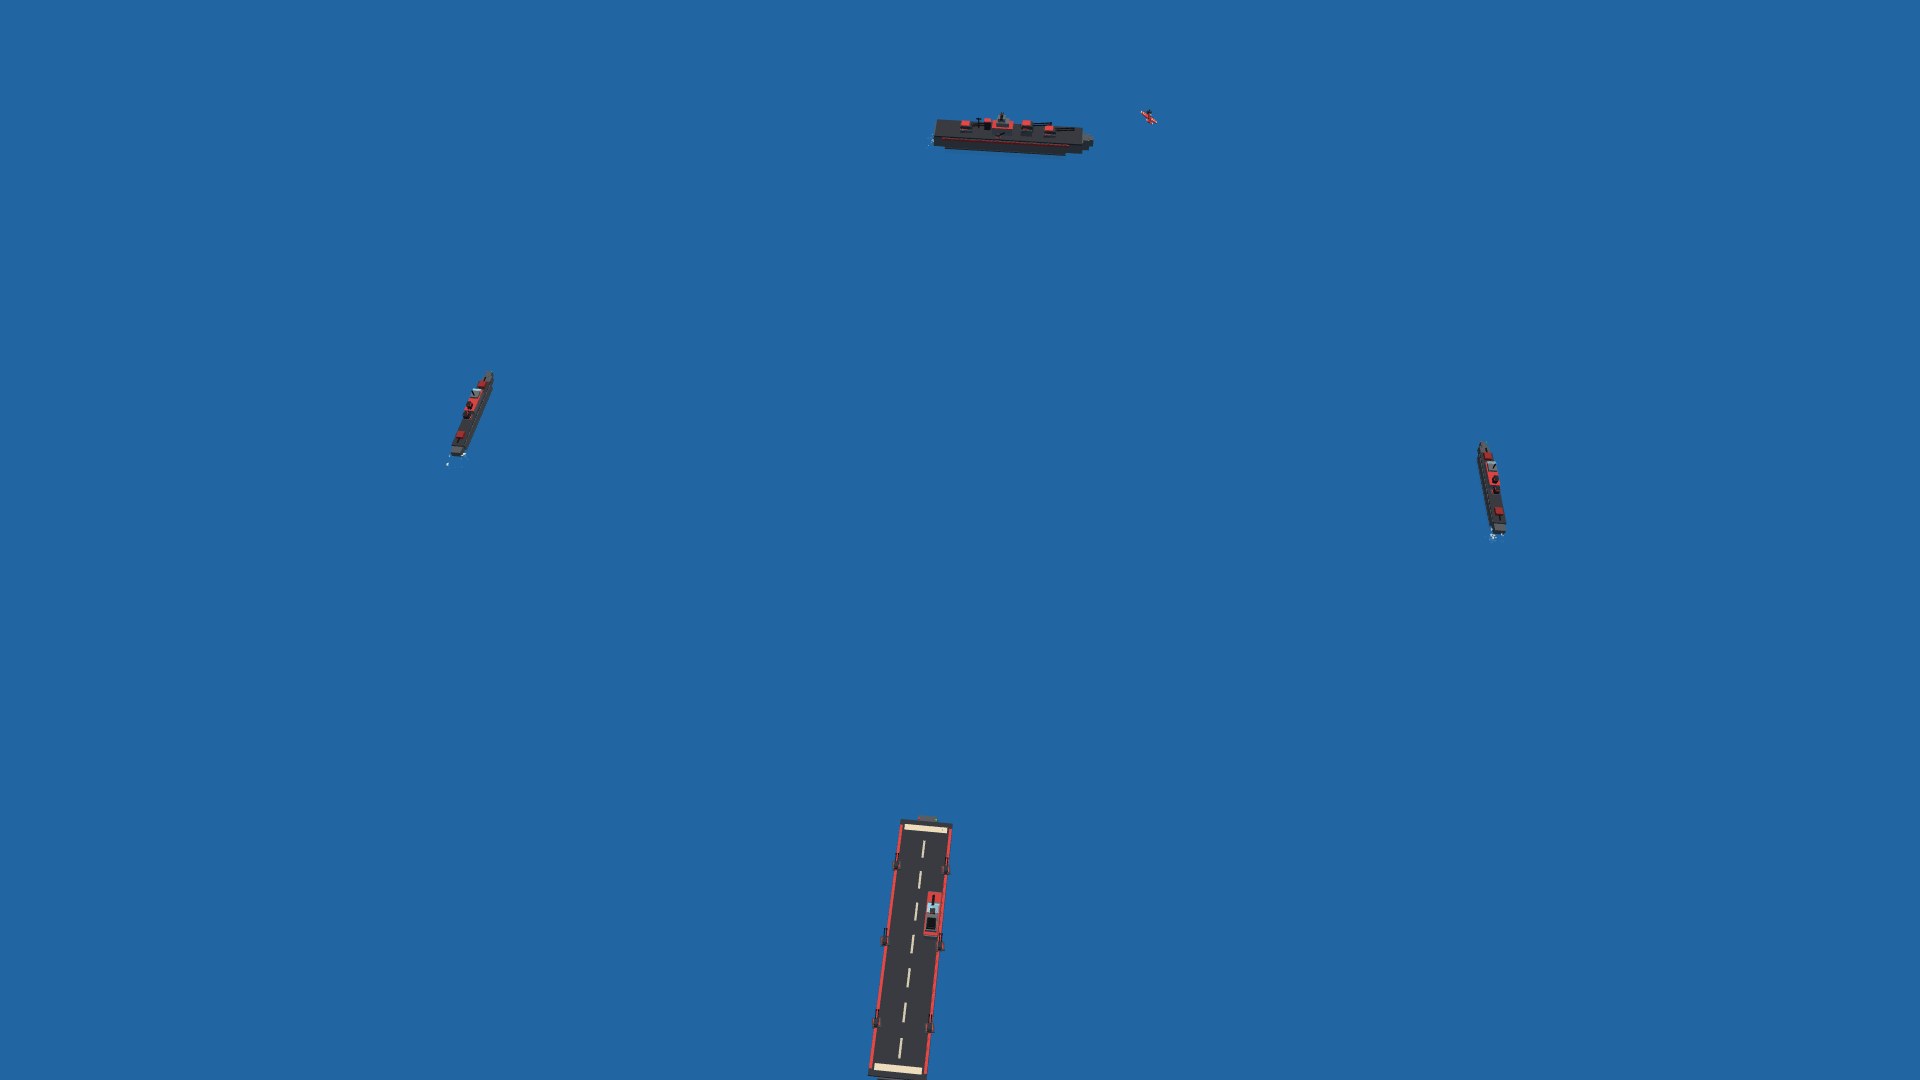
All five warbird types flying in a shallow echelon over the island
Pick your ride: the Sparrowhawk, Thunderhead, Ironclad, Leviathan and Swordfin — five distinct flight models.
A vic of Leviathan heavy bombers flying through flak bursts at sunset
A vic of Leviathans holds course through the flak, escorts riding high cover.
A Leviathan heavy bomber dropping a full stick of bombs against the sky
A Leviathan walking its twelve-bomb bay out over the target, flak hunting for the formation.

The fleet

Each team's hulls hold a diamond formation pointed at the enemy: the battleship in the van showing its broadside, the two destroyers screening on the beams, and the carrier at the rear with its bow toward the fight. The two fleets are anchored a deliberate distance apart — just beyond either battleship's direct-fire range, but inside its over-the-horizon reach. So the fleets can't simply trade blows: to land shells on the enemy task force you need a teammate flying over it.

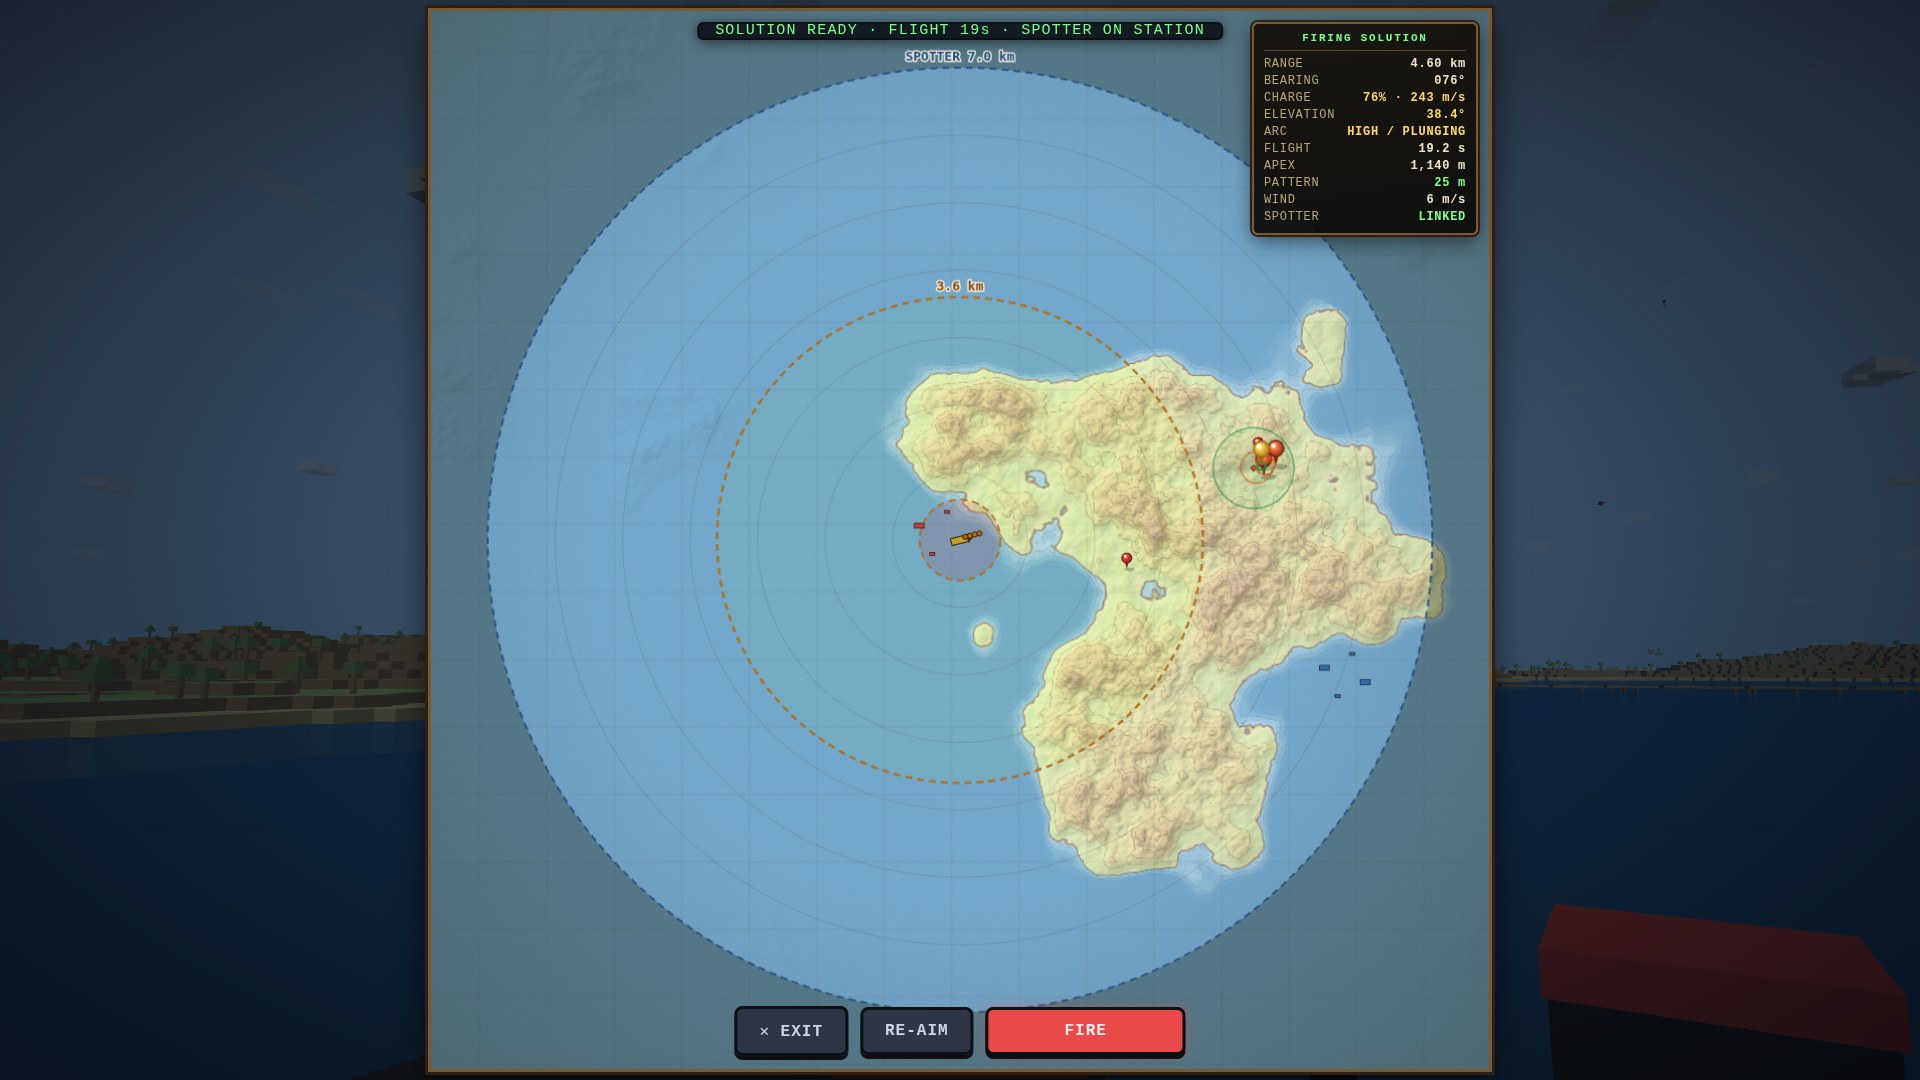
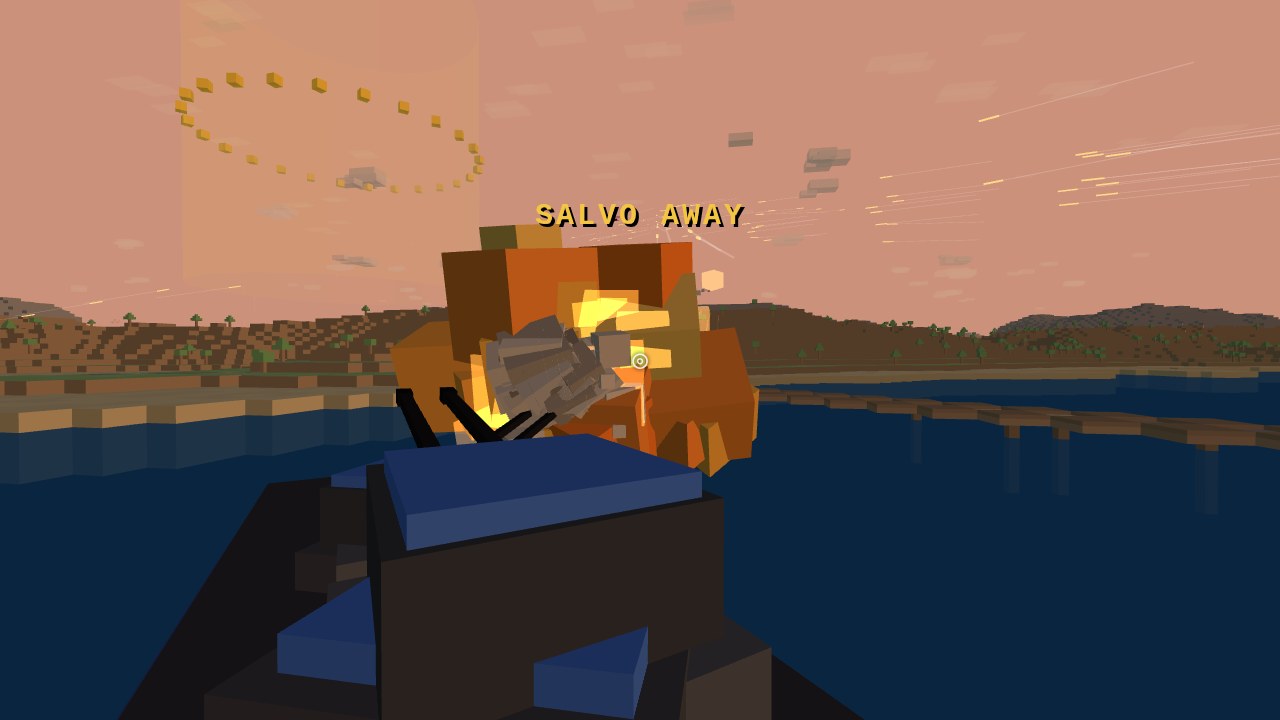
The battleship's three main-battery turrets are crewed by players. Take a BIG GUNS slot from the respawn screen and the minimap becomes a plotting chart: click a target inside the range rings, wait out the ballistic computer's solve, then hold fire to send a salvo on a genuine ten-second arc. A teammate flying over the target spots your shells onto a tight pattern — and past the direct-fire ring, out in the spotter range where the enemy fleet lies, the battery won't even loose until a friendly plane is over the target. The chart only shows enemy ground inside your direct ring or inside a spotter's view bubble, so reaching the enemy's deep installations takes eyes in the sky — watch the fog lift as teammates fly the target area. Flak cracked open by naval gunfire stays suppressed extra long. While down you can also man any free AA gun on your team (F bails out).

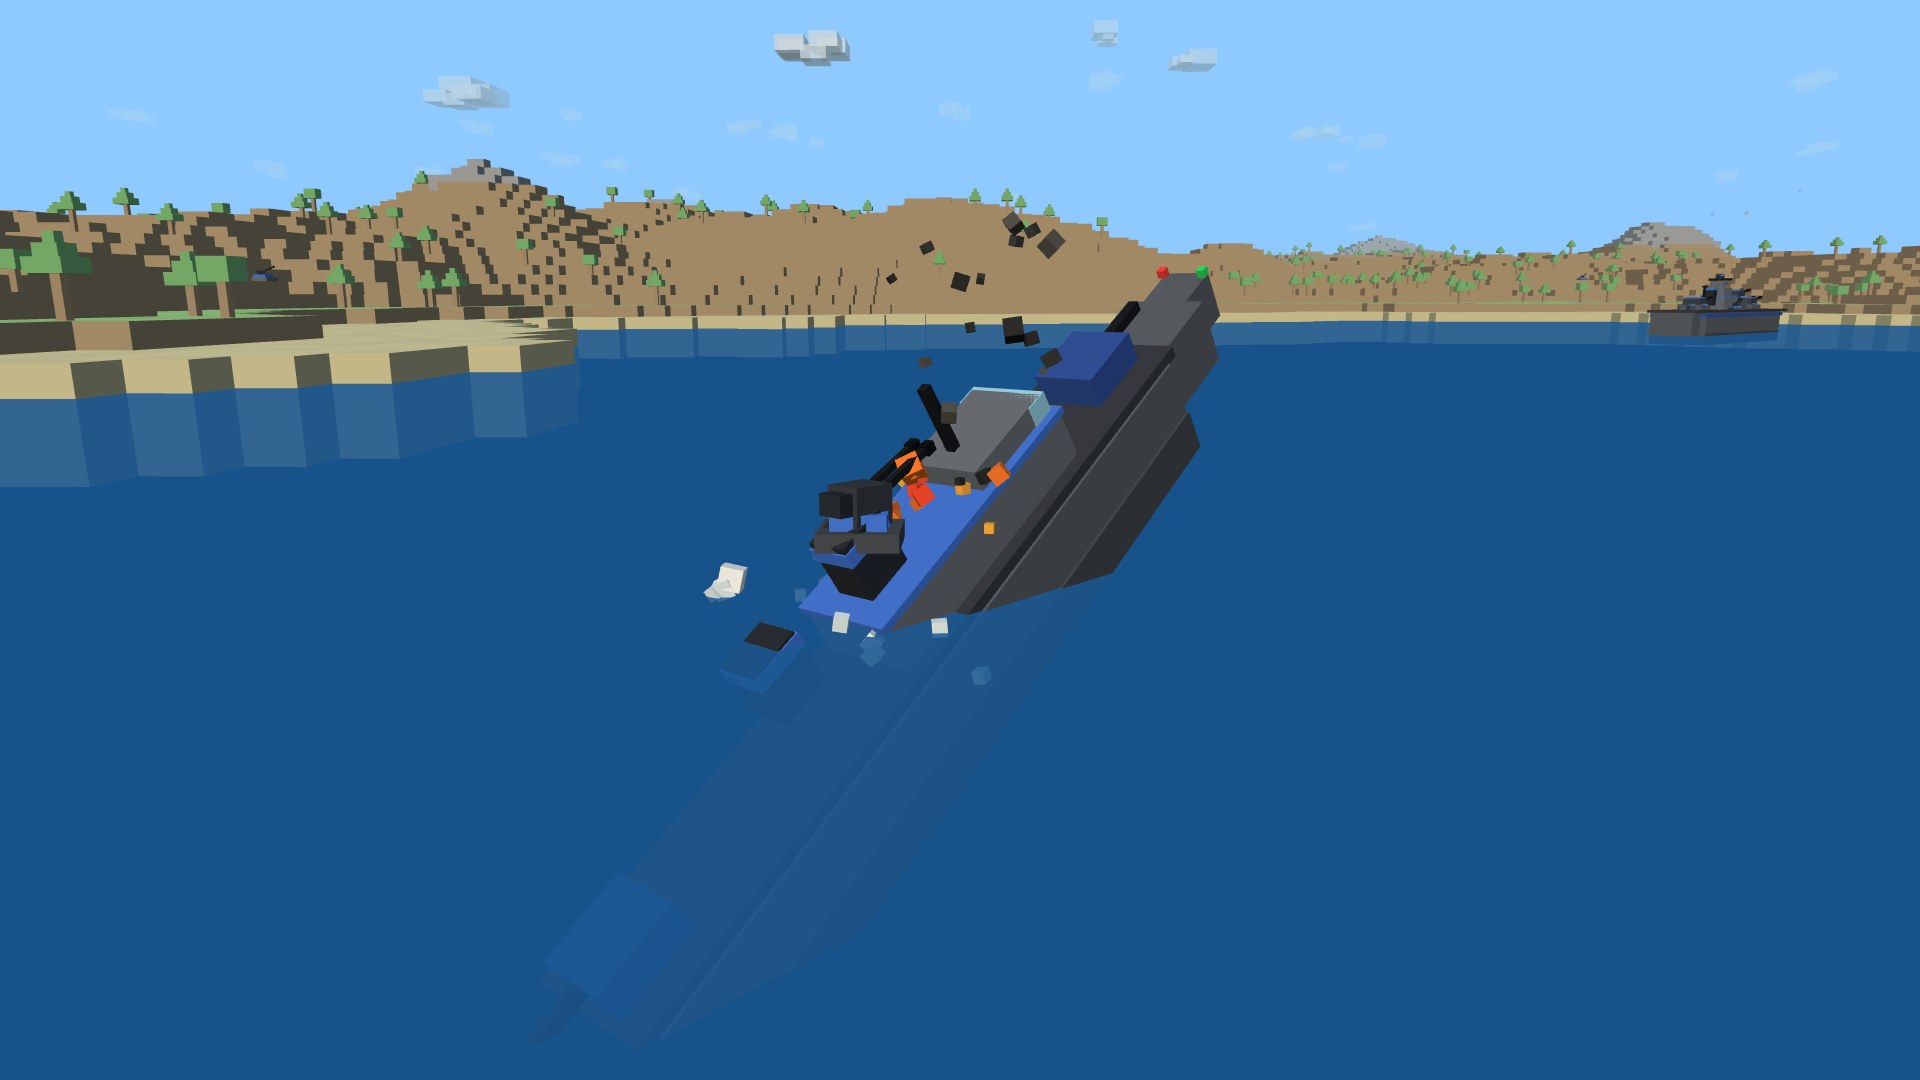
Every hull is sinkable. Torpedoes must be dropped low and slow or they break up on entry; a good fish runs straight just under the surface behind a wake everyone can see. One sinks a destroyer; a sunk ship takes its guns and gunners down with it and refloats minutes later.

The fleet runs on supplies too. Supply ships are the convoys' seagoing cousins: freighters steaming an open-water lane to the carrier, funnels smoking so you can spot them a long way off. Every one that delivers rebuilds your downed guns faster — so escort your sealift and sink theirs with bombs, rockets, or a fish.

A naval task force in a diamond formation: a battleship leading broadside-on, two destroyer escorts on the beams, and a carrier bringing up the rear, with a fighter overhead
The task force in its diamond — the battleship in the van, broadside to the enemy; the destroyers screening on the beams; the carrier at the rear, bow toward the fight. The two fleets sit just out of each other's direct gun range, so reaching the enemy hulls takes a spotter overhead.
A line of supply freighters with smoking funnels steaming across open water toward an aircraft carrier
The sealift arriving — a line of supply ships steaming up their lane to the carrier to deliver, funnels smoking so everyone can see them coming.
The carrier from the bow quarter with aircraft spotted on deck and one off the catapult
The carrier: deck spotted, one off the bow cat. Make a slow pass over her and the crews patch you up and rearm you.
A Sparrowhawk catapulting off the carrier's bow at dusk
Catapult launch at dusk — the carrier is your forward base until somebody sinks her.
A close three-quarter view of a destroyer escort's hull, funnels and turrets on open water
A destroyer escort up close — fast, lightly armored, and the screen that dies first. One good fish sinks her.
A close view of the battleship from the bow quarter, all three main-battery turrets trained out
The battleship from the bow quarter, main battery trained out — the heaviest hull on the Brick Sea, and the hardest to put under.
The battleship's main battery firing a salvo at dusk, shells arcing away
BIG GUNS: player-crewed main battery, two-shell salvos on a genuine ten-second arc to somewhere unlucky.
The battleship gunner's plotting table: a full-screen fire-control chart with the direct-fire ring, a wider dashed spotter range, a friendly plane's green view bubble lifting the fog over a cluster of enemy targets, and a solved fire mission ready to fire
From the gunner's seat the chart fills the screen — the inner ring is direct fire, the wider SPOTTER ring is over-the-horizon reach, and enemy ground only shows where a teammate's view bubble lifts the fog. Lay a target, wait out the solve, then FIRE.
The battleship's main-battery turrets firing a salvo at night, smoke trails arcing away over the water
Pull the trigger and the camera leaves the chart to ride the salvo — muzzle flash, then up and away with the shells on their ten-second arc to the fall of shot.
Two Swordfin torpedo bombers wave-top at dawn, torpedo wakes running toward a battleship
Swordfins on the deck at first light, two fish in the water. Drop low and slow or they break up on entry.
A torpedo detonating against the battleship's hull in a column of water and fire
A fish finding the belt. Drop it low and slow and this is what the battleship gets.
A torpedoed destroyer listing hard and going down by the head, on fire amidships
Every hull is sinkable — a torpedoed destroyer going down by the head, guns and gunners with her.

The ground war

Forward territory hides shore installations — radar stations and fuel depots worth big points and painted on the gunner's chart. Supply convoys roll the base-to-base highway; every truck that survives the run scores and rebuilds your downed guns faster, so strafe theirs and escort yours. Rounds also roll wind with their weather: bombs drift downwind (watch the minimap wind sock), though the battleship's computer corrects automatically. And after dark, searchlights sweep the sky: every gun is half blind at night unless a beam cones the target — a lit plane is visible to everything on the map.

A fuel depot erupting in flame under an Ironclad pulling off the target
A fuel depot going up. Forward territory hides shore installations worth big points and painted on the gunner's chart.
A supply convoy on a dirt road taking strafing fire from above
Supply convoys run the base-to-base road — strafe theirs, escort yours; every truck that gets through rebuilds their guns faster.
A heavy tank firing its main gun across the road into an enemy tank brewing up in smoke and flame
Armor on the highway: behind the convoys rolls a column of combat vehicles — here a heavy tank lands an 88 on an enemy hull. Crew one yourself from the spawn screen.
A quad 20 mm anti-aircraft half-track firing a cone of tracers up at a banking, smoking fighter through bursting flak
The quad-20 AA half-track throwing up a wall of mobile flak — strafing the road is never free with one of these in the column.
A scout car leading an armored column up the road, machine gun snapping back at a fighter strafing the convoy
A scout car leading the column under a strafing run, its machine gun snapping back at the diving fighter.
An Ironclad strafing a flak emplacement below the barrage balloons near the enemy base
The Ironclad's day job: under the balloon fence, guns working over the enemy flak line.
An Ironclad threading a barrage balloon's cable at dusk
Threading the barrage-balloon fence at dusk — the cables are every bit as lethal as the guns.
A Leviathan bomber caught in two searchlight beams at night with heavy flak rising
Coned. After dark the searchlights come out — and a lit plane is visible to every gun on the map.
A flak gun firing up a searchlight beam at a coned bomber under the stars
Man any free gun on your team: a flak crew firing up the beam at a coned night raider.

Easy to fly, honest underneath

The plane flies on a real six-degree-of-freedom model — lift, drag, stalls, the works — which used to mean fighting a constant sink just to stay level. Now auto-trim holds your altitude for you: take your hands off and the nose stays where you left it, so you can look around, line up a shot, or just cruise. Pull, push, or roll into a turn and it bows out instantly — you always have the plane. The little TRIM strip on the gauges shows it working; tap T to switch it off if you'd rather fly it all yourself.

A fighter cruising hands-off and level over the island at night, the heads-up gauges showing speed, altitude, throttle, a 0.9 G load and the TRIM strip holding a touch of nose-up
Hands off, nose level. Same flight model as ever — auto-trim just soaks up the steady back-pressure so cruising and lining up an attack don't cost you a constant pull. A deliberate climb, dive or turn always overrides it.

Controls

MOUSE steers your plane (V toggles)   CLICK/SPACE fire   B drop bomb / torpedo   RIGHT MOUSE look around
W/S pitch   A/D roll   Q/E rudder   SHIFT/CTRL throttle
T auto-trim — holds your altitude hands-off, on by default (a deliberate climb, dive or turn always overrides it)   P autopilot — flies straight & level
1–5 switch plane while down   TAB scoreboard   ENTER chat   M mute   F bail from a gun
Battleship turret: click the chart to plot a target, hold FIRE once the solve completes.
On touch devices: left thumb steers, right drag looks around, on-screen FIRE/BOMB buttons, left slider sets throttle. At sea, ZOOM raises the gunsight and the conning chips (shell, repair, boost, damage control) are tap targets.
Gamepads & HOTAS sticks are supported — just plug in and move an axis.